Refrigerator Leaking Water? Trace the Source Before Replacing a Part
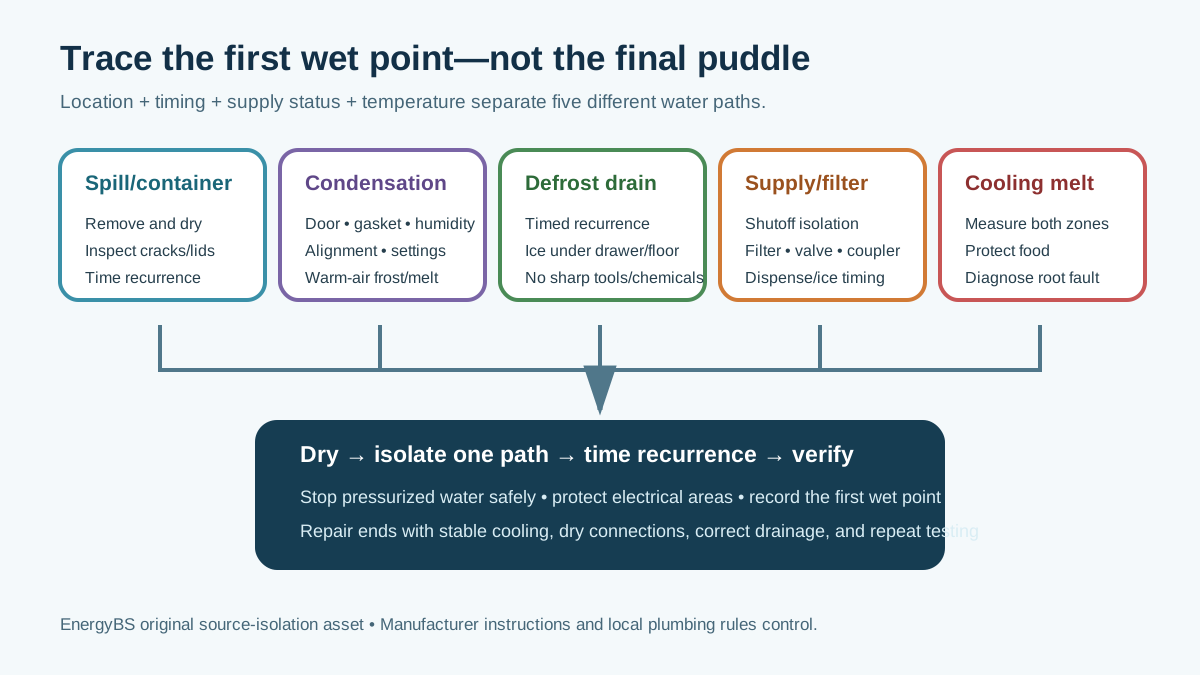
Trace refrigerator water by location, timing, temperature, and watersupply status to distinguish spills, condensation, defrost drainage, dispenser/filter connections, ice melt, and household plumbing before authorizing repair.
Direct Answer
Trace refrigerator water by location, timing, temperature, and watersupply status to distinguish spills, condensation, defrost drainage, dispenser/filter connections, ice melt, and household plumbing before authorizing repair.
Water Location and Timing Are Better Than a Parts List
Short answer: Protect the floor and electrical area, photograph the water before wiping it up, and determine whether it appears inside the cabinet, under a drawer, at the dispenser, around the filter, behind the refrigerator, or beneath the machine. Note whether it follows dispensing, ice production, defrosting, door opening, humid weather, a filter change, relocation, or a plumbing event. If a pressurized supply leak is suspected and the shutoff is safely accessible, stop that supply according to the appliance and plumbing instructions. Do not dismantle energized equipment or probe hidden tubing. A dry-and-observe test with the water supply isolated can separate supply-side leaks from condensation or defrost drainage.
“The refrigerator is leaking” can describe at least five systems: household supply plumbing, the appliance's dispenser/ice circuit, condensate and defrost drainage, warm-air condensation, or melting ice from a cooling problem. Finding the source prevents replacing a valve when the real cause is a door left ajar—or clearing a drain while a pressurized connector continues damaging the floor.
Make the Area Safe
Water and electricity require restraint. If water is entering a receptacle, power strip, cord connection, control area, or exposed wiring—or if there is arcing, heat, smoke, or shock risk—do not touch wet equipment. Isolate the area and use appropriate emergency, electrical, or appliance help.
For a non-electrical puddle:
- keep people and pets away from the slip area;
- photograph the undisturbed water edge and drip path;
- move food if cabinet temperature is unsafe;
- place absorbent material or a shallow tray without blocking ventilation;
- locate the refrigerator water shutoff before moving the appliance;
- move the refrigerator only if the manual permits, the floor is protected, the anti-tip/leveling arrangement is understood, and connections will not be pulled;
- dry the area so the next appearance can be timed.
If the unit is also warm, follow the refrigerator not-cooling guide. USDA says the fresh-food compartment should remain at 40°F or below; water on the floor does not tell you whether food stayed safe (USDA refrigeration guidance).
Create a Water Evidence Log
| Observation | Record |
|---|---|
| First wet location | Inside shelf, under crisper, dispenser, filter, hinge, rear connection, floor center/front |
| Water character | Clear, cloudy, colored, sticky, odor, room-temperature, cold, frozen |
| Timing | Continuous, after dispense, after ice fill, after defrost, after door opening, overnight |
| Supply status | Valve open/closed, recent plumbing work, filter change, relocation |
| Cooling status | Refrigerator and freezer thermometer readings |
| Weather/room | Humidity, door sweating, nearby plumbing or floor drain |
| Repeat interval | Minutes, hours, days, only under certain use |
Do not taste water to identify it. A colored or odorous liquid may be a spill or contaminated drain water. Refrigerant is not a pool of ordinary water; oily residue, hissing, loss of cooling, or damaged tubing needs service rather than sampling.
Separate the Five Main Paths
1. Spill or container leak
Remove and inspect food containers, ice trays, pitchers, beverage reservoirs, and removable bins. Dry each component before returning it. A cracked pitcher can leak even when outside the appliance; an overfilled tray can spill only when a door moves. This is the least expensive explanation and should be excluded before disassembly.
Manufacturer features are model-specific. Samsung, for example, has dedicated checks for its AutoFill pitcher and advises inspection for damage and correct lid assembly on affected products (Samsung leak support). Do not apply that sequence to an unrelated design.
2. Condensation from warm humid air
Moisture can form when humid room air contacts cold surfaces. Common clues include droplets on door edges, mullions, ceilings, or packages; frost near an opening; a gasket gap; a door left ajar; or water that follows humid weather and heavy door use.
Check:
- packages or bins preventing closure;
- dirty, folded, torn, or displaced gaskets;
- refrigerator level/alignment as specified by the manual;
- missing hinge covers or door parts after relocation;
- control settings or model-specific anti-condensation modes;
- room humidity and nearby moisture sources.
Do not assume every sweating surface is defective. Some models manage condensation with heaters whose operation changes with an energy-saving control. The exact manual explains the intended behavior.
3. Defrost water not reaching the drain pan
Automatic defrost melts frost from the evaporator area and routes water through a drain to a pan, where it normally evaporates. If the path is iced, obstructed, disconnected, misaligned, or damaged, water may collect under drawers, freeze into a sheet, or appear on the floor after a repeating interval.
Evidence can include:
- a clear sheet of ice on a freezer floor;
- water beneath a crisper after a cycle;
- a gurgle followed by water;
- recurring leakage even when the dispenser supply is shut off;
- frost or cooling symptoms suggesting a door/defrost issue.
Do not force wire, compressed air, chemicals, boiling water, or a sharp tool into a drain. You could puncture tubing, dislodge a hose, damage a liner, or flood hidden insulation. Use only the exact manual procedure or qualified service.
4. Pressurized water supply, filter, valve, or connector
Water/ice-equipped refrigerators add a pressurized path from the household shutoff through tubing, fittings, valves, a filter/housing, reservoir, dispenser, and ice maker. A leak may be continuous, appear only while a valve is energized, or follow a filter change.
Inspect only accessible components the manual designates:
- household shutoff and visible supply tube;
- kink, abrasion, pull, or wetness at connection points;
- filter seating, O-rings, cap, and housing for the exact approved filter;
- couplers disturbed during door removal or relocation;
- dripping at the dispenser after use;
- water near the ice maker or bucket after a fill.
Samsung's installation instructions tell owners to turn on the water and check connection areas for leaks and caution against overtightening a compression connection (Samsung water-line installation). That is a product-family example; use the materials, fitting method, pressure limits, and flushing sequence approved by the exact refrigerator and local plumbing rules.
If closing the dedicated refrigerator shutoff stops the leak after the cabinet and floor are dried, the supply-fed path becomes more likely. If water continues on a timed defrost pattern, investigate other paths. A shutoff that will not operate, leaks at the stem, or serves other equipment requires plumbing judgment.
5. Meltwater from a cooling failure
A freezer door left open, power loss, high cabinet temperature, failed fan/defrost/control, or broader refrigeration fault can melt ice and frost. The resulting puddle is an effect, not the root cause. Measure both compartment temperatures. Photograph the frost and ice before it melts. Protect food using USDA guidance.
Use Isolation Tests Carefully
Dry-and-time test
Dry the appliance interior, floor, fittings, and removable components. Place separate dry paper towels at accessible suspected locations without blocking airflow or contacting moving/electrical parts. Mark the time. The first wet point is more informative than the final puddle, which may travel along tubing or cabinet seams.
Supply-off test
If the refrigerator has a dedicated accessible water shutoff and the manual allows operation without the water feature, close it gently, document the position, disable the ice maker if required, dry the evidence points, and monitor. Do not use an ice maker without an adequate water supply if the instructions prohibit it. Do not force a corroded valve.
Feature-by-feature test
After the area is dry and safe, test one function at a time according to the manual: dispenser, then ice maker, then normal idle/defrost observation. Catch water in a transparent container and watch accessible connections. Do not repeatedly energize a known leak.
Temperature test
Log refrigerator and freezer temperatures. A leak paired with warming, soft ice, or heavy frost needs cooling diagnosis, not just plumbing repair.
What Not to Do
- Do not pull the refrigerator against a short supply line.
- Do not use a saddle valve or substitute tubing merely because it fits; follow current local rules and manufacturer instructions.
- Do not overtighten plastic fittings or filter housings.
- Do not bypass a filter with an unapproved plug.
- Do not pour drain cleaner into the cabinet.
- Do not chip ice with a blade or screwdriver.
- Do not operate with removed electrical or airflow panels.
- Do not leave wet flooring trapped under the unit.
- Do not assume a leak detector replaces a shutoff or repair.
EPA WaterSense encourages finding and repairing household leaks and notes that the water meter can help identify leakage in a no-use period (EPA Fix a Leak Week). A meter test may show that water is flowing, but it will not identify the refrigerator as the source when toilets, irrigation, humidifiers, or other fixtures share the supply.
When the Building Needs Attention Too
Inspect adjacent cabinetry, baseboard, flooring seams, the ceiling below, and wall penetrations. A slow refrigerator connection leak can damage wood, swell laminate, corrode metal, and support microbial growth before a large puddle appears. Moisture may also originate from a nearby dishwasher, sink supply, drain, radiant line, floor drain, or condensate system and migrate under the refrigerator.
Escalate promptly when:
- water reaches electrical components;
- the household shutoff fails or leaks;
- flooring or cabinetry is swelling;
- the ceiling below is wet;
- mold-like growth or persistent odor appears;
- a pressurized leak continues;
- the source is concealed in a wall or floor;
- the refrigerator must be moved in a way that risks the line or floor.
Document material condition for a plumber, appliance technician, restoration professional, landlord, or insurer as appropriate. Do not make coverage claims; policies and reporting duties vary.
Read the First Wet Location Room by Room
Water inside the fresh-food ceiling or light area
Stop if water is entering lighting, controls, connectors, or wiring. Otherwise photograph whether it begins near a filter, reservoir, dispenser tubing, air tower, or door opening. Condensation droplets spread differently from a focused connection drip. Do not remove the ceiling liner to chase it.
Water beneath the crisper drawers
Remove drawers only as the manual allows and inspect for a spilled container, cracked drawer, food debris, ice sheet, and the highest wet point. If the water returns on a regular interval while the dispenser supply is isolated, the defrost/drain path becomes more plausible. If it returns immediately after dispensing, trace the supply-fed path.
Ice on the freezer floor
Photograph the pattern before thawing. A sheet that repeatedly grows from the rear can be consistent with water not reaching its intended drain, but door infiltration and melting ice products can imitate it. Do not pry the sheet against a liner. A technician should establish why water or frost accumulates, not merely remove the ice.
Water at a front corner
The visible corner may be the lowest exit point rather than the source. Check door/gasket evidence, dispenser drips, cabinet seams, leveling per the manual, and tracks leading from under the unit. Place separate dry indicators at candidate paths so the first one to wet identifies direction.
Water directly behind the refrigerator
An accessible household valve, supply tube, coupling, inlet connection, nearby sink/dishwasher plumbing, or wall penetration may be involved. Do not pull the unit farther than the connections allow. A plumber and appliance technician may define their boundary differently; ask each to state whether the failed component is on the building side or appliance side.
Water centered under the cabinet
Possible paths include a drain pan, supply tubing, valve, migrated rear leak, defrost overflow, or external building water. A pan can contain normal defrost water and still be incorrectly positioned, cracked, overfilled because of abnormal conditions, or receiving water from elsewhere. Access varies widely; do not remove structural or electrical covers without the service procedure.
Water only at the dispenser
Distinguish a few residual drops immediately after use from ongoing dripping, sputtering after a filter change, ice-chute melt, or flow without a command. Dry the nozzle/chute and record the exact trigger. Purge only according to the exact model instructions, capturing the specified volume rather than running water indefinitely.
Assign the Correct Trade Boundary
| Evidence points to | Likely lead | What to request |
|---|---|---|
| House shutoff, branch tube, in-wall connection | Licensed/qualified plumber under local rules | Material, pressure, shutoff, connection and leak-test scope |
| Filter housing, appliance valve, internal reservoir/tubing | Appliance service | Model-specific part, pressure limits, leak and function test |
| Door, gasket, alignment, condensation control | Appliance service/installer | Closure cause and repeat humidity test |
| Defrost drain, hidden ice, fan/control interaction | Appliance service | Root-cause diagnosis and full thaw/drain verification |
| Wet flooring, cabinet, wall, ceiling | Appropriate building/restoration professional | Moisture boundary, drying plan, material condition |
| Water near energized equipment | Electrical/emergency help as conditions require | Safe isolation and damage assessment |
The best first call depends on evidence and local licensing. If the shutoff itself leaks, the appliance technician may reasonably require a plumber first. If household pressure is outside the refrigerator's allowed range, fix that condition before repeatedly replacing appliance valves.
Pressure, Filters, and Connection Details
Never import a numeric pressure range from another model. The refrigerator manual may specify minimum and maximum supply pressure, different provisions for reverse-osmosis systems, approved tubing, and flushing volume. Record static/dynamic measurements only with suitable tools and plumbing knowledge.
A filter is not merely a cartridge shape. Confirm the exact part number, orientation, protective-cap removal, O-ring condition, insertion depth, locking position, and required flush. Counterfeit or incompatible filters can create fit and performance problems; a manufacturer may condition support or warranty on approved parts. That is a product policy, not a universal statement about every third-party filter.
For a new connection, require:
- an accessible operable shutoff;
- approved tubing and fittings protected from kinks/abrasion;
- enough managed length for service without tension;
- correct transition at copper/plastic components;
- no cross-connection after door removal;
- leak checks both idle and while valves operate;
- flushing and ice discard per the manual;
- a final inspection after the refrigerator is returned to position.
Drying Is Part of the Repair
Stopping the leak does not dry trapped materials. Remove only finishes and components within the authorized scope. Use a moisture professional when water has entered layered flooring, wall cavities, insulation, cabinetry, or the ceiling below. Record initial and final conditions. Avoid directing high heat at appliance plastics, refrigerant lines, electrical parts, or finished wood.
If the refrigerator sits in a rental, condominium, or shared building, follow notification and access rules promptly. Identify whether the supply branch or damage crosses a unit boundary. Do not delay an active leak while debating responsibility.
Post-Repair Leak Test
Create a clean baseline and test the repaired path under the conditions that previously triggered it:
- dry every observed location;
- restore the supply slowly as instructed;
- inspect idle connections;
- dispense the manufacturer-specified amount;
- observe an ice fill when practical;
- monitor at least the relevant defrost interval as advised by service;
- verify door closure and cabinet temperatures;
- recheck after the appliance is pushed back, because a tube can kink or pull during positioning;
- document the result and warranty.
Ask who returns if the same path wets again. A repair without a recurrence test leaves the highest-risk moment unobserved.
Repair Scope and Verification
Ask the service provider to identify:
- the first failed location, not just the final puddle;
- whether the source is household plumbing or appliance-side;
- the failed part and causal condition;
- whether the approved replacement changes tubing, filter, valve, or connector requirements;
- whether any freeze-up or door problem caused the drain failure;
- leak test method and duration;
- post-repair dispenser/ice/defrost checks;
- hidden moisture that needs drying;
- parts and labor warranty.
A successful repair ends with dry components, stable water pressure within product requirements, normal cooling, correct drainage, and repeated operation without new moisture. Wiping the floor is not verification.
Original Leak-Source Decision Table
| First wet point or trigger | Most useful isolation | Likely trade involved |
|---|---|---|
| Filter/housing after change | Reseat only per manual; inspect approved filter and housing | Appliance service if housing is damaged |
| Rear supply connection continuously | Close dedicated shutoff; dry and observe | Plumber or appliance installer depending on boundary |
| Dispenser after use | Dry chute/nozzle; follow purge and seal checks for model | Appliance service if persistent |
| Freezer floor ice, then puddle | Supply-off observation plus temperature/frost log | Appliance/defrost diagnosis |
| Door edges in humid weather | Closure, gasket, alignment, room humidity | Appliance adjustment or humidity control |
| Under crisper on a cycle | Drain/frost evidence without probing | Appliance service |
| Puddle persists with refrigerator supply closed | Check melt/defrost, spill, and other building sources | Appliance, plumbing, or building diagnosis |
Frequently Asked Questions
Should I turn off the refrigerator water line?
If a pressurized leak is suspected and the dedicated shutoff is safely accessible and operable, isolating that supply can limit damage and provide diagnostic evidence. Follow the exact appliance instructions; do not force a corroded valve or leave an ice maker operating contrary to its manual. Samsung's installation guide illustrates supply isolation and connection leak checks for its products.
Why is water collecting under the crisper drawers?
A spill, container leak, condensation, or misrouted/blocked defrost drainage can all appear there. Dry and time the first wet point. Manufacturer paths differ, so use the exact manual rather than pushing tools into a generic drain location.
Why did the dispenser start dripping after a filter change?
Trapped air, filter seating, a damaged filter/housing, or a disturbed connection may be involved. Samsung's current leak troubleshooting includes model-specific filter inspection and purging checks; follow the instructions for your brand and model.
Can a door gasket cause water on the floor?
Yes. Warm humid air entering at an incomplete seal can create condensation or frost that later melts. Check obstruction, cleanliness, damage, alignment, and manual-specific leveling before ordering a gasket.
Is the water from a refrigerator leak dangerous?
Treat unidentified water as potentially contaminated, especially when it has contacted food spills, drain paths, flooring, or raw-food packages. Do not taste it. If cooling is affected, USDA's refrigeration guidance governs food decisions.
Can I use drain cleaner in a refrigerator defrost drain?
No generic chemical treatment is justified. Chemicals and improvised tools can damage appliance materials, hidden tubing, or insulation. Use only the exact manufacturer procedure or qualified service.
Will a smart leak detector solve the problem?
It can provide earlier notice and, in some systems, initiate shutoff, but it does not identify or repair the failed connection. Review placement and response planning in the smart leak-detector guide.
What to Read Next
If temperatures are rising, start with the refrigerator not-cooling diagnostic. Understand normal variable-speed behavior in the inverter compressor guide. If the repair quote is substantial, use the refrigerator repair-versus-replace worksheet. Add building-level warning with the smart water leak-detector guide.
Sources and Verification
The Samsung refrigerator leak guide and water-line installation guide are product-specific examples of source isolation, filter, purge, connection, and service boundaries. Use the exact manufacturer's manual for the actual model. Food-temperature claims come from USDA FSIS; water-conservation context comes from EPA WaterSense. Local plumbing rules, approved materials, appliance warranty, and qualified diagnosis control the final repair.
Sources and Verification
Editorial Review
EnergyBS Editorial Team
EnergyBS publishes practical homeowner guides. Important program, product, and cost claims should be checked against the linked source and local project documents before you commit to work.
Related Guides
View All ArticlesRefrigerator Not Cooling? Protect the Food, Measure the Pattern, and Diagnose Safely
A measurementfirst guide to a warm refrigerator, including food safety, thermometer placement, airflow and door checks, freezerversusfridge patterns, frost evidence, condenser conditions, service documentation, and repair decisions.
Why Your Inverter Refrigerator Runs All The Time (2026 Guide)
If your new refrigerator seems to run constantly, that is often normal invertercompressor behaviour. Here is how to tell efficient operation from a real service problem.
Refrigerator Repair vs. Replace: A FiveYear Cost and Reliability Worksheet
A diagnosisfirst refrigerator repairversusreplace worksheet that compares the full installed decision, EnergyGuide operating cost, foodloss risk, warranties, fit, serviceability, and responsible disposal.