The Physics of Air Sealing: Why Your RValue Doesn't Matter (If You Don't Seal)
Insulation is just a sweater. Air sealing is the windbreaker. We explain the physics of the Stack Effect, why Rvalues lie, and how to stop your home from leaking energy like a sieve.
Quick Checks
- 1Insulation filters air; it doesn't stop it. You must seal first.
- 2Your house acts like a chimney in winter—seal the top (attic) and bottom (basement) first.
- 3A $5 tube of caulk often saves more energy than a $500 window.
The Sweater and the Windbreaker
Short Answer: Insulation is just a sweater. Air sealing is the windbreaker. We explain the physics of the Stack Effect, why R-values lie, and how to stop your home from leaking energy like a sieve.
Imagine standing outside in a freezing blizzard. You're wearing a thick, heavy wool sweater. It has a high "insulation value." But the wind is cutting right through the weave, chilling your skin instantly. You're freezing despite the wool.
Now, imagine putting a thin nylon windbreaker over that sweater. Suddenly, you're warm.
Did the windbreaker add insulation? Technically, very little. But it stopped the air movement that was rendering the insulation useless.
This, in a nutshell, is the single most misunderstood concept in home energy efficiency. Homeowners spend thousands of dollars adding "more wool" (insulation) to their attics and walls, while completely ignoring the "windbreaker" (air sealing).
If your house leaks air, your insulation is failing. In this deep dive, we're going to explore the physics of air movement, the "Stack Effect" that turns your home into a chimney, and why fixing this is the single most effective upgrade you can make.
Part 1: The Physics of Air Movement
Air doesn't just wander randomly into and out of your house. It is driven by powerful physical forces. Understanding these forces is the key to stopping them.
1. The Stack Effect (Chimney Effect)
The most dominant force in most homes, especially in cold climates, is the Stack Effect.
Warm air is less dense than cold air. It rises. In the winter, the warm air inside your house pushes upward against your ceiling and attic. It finds every tiny crack—around light fixtures, plumbing stacks, and chimney chases—and escapes into the attic and out the roof vents.
This escaping warm air creates a vacuum (negative pressure) at the bottom of the house. To replace the air that left, cold outdoor air is sucked in through the basement rim joists, foundation cracks, and lower windows.
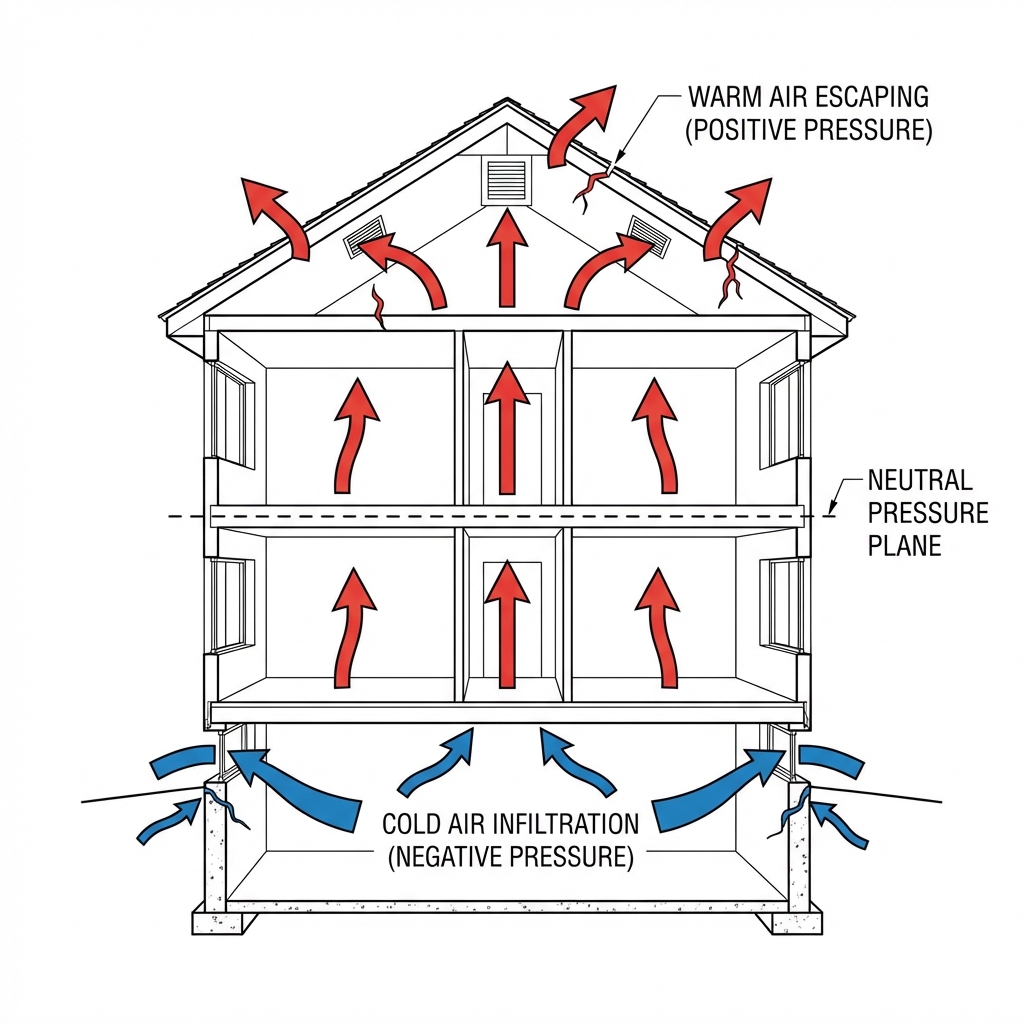
The Result: Your house is effectively acting like a giant chimney. You are heating air, sending it up into the attic to melt snow on your roof, and sucking freezing air in at your feet.
2. The Wind Effect
Wind blowing against the windward side of your home creates high pressure, forcing air in through cracks. On the leeward (downwind) side, it creates low pressure (suction), pulling air out.
3. Mechanical Effect
Your exhaust fans (bathroom, kitchen range hood) and dryer actively pump air out of the house. If your house is too tight (rare for older homes) or lacks make-up air, this can back-draft dangerous combustion appliances like water heaters. But in most leaky homes, it just accelerates the infiltration of cold outdoor air.
Part 2: Why R-Value Lies
We are trained to look for "R-Value"—the resistance to conductive heat flow. Fiberglass batt insulation might be rated R-13 or R-19.
But R-Value is measured in a static environment with no air movement.
Fiberglass insulation is effectively an air filter. It is porous. If there is a pressure difference (like the Stack Effect) across a fiberglass batt, air flows right through it.
The degradation is severe:
- Grade 1 Installation (Perfect): 100% R-Value performance.
- Grade 2 (Gaps/Compression): R-Value drops by 15-30%.
- With Air Leakage: Studies show that moderate air movement through fiberglass insulation can reduce its effective R-value by 50% or more.
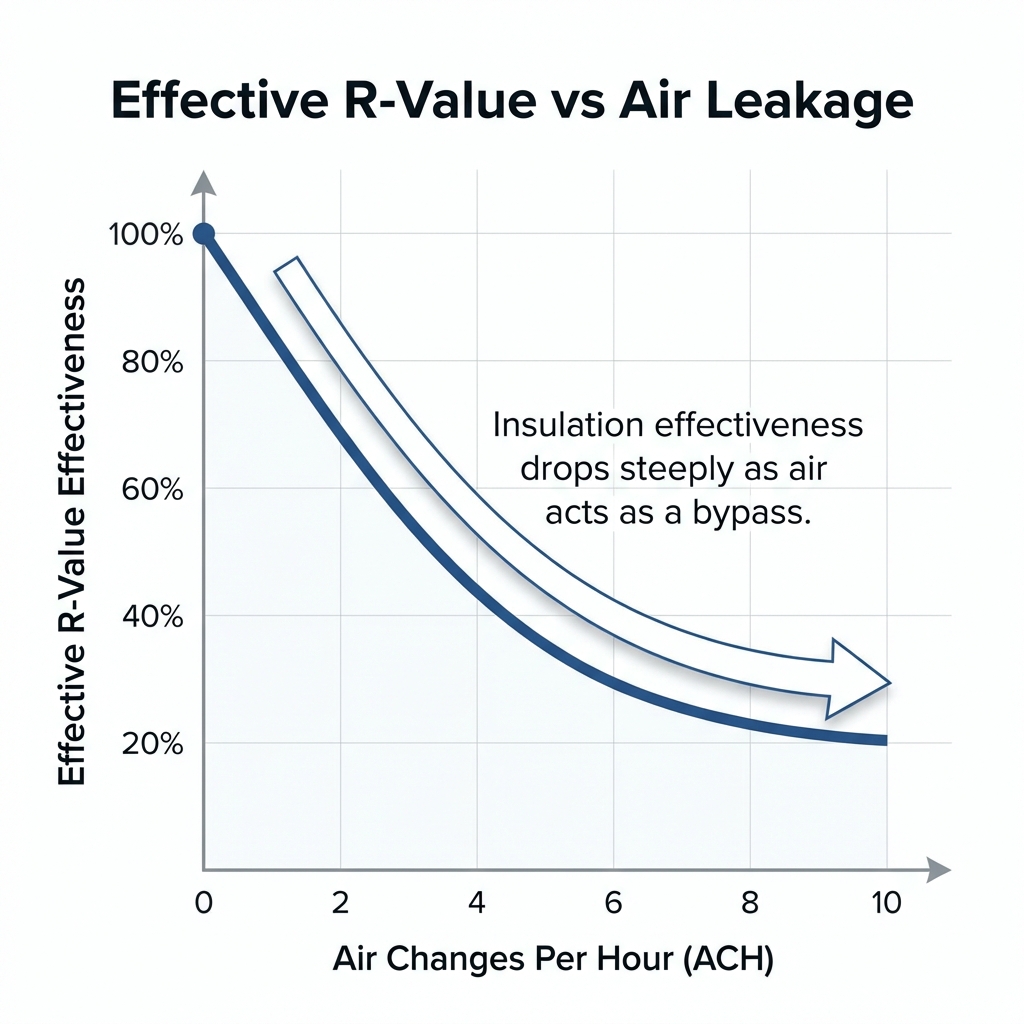
This is why you can have R-60 in your attic and still have high heating bills and ice dams. The heat isn't conducting through the insulation; it's convecting through it, carried by moving air.
Part 3: The Continuous Thermal Envelope
To fix this, we need to think about the "Thermal Envelope." This is the continuous boundary that separates the "conditioned" (heated/cooled) space from the "unconditioned" (outdoor) space.
For a house to be efficient, this envelope must be continuous. It needs two layers:
- The Thermal Barrier: The insulation (the sweater).
- The Air Barrier: The seal (the windbreaker).
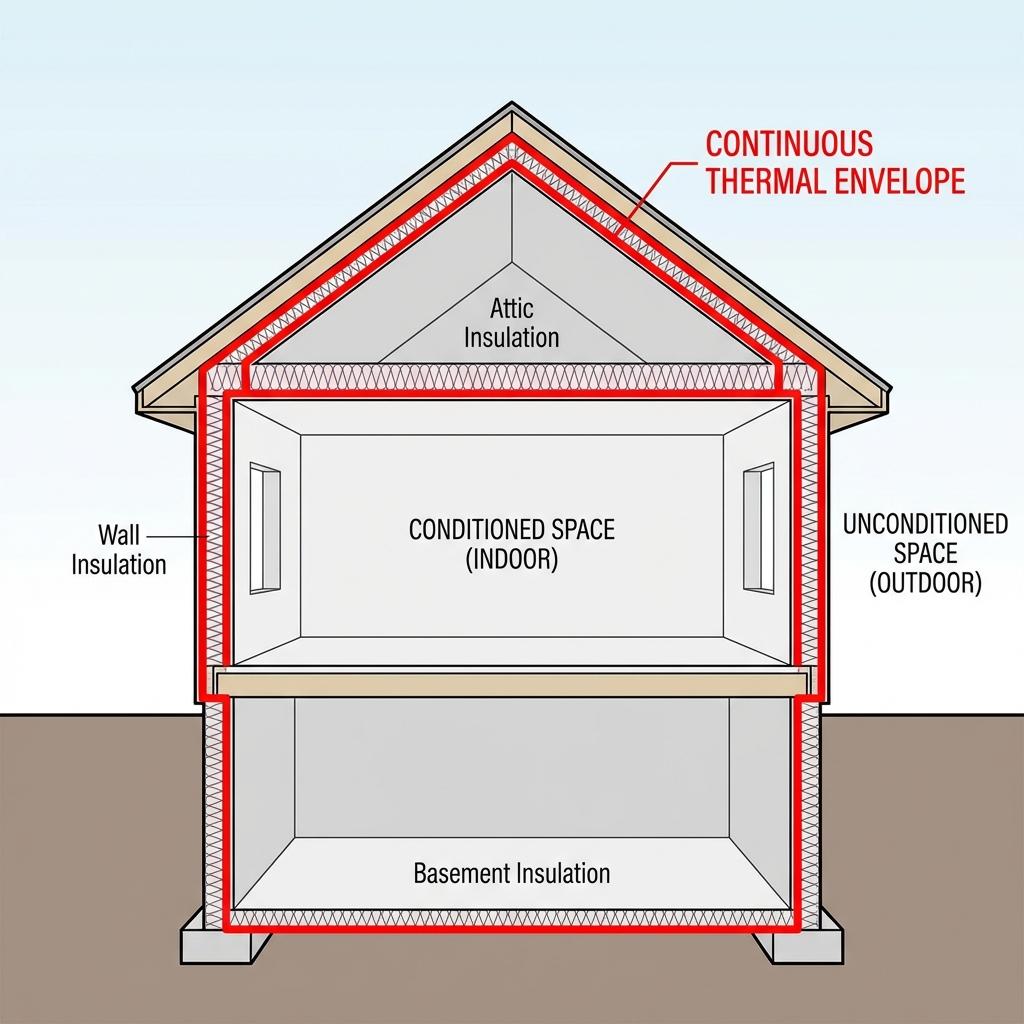
In many homes, this line is broken.
- Recessed Lights: Holes in the ceiling.
- Attic Hatches: Often uninsulated plywood.
- Kneewalls: Short walls in finished attics that often lack air blocking.
- Cantilevers: Overhangs that are rarely sealed properly.
Part 4: Global Climate Context
The physics of air pressure are universal, but the moisture management strategy changes depending on where you live.
Cold Climates (Canada, Northern US, Scandinavia)
- Primary Drive: Warm, humid indoor air trying to escape.
- Risk: If moist indoor air leaks into the attic or walls, it hits cold sheathing and condenses (or freezes). When it thaws, it causes rot and mold.
- Strategy: Your air barrier must be on the warm side (interior) of the insulation. Polyethylene sheeting or smart vapor retarders are common.
Hot/Humid Climates (Florida, SE Asia, Southern US)
- Primary Drive: Hot, humid outdoor air trying to get in.
- Risk: If humid outdoor air leaks into cool, air-conditioned wall cavities, it condenses on the back of the drywall.
- Strategy: The air barrier typically needs to be on the exterior (like Tyvek or taped sheathing). Avoid interior vinyl wallpaper, which traps moisture.
Mixed Climates
- Strategy: These are the tricky zones. The wall assembly must be able to dry in both directions. "Smart" vapor retarders that change permeability based on humidity are essential.
Part 5: The Master DIY Air Sealing Checklist
You don't always need a pro. Many air sealing tasks are high-ROI DIY projects.
Priority 1: The Attic Floor (Top of the Stack)
Stopping the air escaping at the top is the most effective way to slow the Stack Effect.
- Plumbing Stacks: Use expanding foam (Fireblock rated) around pipes entering the attic.
- Electrical Wires: Foam tiny holes where wires penetrate the top plates of walls.
- Chimney Box: Use metal flashing and high-temp caulk (NEVER spray foam) around chimneys.
- Attic Hatch: Add weatherstripping and glue rigid foam insulation to the back of the hatch.
Priority 2: The Basement Rim Joist (Bottom of the Stack)
Here, cold air enters.
- Rim Joist: The band of wood sitting on top of your foundation wall. It's often leaky.
- Fix: Cut blocks of 2-inch XPS (rigid foam) to fit between joists. Glue them against the rim joist and seal the edges with spray foam "picture frame" style. This insulates and air seals.
Priority 3: Windows and Doors
People obsess over windows, but they actually account for a relatively small percentage of total leakage.
- The Sash: Replace worn weatherstripping.
- The Trim: Often, the leak isn't through the window, but around the frame. Carefully remove interior trim and use low-expansion foam between the window jamb and the rough opening framing.
Part 6: Measuring Success
How do you know if it worked?
1. The Blower Door Test (The Gold Standard)
A professional installs a calibrated fan in your door frame. It depressurizes the house to -50 Pascals. They measure exactly how much air is leaking (CFM50).
- Passive House: < 0.6 ACH50 (Air Changes per Hour)
- Modern Code: < 3.0 ACH50
- Average Existing Home: 7-10 ACH50
- Leaky Old House: > 15 ACH50
2. The DIY Fog Test
Pick a windy day. Turn on all exhaust fans (kitchen, bath) to negatively pressure your house. Light an incense stick (or use a smoke pencil). Walk around windows, outlets, and baseboards. Watch where the smoke streams sideways. That's a leak.
The Verdict
Before you spend $10,000 on new windows or $5,000 adding more attic fluff, spend $200 on caulk, spray foam, and weatherstripping.
Air sealing is the unsexy, invisible hero of home efficiency. It improves comfort, lowers bills, prevents ice dams, and improves indoor air quality by keeping pollen and dust out.
Seal tight, ventilate right. That's the mantra. Once your house is tight, you control the ventilation (via a fresh air system), rather than letting the wind do it for you.
About the Editorial Team EnergyBS reviews public program rules, product specifications, utility rates, and reader-facing cost assumptions. Treat savings figures as estimates until you verify local prices, permits, rebates, and contractor quotes.
Common Questions
What should I check first before using this building science advice?
Start with the numbers that apply to your home: climate, utility rate, equipment age, contractor quote, and local program rules. Insulation is just a sweater. Air sealing is the windbreaker. We explain the physics of the Stack Effect, why Rvalues lie, and how to stop your home from leaking energy like a sieve.
How should I verify rebates, tax credits, rates, or savings before spending money?
Treat program amounts, utility rates, and tax rules as date-sensitive. Check the named government, utility, or manufacturer source before you sign a contract, and keep screenshots or PDFs of eligibility rules for your records.
What is the next useful step after reading this?
Compare this with Thermal Bridging: Why Your R20 Wall Acts Like R10 so you can check the cost, rebate, installation, or operating-risk angle before making a decision.
What to Read Next
Thermal Bridging: Why Your R20 Wall Acts Like R10Use this next to compare the cost, incentive, installation, or operating-risk angle before you make a home energy decision.References & Citations
Editorial Review
EnergyBS Editorial Team
EnergyBS publishes practical homeowner guides. Important program, product, and cost claims should be checked against the linked source and local project documents before you commit to work.
Related Guides
View All ArticlesThermal Bridging: Why Your R20 Wall Acts Like R10
You paid for expensive insulation, but wood studs are conducting heat right through it. We explain 'The Ghosting Effect' and how Continuous Exterior Insulation solves the problem.
The $50 Window Fix: Deep Physics of Interior Storm Inserts
Don't replace your historic windows—they are built to last 100 years. We explain the physics of the 'Secondary Air Seal' and why acrylic inserts often outperform $1,500 doublepane replacements.
HVAC Maintenance Physics: The Science of Static Pressure
Changing a filter isn't just about dust; it's about fluid dynamics. We explain how airflow restriction leads to 'Liquid Slugging', cracked heat exchangers, and the $3,000 'Death Spiral'.