Winter Window Condensation: Find the Cause and Fix Humidity, Airflow, or the Window
Use condensation location, outdoor temperature, indoor humidity, surface temperature, and room conditions to separate normal coldsnap fogging from failed glass, leaks, and mold risk.
Direct Answer
Use condensation location, outdoor temperature, indoor humidity, surface temperature, and room conditions to separate normal coldsnap fogging from failed glass, leaks, and mold risk.
Quick Checks
- 1Record indoor relative humidity and outdoor temperature when condensation appears.
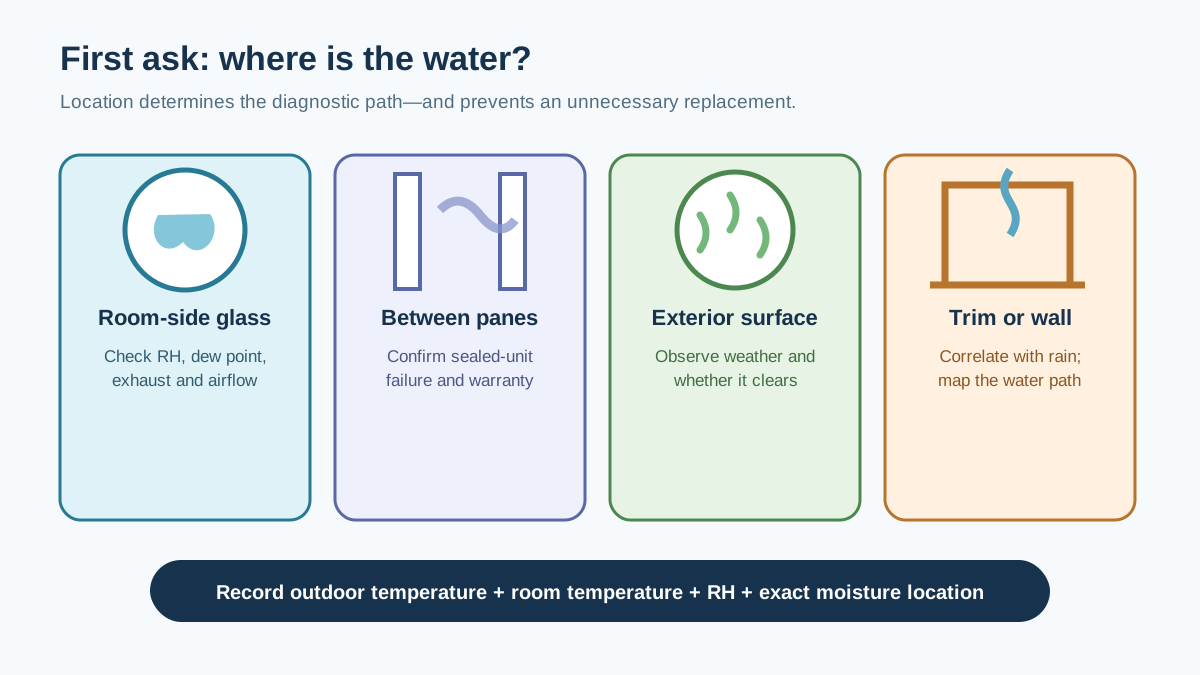
- 2Identify whether moisture is indoors, between panes, or outdoors before buying anything.
- 3Dry wet sills promptly and correct the moisture source before refinishing.
Start With Which Surface Is Wet
Short answer: Winter condensation on the room-side glass means that the interior window surface fell below the dew point of indoor air. Reduce excess moisture, verify bath/dryer/kitchen exhaust, allow room air to wash the glass, and investigate unusually cold or leaky parts of the window. Fog between sealed panes points to an insulated-glass seal failure. Exterior condensation can occur on efficient glass and is not, by itself, a window defect. Water at trim or the wall may be rain leakage rather than condensation.
“My windows sweat” is not one diagnosis. The same-looking droplet can come from indoor humidity, a cold surface, failed insulated glass, an exterior weather event, or water entering around the opening. Replacing every window before locating the moisture can spend thousands without fixing the source.
Use four observations together:
- Location: room side, between panes, outside, or around the frame.
- Timing: cold snap, overnight, shower/cooking event, rain, or all season.
- Conditions: indoor relative humidity, indoor temperature, and outdoor temperature.
- Pattern: lower edge, perimeter, whole pane, one room, one sash, or every window.
That small dataset separates most cases more reliably than a product salesperson's first impression.
The Four Moisture Locations
1. Room-side glass or frame
This is classic indoor condensation. Warm indoor air contains water vapor. When that air contacts a surface below its dew-point temperature, liquid water forms. The lower edge and perimeter often become wet first because spacers and frames conduct more heat than the center of a good glazing unit, and cool air pools near the sill.
Room-side condensation is evidence of a relationship, not automatic blame. Indoor moisture may be high, the glass may be unusually cold, air circulation may be blocked, outdoor temperature may be extreme, or several factors may combine.
2. Between panes
Moisture or haze trapped between the panes of a sealed insulated-glass unit usually indicates that its edge seal has failed and desiccant capacity has been exceeded. Cleaning and lowering room humidity cannot reach that cavity. Depending on the window, the insulated-glass unit, sash, or full assembly may be replaceable. Confirm that the haze is actually inside the unit rather than on a removable storm panel.
Seal failure reduces appearance and may reduce thermal performance, but it does not prove that the frame, flashing, and every other window need replacement. Ask for glass-unit and labor warranty terms.
3. Exterior glass
Exterior condensation can appear when the outdoor glass surface is colder than humid outdoor air—for example, after a clear night when the glass loses heat to the sky. High-performance glazing can make this more visible because less indoor heat reaches the exterior pane. Morning exterior dew that clears with sun is generally not the same problem as indoor water soaking a wood sill.
4. Trim, drywall, or wall cavity
Water staining above, beside, or below a window during wind-driven rain may indicate cladding, flashing, sealant, roof, or rough-opening leakage. Plumbing and roof runoff can also travel before emerging. Condensation within a wall can wet similar locations, but diagnosis requires weather correlation, moisture mapping, and sometimes controlled water testing. Do not label every stain “window condensation.”
Dew Point Without the Jargon
Relative humidity describes how much water vapor is in air compared with the maximum it could hold at that temperature. Warm air can support more vapor than cold air. When indoor air cools against glass, its relative humidity rises until it reaches saturation; the corresponding temperature is the dew point.
For example, indoor air at 70°F and 40% relative humidity has an approximate dew point near 45°F. If the room-side glass edge is 41°F, it can condense even though the room feels dry. At 70°F and 30% RH, the dew point is roughly 37°F, so that same 41°F surface would remain above the dew point.
These are approximate psychrometric values, not a promise. Sensor error, local temperature, curtains, wind, and transient moisture matter. The key relationship is:
- lower indoor moisture lowers the dew point;
- a warmer interior glass surface increases the safety margin;
- better air circulation keeps the glass closer to room conditions;
- colder or windier weather lowers surface temperatures.
A practical margin
If measured glass temperature is only one or two degrees above the calculated dew point, minor sensor error or a colder edge can still produce water. Aim for a reasonable margin, not a decimal-perfect target. Measure at the wet location, not on an interior wall across the room.
Build a Seven-Day Condensation Log
Use a reliable digital thermo-hygrometer in the affected room. Compare it with another unit if the reading seems implausible. Record conditions before wiping the glass.
| Time | Outdoor temperature/weather | Room temperature | Room RH | Moisture location | Recent activity | Shade position |
|---|---|---|---|---|---|---|
| 7 a.m. | 12°F, calm | 69°F | 46% | Lower 3 in. inside | Two showers | Cellular shade closed |
| Noon | 24°F, sun | 71°F | 37% | Dry | Fan used | Shade open |
| 10 p.m. | 18°F, wind | 70°F | 42% | Perimeter mist | Cooking | Drapes closed |
Also note whether the bathroom fan ran, how long it ran, whether a humidifier operated, how many people were home, whether laundry dried indoors, and whether the heating system reduced temperature overnight.
The example suggests a combination of morning moisture load and an insulating shade that isolates the cold glass from room heat. It does not prove the window needs replacement.
Find the Moisture Sources First
People, showers, cooking, plants, aquariums, drying laundry, wet firewood, unvented combustion, damp foundations, and humidifiers all add indoor moisture. New construction and recent concrete or plaster work can release moisture for an extended period. A very airtight home may retain moisture that a leakier predecessor unintentionally exhausted.
Bath exhaust
Confirm the fan actually moves air and terminates outdoors—not in an attic, soffit cavity, or wall. A tissue test at the grille is only a rough screen. Dusty grilles, crushed ducts, long flexible runs, failed dampers, and poor replacement-air paths can reduce flow. The bathroom exhaust-fan guide shows how to specify the duct route and measure delivered airflow. Run the fan during bathing and after the visible moisture event; ENERGY STAR consumer guidance suggests continuing roughly 20 minutes after cooking or showering.
Kitchen exhaust
A recirculating range hood captures some grease but does not remove water vapor outdoors. Gas cooking also introduces combustion products and moisture. Use an outdoor-vented hood where available and appropriate, operate it before moisture spreads, and maintain filters. Never use an oven or range to heat a home.
Dryer exhaust
Dryers should discharge outdoors through an appropriate, intact duct. A disconnected duct can inject a large moisture load into the building or crawlspace. Lint accumulation is also a fire risk. Correct the duct rather than compensating with a dehumidifier.
Whole-house humidifier
Humidifiers can make winter air more comfortable, but a fixed high setting during colder weather can wet windows and walls. Verify the control and water valve, check for mineral buildup, and lower or disable humidification during a cold snap. Do not assume the humidistat is accurate because it displays a plausible number.
Foundation and bulk water
A damp basement or crawlspace can raise moisture throughout the house. Fix roof drainage, grading, plumbing leaks, sump issues, and exposed soil moisture before trying to exhaust the symptom upstairs. The source may be several rooms away from the wet window.
Do Not Use One Humidity Number for Every Winter Day
EPA broadly recommends indoor relative humidity below 60%, ideally 30%–50%, for moisture and mold control. That is not a guarantee that a window stays dry in a cold climate. A window's safe winter RH depends on outdoor temperature, whole-product performance, installation, interior temperature, edge conditions, wind, and curtains.
When outdoor temperatures plunge, a temporary lower indoor RH may be needed. The correct response is to reduce avoidable moisture and monitor the actual surfaces, not to force the home to an arbitrary number regardless of comfort and health. Extremely low humidity can cause discomfort for some people and damage sensitive materials; medical concerns deserve professional advice.
Use this operational hierarchy:
- Stop uncontrolled moisture sources and leaks.
- Verify local exhaust reaches outdoors.
- Adjust humidification to weather and observed surface conditions.
- Provide code-appropriate whole-house ventilation if the home needs it.
- Improve cold surfaces and air distribution where justified.
Opening windows may provide brief dilution in some conditions, but it wastes energy and is not a designed ventilation strategy. In humid or mild weather, outdoor air can add moisture.
Check Airflow at the Glass
Windows rely partly on room heat and air movement to keep interior surfaces warm. Deep sills, furniture, tight blinds, layered curtains, and cellular shades can isolate the glass. The room may be 70°F while the pocket behind a shade becomes much colder.
Run a simple comparison:
- record morning RH, outdoor temperature, and condensation with the treatment closed;
- on a comparable night, leave a safe gap at top and bottom or open the treatment;
- keep other conditions as similar as practical;
- compare the location and amount of water.
If condensation drops sharply, the treatment is part of the operating condition. That does not make it “bad”; it means the energy benefit of reducing heat loss must be balanced with airflow and moisture risk. Avoid pressing absorbent shades against wet glass.
Check whether supply registers are closed or blocked and whether bedroom doors restrict return airflow. Do not aim portable heaters at glass or create a fire hazard. Heating-system airflow changes should preserve comfort, pressure balance, and equipment requirements.
Inspect the Window and Rough Opening
Weatherstripping and sash contact
Operate and lock the window. Compression seals often work best when hardware pulls the sash tight. Look for torn weatherstripping, debris, warped sashes, and missing corner pads. Replace with compatible parts; over-thick generic foam can prevent locking or distort operation.
Air leakage around trim
Cold streaks at interior casing may come from the rough opening rather than the window product. During an energy audit, blower-door-assisted smoke or infrared diagnostics can locate leakage. Interior trim can sometimes be removed to seal the gap with a compatible low-expansion system while preserving drainage to the exterior. Do not fill intentional weep paths.
Drainage and weeps
Many windows manage incidental water through tracks and weep openings. Keep them clear according to manufacturer instructions. Caulking every visible opening can risk water inside the frame.
Frame and edge temperatures
Metal spacers, conductive frames, missing thermal breaks, and installation gaps can create a cold perimeter. An infrared camera can screen for anomalies, but reflections from glass make exact readings unreliable. A contact probe used carefully at the wet edge can be more informative. Compare similar windows under the same conditions.
Failed insulated glass
If fog is between panes, photograph it under different light and check the glass or window warranty. A glazing contractor may replace only the sealed unit. Ask whether grids, coatings, tempered safety glass, argon fill, spacer, and thickness will match.
When a Storm Window Is the Better First Move
A well-fitted interior or exterior storm panel can raise the room-side surface temperature, reduce drafts, and preserve an existing primary window at lower cost than full replacement. Fit, low-e coating, air leakage, egress, lead-safe work, and condensation management matter.
The attachment must not create a moisture risk. Interior panels need a very good room-side air seal so humid air does not enter the cavity and condense on the cold primary glass. Exterior storms generally need drainage to the outside. See the storm-window comparison guide before choosing a system.
When Replacement Is Defensible
Replacement moves higher on the list when the window has structural decay, failed operation, unsafe glazing, irreparable air leakage, repeated water entry tied to the assembly, multiple failed glass units, accessibility problems, or very poor thermal performance combined with comfort goals. Energy savings alone often do not justify replacing sound windows.
Specify whole-product NFRC U-factor and other relevant ratings for the exact configuration. Lower U-factor generally means a warmer winter interior surface under comparable conditions, but installation and indoor humidity still control condensation. No label guarantees a dry window under every indoor/outdoor condition.
The high-performance window guide includes a product and installation scorecard. Require flashing, water management, air sealing, fastening, operation, interior/exterior sealants, and acceptance checks—not just glass layers.
Distinguish Condensation From Rain Leakage
Use correlation rather than guessing:
- condensation tracks cold outdoor temperature and indoor moisture;
- rain leakage tracks wind direction, rainfall intensity, and duration;
- roof or wall leaks may appear above or beside the opening;
- plumbing leakage may occur regardless of weather;
- between-pane fog changes with glass temperature but remains inside the unit.
A controlled water test should proceed from the lowest, simplest component upward while areas above remain dry. Flooding the whole wall with a hose cannot isolate the path and may create damage. Complex cladding or multi-story testing belongs with a qualified envelope professional.
Mold and Material Safety
Wipe and dry window water promptly. Fix the source rather than repeatedly painting over staining. EPA advises drying wet materials quickly—generally within 24–48 hours—to reduce mold risk. Porous, extensively mold-damaged materials may require removal; hard surfaces can often be cleaned with water and detergent when the area is small and the moisture source is corrected.
Do not mix cleaning chemicals, and never mix bleach with ammonia. People with asthma, immune suppression, respiratory conditions, or other health concerns should follow clinician and EPA guidance. Extensive growth, sewage contamination, hidden wall wetting, or HVAC contamination warrants professional assessment.
Pre-1978 U.S. windows may involve lead-based paint. Disturbing painted sash, trim, or friction surfaces can create hazardous dust. Use lead-safe practices and appropriately certified firms where rules apply.
A Cold-Snap Operating Plan
Before a forecast severe cold period:
- Calibrate or compare hygrometers.
- Lower an over-aggressive humidifier setting.
- Use bath and kitchen exhaust consistently.
- Verify the dryer duct is intact and outdoors.
- Open interior shades enough to permit air circulation where safe.
- Keep supply and return paths unobstructed.
- Dry existing sill water and protect vulnerable finishes.
- Log the first morning's room temperature, RH, outdoor temperature, and glass condition.
- Adjust one variable at a time where practical.
- Escalate persistent wall wetting, ice, mold, or concealed leakage.
This is an operational response, not an excuse to tolerate chronic damage. A window that repeatedly freezes at moderate humidity may have a product, installation, or airflow defect worth diagnosing.
Quote and Verification Scorecard
| Question | Strong answer | Warning sign |
|---|---|---|
| Where is the moisture? | Documents room-side, cavity, exterior, or wall | Calls all moisture “seal failure” |
| What conditions trigger it? | Uses temperature/RH/weather log | No measurements |
| Are exhaust systems working? | Verifies termination and airflow | Recommends a dehumidifier first |
| Is the rough opening leaking? | Uses targeted pressure or visual diagnostics | Blames glass from across the room |
| Can the unit be repaired? | Prices weatherstrip, glass, sash, storm, replacement | Offers only whole-house replacement |
| What rating is proposed? | Exact whole-product label/configuration | Center-of-glass marketing value |
| How is installation verified? | Flashing, seal, operation, water path, photos | “Caulk it and cover it” |
| How will success be checked? | Repeats measurements under comparable weather | No acceptance condition |
Worked Diagnostic Examples
Example A: every bedroom window is wet at dawn
Outdoor temperature is 10°F, indoor temperature is 69°F, and bedroom RH is 48%. Doors are closed, cellular shades are tight, and the whole-house humidifier is fixed at one setting. Start with humidifier control, local moisture, door/return-air balance, and shade position. Replacement may improve surface temperature but is not the first diagnostic step.
Example B: one pane stays cloudy in all weather
The haze cannot be wiped from either accessible surface and sits inside the insulated unit. Ask a glazing contractor to confirm seal failure and price an insulated-glass or sash replacement before replacing the frame.
Example C: staining appears only in northeast rain
Indoor RH is normal and the glass remains dry, but trim becomes wet during wind-driven rain. Investigate cladding joints, head flashing, roof runoff, and rough-opening drainage. A lower indoor humidity setting will not fix exterior water entry.
Example D: an efficient window has morning dew outside
The exterior surface is wet after a clear humid night and dries in sunlight. There is no water indoors. This can be a normal exterior-surface condition and may demonstrate that little indoor heat is warming the outer pane.
Frequently Asked Questions
Is 40% indoor humidity too high in winter?
Sometimes. It may be comfortable and safe during mild weather but cause condensation during severe cold or on low-performing glass. Use outdoor conditions, surface temperature, and actual moisture evidence rather than a universal threshold.
Why is the bottom of the glass wet first?
The edge spacer and frame can be colder than the center, cool air settles, and room airflow may be weakest at the sill. Water also runs downward after forming elsewhere.
Will a dehumidifier solve it?
It can lower moisture, but first correct exhaust failures, leaks, humidifier settings, and foundation sources. Winter dehumidifier performance and energy use vary by temperature and model.
Do new windows eliminate condensation?
Better windows generally have warmer interior surfaces, reducing risk under comparable conditions. They can still condense when indoor humidity is high or outdoor temperatures are extreme.
Should I leave blinds open all winter?
Not necessarily. Adjust enough to maintain safe airflow and inspect for moisture. Insulating shades reduce heat loss but can make the glass behind them colder; operation is part of the system.
Is frost on the inside dangerous?
It signals that the surface is below freezing and moisture is accumulating. Melting can soak wood and walls. Reduce moisture, dry the area, and investigate persistent freezing promptly.
Can air sealing make condensation worse?
Air sealing reduces drafts and uncontrolled moisture transport, but a tighter home may retain indoor-generated moisture if ventilation is inadequate. Pair tightening with source control and ventilation assessment.
Should I caulk the exterior window?
Only at joints intended to be sealed, using compatible materials and preparation. Do not block weeps or drainage paths. Water management depends on the full opening and cladding detail.
Read Next
- Compare repair and replacement with the high-performance window guide.
- Evaluate a lower-cost second layer in the interior storm-window guide.
- Locate rough-opening leakage with the blower-door guide.
- Put window moisture in a whole-house context with the home energy audit guide.
The useful question is not “Are these windows bad?” It is “Where did the water form, what were the air and surface conditions, and which control changes the outcome?” Answer that before purchasing a replacement.
What to Read Next
HighPerformance Windows: How to Compare UFactor, SHGC, Air Leakage, and InstallationUse this next to compare the cost, incentive, installation, or operating-risk angle before you make a home energy decision.Sources and Verification
Editorial Review
EnergyBS Editorial Team
EnergyBS publishes practical homeowner guides. Important program, product, and cost claims should be checked against the linked source and local project documents before you commit to work.
Related Guides
View All ArticlesHighPerformance Windows: How to Compare UFactor, SHGC, Air Leakage, and Installation
Specify replacement windows by wholeproduct NFRC ratings, climate and orientation, comfort, durability, and roughopening installation. Includes a label decoder and quote scorecard.
Interior Storm Windows vs. Replacement: Cost, Condensation, and Fit
Decide whether an interior storm panel, exterior lowe storm, repair, or full replacement best fits an existing window. Includes fit, condensation, egress, acoustic, and quote checks.
Blower Door Test: What Is Your ACH50 Score?
Prepare for a calibrated blower door test, understand CFM50 and ACH50, map leakage safely, compare testin and testout results, and know what the score cannot tell you.