Duct Leakage Testing and Sealing: A Homeowner's Guide to DuctBlaster Results
A practical guide to total duct leakage, leakage to outdoors, CFM25 results, pressure problems, sealing materials, contractor scopes, safety checks, and postwork verification.
Duct Leakage Testing: The Short Answer
Short Answer: A useful duct-sealing project starts with diagnosis, reports leakage at a stated test pressure, distinguishes total leakage from leakage to outdoors when that distinction matters, repairs accessible failures with approved mastic or UL 181 products, checks airflow and combustion safety, and repeats the same test after work. A percentage claim without baseline CFM25, floor area, test type, repair scope, and post-test result is not enough to judge value.
The U.S. Department of Energy says a typical house can lose roughly 20% to 30% of the air moving through ducts because of leaks, holes, and poor connections. That national statement explains why ducts deserve attention; it does not prove your house loses that amount. Your decision should come from the location and condition of your ducts, measured leakage where appropriate, comfort symptoms, system pressure, and the cost of reaching the defects.
This guide explains the test report and the repair sequence so you can compare scopes rather than buy a vague promise to “seal all ducts.”
First Separate Three Different Problems
Homeowners often use “bad ducts” to describe any distribution complaint. At least three problems can exist alone or together:
- Leakage: Air escapes supply ducts or enters return ducts through unintended openings.
- Conduction: Heat moves through the duct wall because insulation is missing, thin, wet, compressed, or exposed to extreme attic or crawlspace temperatures.
- Flow restriction or imbalance: Ducts, filters, coils, grilles, or dampers resist airflow or distribute it poorly.
Sealing addresses the first. Insulating addresses the second. Redesign, cleaning, filter changes, balancing, or equipment corrections may address the third. Coating every seam with mastic will not enlarge an undersized return or fix a crushed flex duct.
That distinction is the foundation of a good scope. Ask the contractor to name the dominant failure and show the evidence.
Supply Leaks and Return Leaks Behave Differently
A forced-air system has a supply side that delivers conditioned air and a return side that brings house air back to the equipment.
Supply leakage
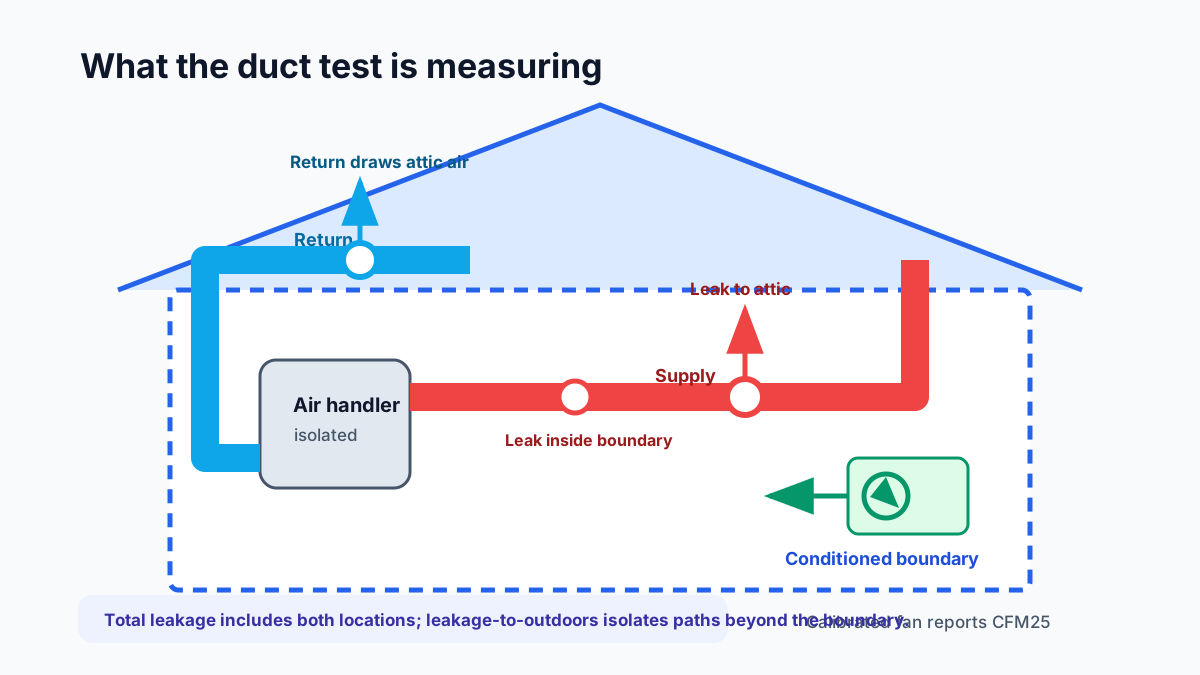
When a supply leak sits outside conditioned space, heated or cooled air is lost to an attic, crawlspace, garage, or wall cavity. Rooms receive less airflow, the system runs longer, and pressure imbalances can draw outdoor air through the building enclosure. A supply leak inside conditioned space may be less severe energetically, but it can still produce poor room delivery or moisture problems inside a cavity.
Return leakage
A return leak pulls air into the duct system. In a hot attic, that can add heat to cooling air before it reaches the coil. In a dusty crawlspace or attached garage, it may draw contaminants or moisture. Return leakage near naturally drafted combustion equipment can also interact with pressure and combustion safety.
The same measured airflow therefore can have different consequences depending on side and location. A good diagnostic report maps the system, not just the final number.
What a Duct Blaster Measures
A duct leakage tester uses a calibrated fan to pressurize or depressurize the duct system while supply and return registers are temporarily sealed. The common reference pressure is 25 pascals, and the reported airflow is often written as CFM25: cubic feet per minute needed to hold the ducts at 25 Pa.
More airflow needed to maintain the pressure means more leakage area. The fan does not identify every hole by itself. Technicians combine the number with inspection, pressure-pan measurements, smoke, theatrical fog, infrared clues under suitable conditions, or other localization methods.
Total duct leakage
The system is isolated and tested to estimate all leakage from the ducts, whether the leaks connect to conditioned or unconditioned space. This is useful for quality control and before-and-after comparisons, but not every unit of total leakage represents air leaving the home's thermal boundary.
Duct leakage to outdoors
The duct tester is used with the house at a matched pressure so the procedure estimates leakage that connects beyond the building enclosure. This can better isolate the energy-relevant portion when some ducts are inside conditioned space. The method and setup are more involved.
DOE's Building Science Education materials explicitly teach both total leakage and leakage-to-outdoors tests. Your report should state which one was performed. A document that says only “duct leakage: 220 CFM” leaves out the test pressure and type.
Normalize the Result Before Comparing Houses
A larger house often has a larger duct system, so raw CFM25 alone is a poor cross-house comparison. Reports may normalize leakage to conditioned floor area:
CFM25 per 100 square feet = measured CFM25 ÷ conditioned floor area × 100
Worked example:
- conditioned floor area: 2,000 square feet;
- total duct leakage before work: 300 CFM25;
- total duct leakage after work: 150 CFM25.
The normalized values are 15 CFM25 per 100 square feet before and 7.5 after. The measured reduction is 150 CFM25, or 50% of the baseline.
That is a meaningful process result. It still does not equal a 50% utility-bill reduction. Energy impact depends on how much leakage was to outdoors, whether it was supply or return, duct location, climate, fan runtime, equipment efficiency, and operating schedule.
Do not compare a total-leakage figure from one quote with a leakage-to-outdoors figure from another as if they were identical metrics.
When Testing Is Most Valuable
Duct testing is particularly useful when:
- significant ductwork runs through an attic, garage, vented crawlspace, or other unconditioned area;
- rooms receive weak airflow despite open registers;
- utility use seems high relative to the equipment and envelope;
- dust, odors, or humidity appear when the air handler runs;
- a heat pump or air conditioner is being replaced;
- ducts have many field-built transitions or disconnected sections;
- a renovation disturbed hidden ducts;
- a rebate, code, or performance program requires a result;
- you need an objective before-and-after measure for a sealing contract.
Testing may have lower decision value when all ducts are short, visible, demonstrably tight, and fully inside the thermal and air boundary. Inspection and targeted repair can sometimes be more economical than a full diagnostic package. Even there, airflow and static-pressure checks may uncover a different problem.
Inspection Before Pressure Testing
DOE's existing-home measure guideline begins with inspection and hazard identification. A technician should understand the equipment, duct materials, access, insulation, and combustion setup before pressurizing or modifying the system.
Useful inspection points include:
- disconnected boots and branches;
- gaps where boots meet drywall or subfloor;
- unsealed plenums and air-handler cabinets;
- takeoffs without mechanical fastening;
- torn or sun-damaged flex duct;
- flex duct compressed behind framing;
- unsupported runs and sharp bends;
- old cloth-backed tape;
- missing end caps;
- return chases made from wall or floor cavities;
- dirty insulation near leaks;
- condensation, rust, or wet duct wrap;
- asbestos-containing tape or insulation;
- inaccessible ducts embedded in slabs or finished cavities.
Dust streaks can indicate air movement, but absence of dust does not prove airtightness. A disconnected branch may be obvious without a test; tiny distributed leaks are not.
Combustion Safety Is Part of the Scope
Duct sealing changes pressure relationships. DOE's measure guideline says combustion equipment should be checked before and after work unless appliances are sealed-combustion. This matters where furnaces, boilers, or water heaters rely on natural draft.
The contractor should identify:
- naturally drafted appliances;
- atmospheric water heaters;
- fireplaces and wood appliances;
- shared flues;
- attached garages;
- return openings near combustion zones;
- exhaust fans that can depressurize the house.
This is not a reason to leave ducts leaky. It is a reason to use a qualified home-performance process. Carbon-monoxide alarms are essential household protection, but they do not replace draft, spillage, and combustion testing where required.
Stop work and obtain specialist advice when suspected asbestos, damaged flues, active moisture, mold, pest contamination, or unsafe electrical conditions are found.
The Repair Hierarchy
Treat the largest and most consequential failures first.
1. Reconnect and mechanically secure failed sections
Mastic is not a structural connector. Disconnected metal sections, boots, collars, and flex-duct cores need appropriate mechanical attachment. Flex duct should be installed without excessive sag, compression, or sharp bends and supported according to the applicable installation requirements.
2. Seal air-handler, plenum, and trunk connections
Large pressure differences often exist near the fan. Cabinet penetrations, filter slots, plenums, and trunk transitions can be high-value targets. Follow equipment manufacturer requirements; do not obstruct service panels, drains, controls, or safety labels.
3. Seal takeoffs, joints, seams, and boots
DOE's tight-duct guidance calls for approved mastic, UL 181 tape, or equivalent products. Wider gaps may need reinforcing mesh before mastic. Ordinary cloth-backed “duct tape” can dry out and fail and is not a durable duct-sealing material.
4. Seal boots to the building finish
Air can bypass the duct at the gap between a metal boot and drywall, subfloor, or ceiling. This is partly a duct detail and partly an enclosure detail. Use a compatible sealant and preserve fire, smoke, and service requirements.
5. Insulate ducts outside conditioned space
Air sealing comes before insulation because insulation can hide defects. Repair wet or damaged sections and correct condensation causes. Duct insulation must remain continuous, dry, and properly sealed at its outer jacket.
6. Re-test under the same protocol
Repeat the baseline test type and pressure. Record remaining leakage, repairs completed, and inaccessible areas. A lower number plus a documented scope is much more useful than a sticker claiming the ducts were “professionally sealed.”
Mastic, UL 181 Tape, and Aerosol Sealing
Duct mastic
Water-based duct mastic is a common durable choice for accessible metal and duct-board joints when installed at the required thickness on a clean, suitable surface. Mesh may bridge larger gaps. Product instructions govern compatibility, curing, and temperature limits.
UL 181-listed products
Foil or film tapes listed for the specific duct material and application can work well when surfaces are prepared and the tape is properly burnished. “Foil-looking” does not automatically mean listed. Match the product to rigid duct, flex-duct closure, or other intended use.
Aerosol duct sealing
An aerosol process can reach distributed leaks from inside the duct system after large accessible holes are repaired and registers and equipment are protected. It can be valuable for inaccessible systems, but it is not a substitute for reconnecting a collapsed branch, correcting undersized ducts, removing contamination, or fixing wet insulation.
Ask an aerosol contractor:
- what must be repaired manually first;
- how coils, dampers, sensors, and equipment are isolated;
- what pre- and post-test protocol is used;
- which leakage paths the process cannot address;
- what material documentation and warranty are supplied;
- whether cleaning or contamination changes eligibility.
The right method follows the defect. Do not choose a technology before locating the problem.
Duct Leakage Versus House Leakage
A blower door tests the building enclosure. A duct blaster tests the duct system. They answer different questions.
The tests interact because ducts outside conditioned space can create house pressure changes when the HVAC fan operates. A supply leak to an attic can depressurize the house; return leakage from outside can pressurize it. A blower door alone cannot quantify all duct leakage, and a duct test does not tell you how leaky the walls and ceiling are.
For a major retrofit, using both can improve the model:
| Test | Main question | Typical use |
|---|---|---|
| Blower door | How much air crosses the building enclosure at a reference pressure? | Air-sealing plan and load-calculation input |
| Duct leakage test | How much air crosses duct boundaries at a reference pressure? | Duct repair baseline and verification |
| Static-pressure measurement | How much resistance does the operating air system face? | Filter, coil, return, supply, and blower diagnosis |
| Room airflow or pressure checks | Is air delivered and returned where needed? | Comfort balancing and closed-door diagnosis |
Read the blower-door guide alongside this article if a contractor treats the two tests as interchangeable.
Static Pressure: Why Tighter Is Not the Whole Goal
Leakage and static pressure are not opposites. Sealing a large supply leak can increase pressure in an already restrictive system because more air is now forced through small branches and registers. The correct response is not to preserve leakage; it is to measure and correct the distribution constraint.
Before and after major duct work, request:
- total external static pressure;
- pressure drop across the filter;
- pressure drop across the indoor coil where appropriate;
- blower setting and estimated or measured airflow;
- room or branch airflow when comfort is part of the scope.
The equipment's blower table connects pressure to airflow. A generic statement that “0.5 inches is always fine” can be misleading because allowable pressure and delivered airflow depend on the specific air handler, filter, coil, and design.
The site's HVAC static-pressure guide explains this diagnostic path in more depth.
Worked Scope Comparison
Imagine two proposals for the same house.
Proposal A
“Seal ductwork: $1,800. Guaranteed 25% savings.”
It includes no test type, baseline, access assumptions, combustion checks, materials, or post-test. The savings statement has no utility or model basis.
Proposal B
“Inspect two-system duct network; perform total duct leakage test at 25 Pa; record floor area and CFM25; inspect natural-draft water heater; reconnect accessible failed branches; seal accessible plenums, takeoffs, boots, and cabinet penetrations with listed materials; exclude asbestos-suspect and concealed slab ducts; measure static pressure; repeat total-leakage test; provide photos and results.”
Proposal B can still be expensive or incomplete, but you can evaluate it. Ask whether leakage to outdoors would change the decision, how inaccessible sections are handled, and what improvement threshold or stop condition applies.
A rational stop condition
Chasing the last small leak behind finished walls may cost far more than the remaining energy loss. Agree in advance whether the objective is:
- repair of named failures;
- a minimum percentage reduction under the same test;
- a target normalized leakage level;
- improvement until marginal repairs become invasive;
- compliance with a specific program or code threshold.
The metric should match the project.
Estimating Savings Without False Precision
DOE public materials cite up to 20% utility-bill reduction from a properly sealed duct system in suitable circumstances and describe typical duct air losses of roughly 20% to 30%. These are screening ranges, not a quote-specific guarantee.
For a house-level estimate, separate:
- annual heating and cooling energy use from baseloads such as appliances and water heating;
- the share of ducts outside conditioned space;
- measured leakage to outdoors or a defensible estimate;
- supply versus return leakage;
- conductive losses;
- equipment efficiency and runtime;
- expected reduction after repair.
If HVAC represents 45% of the annual bill, a project cannot reduce the whole bill by 25% merely because it cuts one duct metric by 25%. Savings are a fraction of a fraction. Comfort, indoor-air-quality risk reduction, and equipment performance may justify work even when precise payback is uncertain.
Track normalized energy before and after. Compare electricity in kWh and fuel in therms, cubic metres, litres, or gallons, and adjust expectations for weather and setpoint changes. Dollar bills alone are distorted by rate changes.
DIY Boundaries
Visible, accessible, low-risk gaps at boots or simple metal joints may be reasonable DIY work for a capable homeowner following product instructions. Many systems warrant a professional.
Do not DIY beyond your competence when the scope involves:
- combustion appliances or possible backdrafting;
- asbestos-suspect tape or insulation;
- inaccessible attics with heat or fall hazards;
- crawlspace contamination;
- active mold or sewage exposure;
- refrigerant components, line-voltage wiring, or equipment internals;
- fire-rated assemblies;
- major duct redesign;
- code, permit, or rebate testing requirements.
Never coat a filter slot shut, block a condensate drain, seal a service panel, cover a damper operator, or apply material inside equipment unless the manufacturer and qualified technician allow it.
Contractor Checklist
Before work:
- Map equipment, supplies, returns, and duct locations.
- Identify combustion and environmental hazards.
- State test type, pressure, and normalization method.
- Record baseline CFM25 and conditioned floor area.
- Measure static pressure when flow is in question.
- Photograph major defects.
- Define accessible and excluded areas.
During work:
- Mechanically reconnect failed sections.
- Use products listed or approved for the duct material and application.
- Preserve access, drains, dampers, and equipment serviceability.
- Correct wet insulation and moisture causes.
- Document hidden conditions and change orders.
After work:
- Repeat the same leakage test.
- Report final raw and normalized results.
- Recheck static pressure and airflow where relevant.
- Complete required combustion-safety checks.
- Balance rooms included in scope.
- Provide photos, product records, warranty, and maintenance notes.
Frequently Asked Questions
What is a good duct-leakage number?
The answer depends on whether the result is total leakage or leakage to outdoors, whether it is normalized, the applicable code or program, duct location, and whether the house is new or existing. Ask the tester to compare the result with the governing target and your own baseline rather than applying a context-free number.
Is CFM25 the same as normal operating leakage?
No. CFM25 is airflow at a standardized test pressure used for comparison. Actual leakage changes with operating pressures at different points in the duct system. The test is useful precisely because it creates a repeatable reference.
Can I seal ducts with ordinary duct tape?
DOE guidance warns that regular cloth-backed duct tape can dry out and fail. Use mastic or a UL 181-listed product suitable for the specific duct and joint, installed according to instructions.
Should ducts be cleaned before sealing?
Not automatically. Accessible joint surfaces need proper preparation, and contaminated ducts may require specialist assessment. Routine whole-system cleaning is a separate decision. Fix moisture, pest, filtration, and return-leak sources rather than treating cleaning as a substitute.
Will duct sealing fix a hot second floor?
It may help if leakage or disconnected branches are the cause. Solar gain, attic insulation, return-air paths, branch sizing, equipment control, and stack effect can produce the same symptom. Use room loads, airflow, pressure, and envelope evidence.
Are ducts inside conditioned space worth sealing?
Yes when leakage harms room delivery, draws cavity contaminants, creates noise, or disrupts pressure. The direct energy penalty may be smaller than leakage to a vented attic or crawlspace, so prioritize based on location and consequence.
Should duct sealing happen before a new heat pump?
Usually diagnose it before final equipment selection. Duct repair can change delivered airflow and modeled distribution losses. The new equipment design should reflect the repaired system, and commissioning should verify both together.
What to Read Next
Turn leakage, static pressure, room delivery, material condition, and access into a scope with the duct seal-repair-replace guide. Use the heat-pump sizing guide when duct condition affects an equipment quote. Compare duct leakage with whole-house leakage in the blower-door test guide, then review air-sealing science before changing the building enclosure. For an HVAC system that is tight but noisy or starved for air, continue with the static-pressure guide.
Sources and Method
This guide draws from DOE Building Science Education testing modules, the DOE Building America existing-home duct measure guideline, and current DOE homeowner upgrade material. Savings statements are framed as official screening ranges, not guarantees. Test procedures, acceptable thresholds, safety requirements, licensing, and permitted materials vary by jurisdiction and program.
Sources and Verification
Editorial Review
EnergyBS Editorial Team
EnergyBS publishes practical homeowner guides. Important program, product, and cost claims should be checked against the linked source and local project documents before you commit to work.
Related Guides
View All ArticlesBlower Door Test: What Is Your ACH50 Score?
Prepare for a calibrated blower door test, understand CFM50 and ACH50, map leakage safely, compare testin and testout results, and know what the score cannot tell you.
HVAC Maintenance Physics: The Science of Static Pressure
Changing a filter isn't just about dust; it's about fluid dynamics. We explain how airflow restriction leads to 'Liquid Slugging', cracked heat exchangers, and the $3,000 'Death Spiral'.
Heat Pump Sizing Guide: How to Read a Manual J and Avoid an Oversized System
A homeownerfocused guide to Manual J loads, Manual S equipment selection, coldweather capacity, balance points, duct constraints, and the documents a defensible heatpump quote should include.