Should You Remove Old Attic Insulation or Add More on
Keep dry, clean insulation when it can remain part of a safe assembly; remove only what blocks air sealing or is wet, contaminated, damaged, or incompatible. Includes a quote and depthgrid worksheet.
Direct Answer
Keep dry, clean insulation when it can remain part of a safe assembly; remove only what blocks air sealing or is wet, contaminated, damaged, or incompatible. Includes a quote and depthgrid worksheet.
Quick Checks
- 1Do not disturb vermiculite or unknown older material until it is assessed.
- 2Move only enough insulation to air-seal and inspect each work zone, then restore or replace it.
- 3Specify installed depth or density and full coverage - not only bag count or nominal R-value.
Most Dry, Clean Attic Insulation Can Stay
Short answer: You usually do not need to remove old attic insulation before adding more. ENERGY STAR says contractors can generally add over existing material unless it is wet, moldy, smelly, or contaminated with animal waste. Removal also makes sense where insulation blocks safe air sealing, hides damage, contains a suspect material, or cannot be restored to full contact and coverage. Fix water, exhaust, wiring, and air leaks before the top-up.
“Old” is not a failure mode. Fiberglass, cellulose, and mineral wool do not expire on a calendar date. Their field performance depends on material, installed thickness or density, settling, moisture, contamination, gaps, compression, and airflow.
The lowest-cost sound project often keeps most existing insulation, temporarily moves it at leakage points, completes repairs, and adds only the amount needed for continuous coverage.
Stop if the Material Is Unknown
Do not rake, vacuum, bag, or blow over vermiculite or another suspect older material. Vermiculite attic insulation can contain asbestos. EPA advises leaving suspected material undisturbed and using trained, accredited professionals for sampling or work when necessary.
Other hazards include:
- animal droppings and nesting material;
- extensive mold or sewage contamination;
- knob-and-tube or damaged wiring;
- recessed lights without safe insulation clearances;
- hot flues and missing fire blocking;
- unstable access and concealed ceiling drywall;
- sharp fasteners and damaged roof framing;
- lead dust from disturbed older finishes.
Safety screening happens before a contractor quotes vacuum removal by square foot.
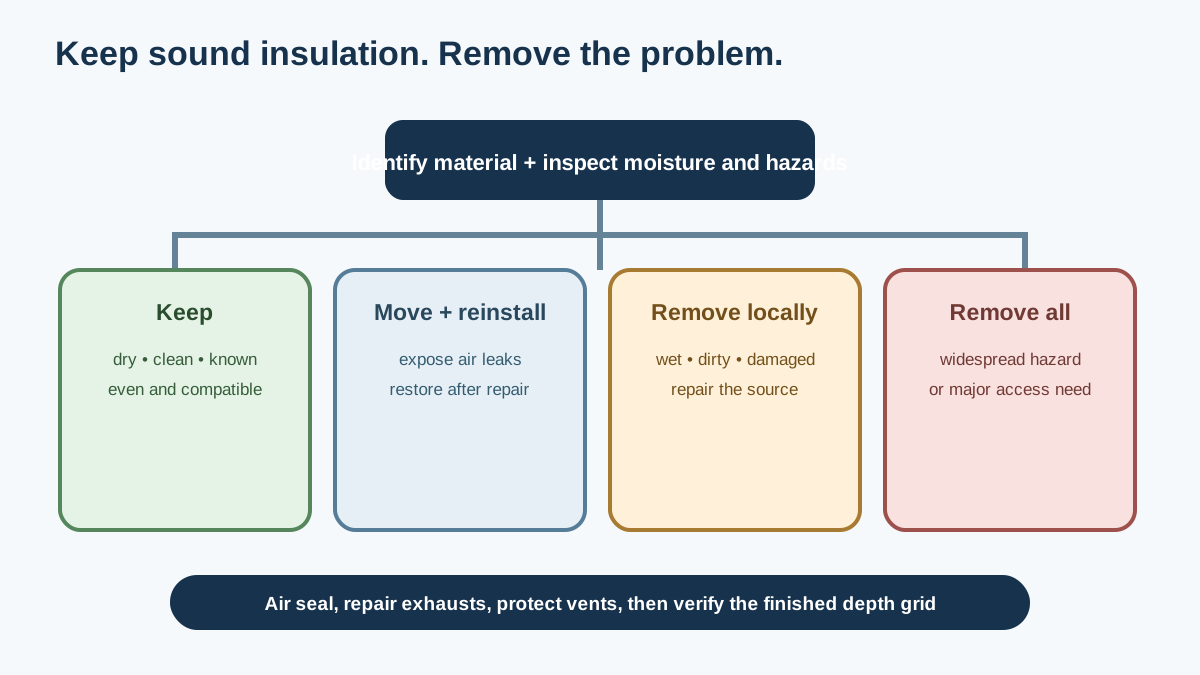
Use a Four-Outcome Decision
Keep it in place
Keep material that is dry, clean, identifiable, evenly distributed, and compatible with the new assembly. It can contribute to total thermal resistance.
Move and reinstall it
Temporarily move clean loose fill or batts to expose top plates, chases, fan housings, wiring penetrations, attic hatches, and other air-leakage points. Reinstall it after sealing if it remains in good condition.
Selectively remove it
Remove localized wet, contaminated, compressed, or inaccessible material while preserving sound areas. Selective removal can give trades access without turning the project into whole-attic disposal.
Remove it all
Full removal may be justified when contamination or moisture is widespread, material identity is unsafe or uncertain, the attic needs extensive electrical/structural repair, insulation is mixed with debris beyond practical separation, or a complete assembly conversion requires access.
The decision should be mapped by area. A wet valley below a roof leak does not automatically condemn clean insulation at the opposite eave.
Inspect Before Anyone Starts a Vacuum
Choose safe representative locations across every roof plane and addition. Record:
- material type and layering;
- depth at a grid of points;
- gaps, compression, wind washing, and storage platforms;
- staining, odor, dampness, frost, or corrosion;
- roof and plumbing leak evidence;
- animal or insect evidence;
- exhaust duct routes and outdoor terminations;
- recessed lights, wiring, flues, and heat sources;
- soffit baffles and vent paths;
- attic hatch and kneewall connections;
- HVAC ducts and equipment;
- previous air-sealing work.
Use a plan or photo mosaic. “About eight inches” at the hatch is not an attic survey.
Separate Roof Leaks From Condensation
Wet insulation needs a source diagnosis. Rain entry tends to track weather and localized flashing or roof defects. Winter condensation can frost large cold surfaces and wet material during thaw. Plumbing and exhaust leakage follow equipment use.
The attic frost guide provides a weather-and-location map. The ice-dam guide covers snowmelt and eave wetting.
Do not install new insulation over wet sheathing or a leaking fan duct. EPA recommends correcting the source and drying wet materials promptly to limit mold growth. Wood that is soft, delaminated, or unable to hold roofing fasteners needs professional assessment.
Air-Seal Before the Top-Up
ENERGY STAR and DOE guidance put air sealing before added attic insulation. The reason is practical: once more material covers the ceiling plane, bypasses become harder to reach and the roof deck becomes colder in winter.
Priority locations include:
- open wall and plumbing chases;
- dropped soffits and tray ceilings;
- partition top plates;
- wiring and pipe holes;
- bath and kitchen fan housings;
- attic hatches and pull-down stairs;
- duct boots and whole-house fans;
- kneewall floor openings;
- chimney and flue enclosures;
- recessed lights.
Large openings need rigid blocking with sealed edges. Flues need listed clearances and noncombustible details. Recessed lights must be identified before covers or insulation are installed. Photograph the air seal before it disappears.
Decide Whether Existing Batts Help
Batts work when they fit the cavity without gaps, compression, or air channels. Common problems include:
- paper facing in an unintended location;
- batts installed upside down or doubled with trapped facers;
- joist bays only partly filled;
- pieces cut around wires instead of split to fit;
- material pulled away from the ceiling;
- large cross-joist gaps;
- wind washing at eaves;
- storage boards compressing the insulation.
Clean batts can often be lifted for air sealing and reinstalled correctly. If loose fill is added over them, make sure the batts sit in full contact with the ceiling and do not create large voids. The new material should cover framing continuously to reduce thermal bridging.
Decide Whether Existing Loose Fill Helps
Cellulose and loose fiberglass can settle. Settling changes depth, but the material may still contribute useful R-value. Identify it, measure the average and low spots, and use manufacturer or program guidance for installed performance.
Do not “fluff” old material simply to increase depth readings. Installed mass and density matter. New blown insulation should be specified by coverage, bag count, settled thickness or installed density as appropriate, plus an even finished depth.
Mixed clean materials can sometimes remain, but the contractor must explain how the existing and added layers are counted. A nominal R-value based on the deepest point is not credible.
Build a Depth Grid
Divide the attic into zones: north/east/south/west eaves, center fields, additions, kneewalls, platforms, and HVAC areas. Measure at multiple safe points.
| Zone | Existing material | Low depth | Typical depth | Defects | Action |
|---|---|---|---|---|---|
| North eave | Cellulose | 2 in. | 5 in. | Wind washed | Add baffle/dam; restore coverage |
| Center | Cellulose | 7 in. | 8 in. | Clean and dry | Keep; add after sealing |
| Bath fan | Fiberglass | 0 in. | 6 in. | Duct leak and stain | Remove locally; repair and dry |
| Storage deck | Batts | 3 in. compressed | 3 in. | Platform | Raise/remove deck or redesign |
Depth markers help acceptance but must not be used to hide thin edges. Photograph eaves, corners, and platforms where coverage usually fails.
Protect Ventilation and Eave Coverage
For a vented attic, baffles keep the soffit intake path open and prevent wind from disturbing loose insulation. Insulation dams hold material away from vents and access points. The thermal layer should still cover the exterior wall top plate as fully as framing permits.
Do not push loose fill into soffits to chase a depth target. Do not add roof vents as a substitute for ceiling air sealing. Confirm that the attic is actually designed as vented; compact roofs insulated at the deck follow different moisture rules.
Ducts and Equipment Change the Scope
Seal attic duct joints and repair damage before burying or working around them. ENERGY STAR notes that properly sealed ducts on the attic floor may be covered with insulation, but equipment access, condensation, climate, duct material, and local requirements still matter.
Do not bury:
- air-handler service panels or filters;
- condensate pans, drains, switches, and traps;
- electrical boxes that require access;
- gas shutoffs or flue connections;
- unsupported or damaged flex ducts;
- labels and safety clearances.
If HVAC equipment dominates the attic, compare relocation or a designed roofline enclosure during equipment or roof replacement. A top-up cannot correct a leaky cabinet or hot supply plenum.
A Simple Increment Check
Suppose a 1,200-square-foot attic currently performs near an effective R-20 and the winter temperature difference is 45°F.
Existing conductive heat flow = 1,200 × 45 ÷ 20 = 2,700 Btu/h
At an effective R-50:
Improved heat flow = 1,200 × 45 ÷ 50 = 1,080 Btu/h
The simplified reduction is 1,620 Btu/h under that condition. It excludes air leakage, framing, ducts, solar heat, wind, and uneven coverage. Adding the same R-30 nominal amount to an already effective R-50 attic produces a smaller incremental reduction than correcting a nearly bare attic. See the R-value diminishing-returns guide before accepting a payback claim.
Compare Top-Up and Removal Quotes
| Scope item | Top-up quote should include | Removal quote should include |
|---|---|---|
| Existing condition | Material/depth/defect map | Exact reason and affected zones |
| Hazard screen | Vermiculite, waste, mold, wiring | Testing/containment requirements |
| Source repair | Water, exhaust, pest clearance | Same; removal alone is not repair |
| Air sealing | Named locations and materials | Full access plan and photos |
| Insulation | Product, mass/density/depth, coverage | Replacement specification |
| Ventilation | Baffles, dams, intake protection | Protection during removal/reinstall |
| HVAC/electrical | Access and damage prevention | Isolation and cleanup controls |
| Disposal | Only localized waste if needed | Quantity, legal destination, receipts |
| Verification | Depth grid and concealed photos | Cleanliness, repair, and final grid |
Whole-attic removal adds labor, disposal, and risk of disturbing contaminants. It can be worthwhile when it enables necessary work. It is wasteful when the material is sound and the sales pitch is simply “new is better.”
Commission the Finished Attic
- Inspect and photograph air sealing before the top-up.
- Confirm all exhausts terminate outdoors.
- Verify flue, light, wiring, and equipment clearances.
- Check baffles and insulation dams at every affected eave.
- Record product labels, bag count, and installed specification.
- Measure the finished depth grid, including low spots.
- Confirm the attic hatch is sealed, insulated, and operable.
- Check that ducts and service areas were not crushed or buried.
- Inspect after the next cold spell for frost or snowmelt anomalies.
- Inspect after a heavy rain and thaw for renewed wetting.
What the Removal Contractor Should Control
Insulation removal can spread dust and contaminants into occupied space. The work plan should name the isolation, access, equipment, cleanup, and waste route.
Ask:
- Will workers enter from an exterior gable or through the house?
- How will the attic hatch and nearby rooms be isolated?
- Is the vacuum and hose system suitable for the material?
- Where will exhaust air discharge?
- How will wiring, ducts, sprinklers, alarms, and ceiling finishes be protected?
- How will sharp debris and hidden fasteners be handled?
- What happens if vermiculite, droppings, mold, or wet wood appears?
- How will material be contained and transported?
- What visual or dust cleanup standard applies?
- Who documents the bare ceiling before new material arrives?
A powerful vacuum can pull on loose ceiling materials, damage flex ducts, or ingest live wiring. The operator needs a mapped attic and a stop-work rule. Removal should expose the assembly for inspection, not race directly into replacement.
Plan the Bare-Attic Inspection Window
When full or large-area removal is justified, use the brief access window. Schedule the right trades before new insulation covers the ceiling.
Envelope inspection
Trace the ceiling air barrier, wall transitions, eaves, kneewalls, dropped ceilings, chases, and addition joints. Mark every repair on a plan. Use blower-door-assisted tracing only after the operator addresses combustion and contamination safety.
Roof and structure
Inspect sheathing, rafters or trusses, fasteners, valleys, penetrations, and previous leak areas. Do not cut, drill, or modify truss members. Have questionable wood or connections reviewed before covering.
Electrical
Identify open splices, buried junction boxes, overheated fixtures, damaged cable, and abandoned equipment. Confirm clearances and covers for recessed lights. Electrical repairs come before insulation.
Exhaust and HVAC
Trace every bath, kitchen, and dryer duct to outdoors. Seal and support permitted ductwork, repair insulation, clear condensate paths, and preserve equipment service zones. Test fan delivery rather than relying on sound.
Pest exclusion
Close entry points with pest-resistant materials, but do not block intended roof ventilation. Remove food, nesting sources, and contaminated debris. Use licensed help where required.
Compare Added Insulation Materials
The new layer must fit the attic and installer capability.
Blown cellulose
Cellulose covers irregular framing and existing layers well. Specify product, installed mass, target settled depth or density, and eave control. Dust management and uniform distribution matter. It should not be piled against heat sources or block vents.
Loose-fill fiberglass
Loose fiberglass can provide broad coverage with relatively low weight. Installed performance still depends on mass, depth, wind protection, and even distribution. Confirm the manufacturer's coverage chart for the exact product.
Fiberglass or mineral-wool batts
Batts can work in accessible regular framing but are harder to fit around obstructions and across joists without gaps. A second layer laid perpendicular to joists can reduce framing bridges when seams are staggered and the material stays uncompressed.
Spray foam at the roof deck
Moving insulation from the ceiling to the roof deck changes the attic from vented/unconditioned to a compact or conditioned assembly. That is not a top-up. It needs roof-moisture assessment, vapor and condensation design, fire protection, HVAC/combustion review, and removal or treatment of the old floor insulation as the design requires.
Do not combine products solely because a contractor has leftovers. The assembly needs one clear boundary and compatible layers.
Storage Platforms and Walkways
Attic storage often compresses insulation to joist depth or removes it entirely. Simply blowing around a low platform leaves a large thermal bridge.
Options include:
- remove storage and restore continuous insulation;
- build a raised platform designed to carry loads without compressing the target depth;
- create a narrow service walkway only where equipment access requires it;
- move storage out of the attic;
- relocate equipment so the thermal layer can remain simple.
Never place loads on ceiling drywall or improvised blocks. A structural professional should review heavy storage, long spans, or truss framing. Keep required access dimensions, clearances, and electrical working space.
Eave and Hatch Details Decide Field Quality
The center of the attic is easy. The edges often fail.
At each eave, require a baffle where the vented design needs it, an insulation dam, and the fullest safe coverage over the exterior wall top plate. Shallow heel height may need a higher-R-value local detail or exterior/roof work to improve - not a blocked soffit.
At the hatch or stairs, require:
- durable weatherstripping;
- latches that compress the seal;
- an insulated cover that stays in position;
- an insulation dam high enough to retain loose fill;
- safe access and a visible depth marker;
- no exposed fasteners or falling material.
Pull-down stairs can be a large, complex opening. A manufactured insulated cover can help, but it must not block safe operation or create a fire issue.
Calculate Disposal Before Approving Full Removal
An attic's insulation volume can be large. For 1,200 square feet at an average 8-inch depth:
Volume = 1,200 × 8 ÷ 12 = 800 cubic feet
That is nearly 30 cubic yards before compaction. Actual weight and disposal volume depend on material, density, debris, and moisture. Ask the contractor to explain the quantity assumption, containment, local disposal route, and what happens if wet material increases weight.
This check exposes low bids that omit disposal or expect to leave bags onsite. It also shows why preserving clean, effective material can reduce cost and waste.
Seasonal Follow-Up
The first year should include three checks:
First cold spell
Look for attic frost, abnormal roof snowmelt, window condensation, and humidifier settings. A colder roof deck can expose missed air leaks.
First heavy rain or thaw
Recheck old leak areas, valleys, eaves, and penetrations. New insulation can hide a small drip, so use the photo map.
First hot period
Confirm bath ducts remain connected, soffit paths are open, HVAC equipment is serviceable, and no powered attic fan is pulling conditioned air through missed bypasses.
Record changes instead of waiting for a ceiling stain. The warranty should state who investigates coverage, moisture, and air-sealing defects.
Common Sales Claims to Challenge
- “All old insulation is dirty and inefficient.” Ask for mapped evidence of contamination or damage.
- “Removal is required for the warranty.” Ask for the written manufacturer or installer term and its technical reason.
- “The vacuum removes mold.” Removing insulation does not clean or repair wet wood.
- “More vents prevent every moisture problem.” Large indoor air or exhaust leaks can overwhelm ventilation.
- “R-60 everywhere.” Ask how eaves, platforms, ducts, and hatches meet the specification.
- “Bag count proves the job.” It supports quantity but not even coverage, density, or missed areas.
- “Foam the roof instead.” That is an assembly conversion needing design, not an interchangeable upgrade.
- “No need to inspect wiring.” Added insulation can conceal electrical hazards and access points.
Frequently Asked Questions
Does insulation become useless with age?
Not just because it is old. Moisture, contamination, compression, gaps, settling, and air movement determine field condition.
Can cellulose go over fiberglass?
It can in some assemblies when the fiberglass is dry, correctly fitted, and free of problematic facers or voids. The contractor should explain how layers and final performance are calculated.
Should mouse-contaminated insulation be removed?
Contaminated areas need safe removal and source control. Extent, pathogen risk, and cleanup method may require a qualified remediation or pest professional.
Can I vacuum the attic myself?
Not when material is suspect, contaminated, or near hazards. Vacuuming can aerosolize dust and fibers and damage wiring or ceilings. Identify the material first.
Should I remove insulation to air-seal?
Move or remove enough to expose each leakage location safely. Full removal is not always necessary.
Can new insulation cover mold stains?
No. Fix moisture, dry the assembly, and assess cleaning or replacement before covering it.
Is more insulation always worth it?
No. The first increments over a poorly insulated ceiling usually reduce more heat flow than later increments. Air sealing and coverage defects may be the better investment.
Do I need a blower-door test?
It is useful when leakage diagnosis or pre/post verification matters, especially in a complex attic. It is not a substitute for the material and moisture inspection.
What to Read Next
Use the attic frost and condensation guide to decide whether a dark or wet area needs roof repair, exhaust repair, or ceiling air sealing before anyone adds insulation.
Sources and Verification
Attic insulation and air-sealing guidance uses ENERGY STAR's attic upgrade guidance, DOE Building Science Education, and the PNNL attic air-sealing and insulation checklist. Moisture and suspect-material precautions use EPA mold guidance and EPA asbestos guidance. Test materials before disturbance when their identity is uncertain; the site assembly and local rules govern.
Sources and Verification
Editorial Review
EnergyBS Editorial Team
EnergyBS publishes practical homeowner guides. Important program, product, and cost claims should be checked against the linked source and local project documents before you commit to work.
Related Guides
View All ArticlesAttic Frost and Condensation 2026 Tool (Guide & Data)
Separate roof leaks from winter condensation, trace indoorair and exhaust paths, assess wet sheathing and insulation, and commission a safe attic repair.
Ice Dam Prevention
Find the heat and moisture paths behind recurring ice dams, choose a durable attic or compactroof repair, and verify the work instead of treating icicles alone.
How Much Insulation Is Enough? RValue, Heat Loss, and
Choose an insulation target from climate guidance, existing wholeassembly performance, air leakage, moisture risk, installation access, and the marginal cost of each added Rvalue.