Water Heater Leaking? Find the Source Before You Repair or Replace
A safetyfirst leaksource map for water around a tank or tankless heater, separating plumbing connections, condensate, relief discharge, drain valve, appliance leaks, recirculation, venting moisture, and tankshell failure.
The Short Answer
Short Answer: Water beside a heater does not prove the tank shell leaks. Stop for gas odor, smoke, scalding discharge, bulging/corrosion, water near live electrical parts, or rapidly increasing flow. Protect people and property, follow the manufacturer's shutdown instructions if safe, and identify the highest wet point without dismantling the appliance. Common sources include inlet/outlet fittings, nearby plumbing, condensate, relief piping, drain valve, recirculation, tankless connections, and the tank itself.
An actively leaking tank shell is generally a replacement event, while an external valve or connection may be repairable. A relief valve that discharges is a safety/pressure symptom, not a drain to cap. Condensate from heat-pump or high-efficiency equipment needs a different diagnosis from potable-water leakage.
Emergency Triage
Leave and call the appropriate emergency/gas authority for
- gas odor or suspected fuel leak;
- combustion fumes, soot, or dangerous vent condition;
- fire, smoke, or sparking.
Do not operate switches or search for a gas leak with a flame.
Stop use and request urgent qualified service for
- hot water or steam discharging from the relief system;
- tank bulging, splitting, or heavy structural corrosion;
- water reaching electrical connections, controls, receptacles, or panel;
- repeated breaker trips;
- a rapidly growing leak that threatens flooding;
- unstable heater, damaged supports, or seismic restraint failure;
- error/shutdown notice in the exact manual.
Do not touch standing water that may be energized. Do not plug or cap a temperature-and-pressure relief valve or its discharge pipe. Do not close valves in a way that traps heating water without required expansion and relief protection.
For a manageable non-hazardous leak, follow the exact manufacturer's shutdown instructions and arrange professional help. Gas, electricity, high-temperature water, pressure, and heavy tanks make improvisation risky.
Protect the Property Without Destroying Evidence
If it is safe:
- move belongings away;
- use pans or towels only where they cannot contact hot/electrical parts or block combustion air;
- photograph the entire installation before wiping;
- mark water edges with tape and time;
- record meter reading using the utility's safe method;
- note whether leak occurs only during heating, draws, recirculation, rain, HVAC cooling, or drain operation;
- preserve error codes;
- notify landlord, condominium, insurer, or emergency restoration provider as required.
Do not apply sealant randomly. Water often travels along piping, insulation, jackets, or floors and appears far from its origin. Cleaning every surface before documenting can erase the path.
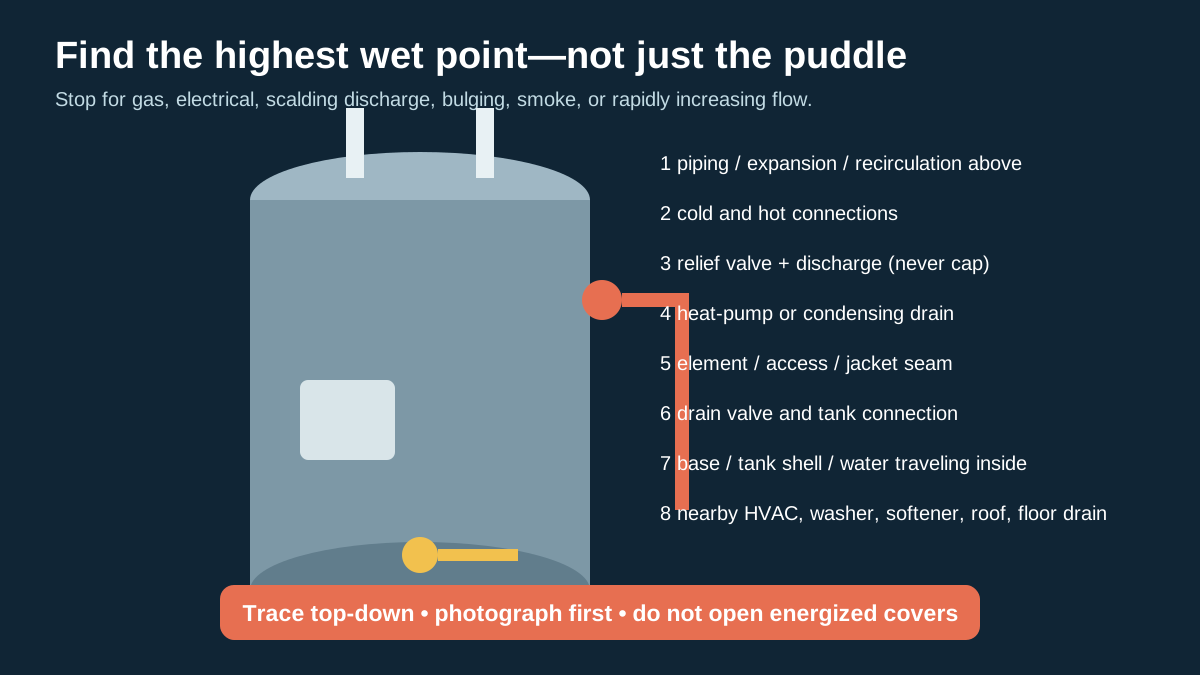
The Highest-Wet-Point Method
With the appliance safely off under its instructions when needed, inspect visually from top down without removing energized or sealed covers.
- ceiling, wall, roof/vent area, and piping above;
- cold inlet and hot outlet connections;
- expansion tank, shutoff, unions, flex connectors, and recirculation;
- relief valve body and discharge line;
- heat-pump condensate pan/hose or condensing drain;
- tankless connections and service valves;
- drain valve;
- accessible jacket seams, access covers, and base;
- floor drain, washer, furnace/AC condensate, softener, boiler, plumbing, and foundation nearby.
The first/highest confirmed wet point is stronger evidence than the final puddle location.
Source A: Cold and Hot Water Connections
Top or side connections can leak at:
- threaded nipples;
- unions or flex connectors;
- soldered/pressed joints;
- shutoff valve stem/body;
- dielectric connection;
- recirculation return;
- expansion tank connection;
- nearby piping that drips onto the heater.
Clues include mineral tracks, green/white staining, rust below a fitting, damp insulation, or a leak that increases during flow/pressure changes.
Do not tighten blindly. Corroded nipples, thin pipe, unsupported expansion tanks, incompatible metals, heat, gas/vent/electrical clearances, and hidden damage can turn a small leak into a break. A plumber should isolate the exact joint and evaluate downstream corrosion.
Source B: Temperature-and-Pressure Relief System
The T&P valve is a safety device. Water at the valve or discharge termination may reflect:
- thermal expansion in a closed system;
- excessive supply pressure;
- high water temperature;
- debris or valve failure;
- improper installation;
- intermittent discharge that evaporates before inspection.
Never cap the outlet, install a shutoff between valve and tank, reduce or reroute discharge casually, or assume replacing the valve alone fixes the cause. A qualified professional should measure pressure/temperature, inspect expansion control, and follow the valve/heater/local requirements.
Record when discharge occurs: during every heat cycle, overnight, after long draws, continuously, or only after testing. Photograph termination and staining without placing yourself in a scald path.
Source C: Drain Valve
The drain valve near the bottom can leak at the outlet, body, stem, or tank connection. A cap may hide a valve that does not seal; it is not a universal repair and can conceal active leakage.
Questions:
- Was the tank recently drained or flushed?
- Is sediment preventing closure?
- Is the valve cracked or corroded?
- Is water coming from the threaded tank connection or only the outlet?
- Can the tank be safely isolated and drained for replacement?
- Does the exact manual specify a service procedure?
Old neglected tanks can develop problems during draining. Use qualified service when valve condition, scalding, electrical/gas shutdown, floor drainage, or tank age raises risk.
Source D: Condensate
Heat-pump water heaters remove moisture from air and need condensate drainage. High-efficiency condensing gas equipment also produces condensate. Nearby HVAC, dehumidifiers, or pipes can add water.
Inspect the approved owner-visible path for:
- full or mis-seated pan/tank;
- kinked, displaced, frozen, or blocked hose;
- failed pump or alarm;
- loose connection;
- improper slope/termination;
- sweating cold surfaces;
- water appearing only during compressor/burner operation;
- shared drain backup.
Condensate can be acidic in some combustion equipment and requires specified materials/neutralization where applicable. Do not assume clear water is harmless potable water. Follow the model instructions and local plumbing requirements.
For heat-pump equipment, preserve filter/airflow, ambient, condensate, and error-code observations. The heat-pump water-heater guide provides installation-readiness questions.
Source E: Tank Jacket, Seam, or Base
Water emerging from the insulated jacket, element/burner access area, welded seam, or base can originate from:
- tank-shell corrosion/failure;
- a top connection traveling inside the jacket;
- element gasket or internal fitting;
- condensation;
- relief or drain leakage following the jacket;
- nearby water entering beneath the tank.
Do not remove energized access covers or insulation. A plumber/qualified technician should prove the source. If the pressure vessel itself leaks, patching the exterior jacket does not repair the tank and replacement is generally required.
Heavy rust at the base, repeated internal leakage, tank age, and warranty status inform urgency, but age alone does not locate the source.
Source F: Electric Element or Access Area
Electric storage heaters may leak at an element gasket or connection area. Water can contact high voltage.
Do not remove covers, touch wet insulation, energize for testing, or assume a gasket replacement is simple. Qualified service should isolate power, verify it is off, inspect tank/element threads and corrosion, replace components correctly, fill/purge fully, and confirm no leaks before energizing. Energizing an empty or partly filled electric heater can damage elements.
If the tank opening is severely corroded, a nominal gasket repair may not be durable. Request repair-versus-replacement reasoning.
Source G: Gas Burner, Vent, and Combustion Moisture
Water near a gas heater can come from plumbing, tank failure, condensation, rain/vent entry, or combustion-related conditions. Soot, corrosion, flue condensation, abnormal flame, or vent damage requires qualified gas/combustion evaluation.
Do not block combustion openings, modify venting, or relight repeatedly. A cold tank can temporarily condense moisture under some operating conditions, but persistent water, corrosion, or combustion symptoms are not a homeowner diagnosis.
Source H: Tankless Heater
For tankless equipment, map:
- cold inlet/hot outlet;
- isolation/service valves;
- relief valve and discharge;
- condensate drain/neutralizer for condensing models;
- internal heat exchanger/cabinet;
- recirculation connections;
- vent or rain entry;
- freeze damage;
- nearby plumbing.
Record error codes and whether leakage occurs during flow, recirculation, freeze weather, or standby. Do not open the cabinet around gas, electricity, combustion, or hot pressurized water. Internal heat-exchanger leakage may require major repair or replacement depending on model, warranty, and cause.
Source I: The Water Is Not From the Heater
Common look-alikes include:
- furnace/air-conditioner condensate;
- dehumidifier or heat-pump drain;
- washing machine hoses/drain;
- softener regeneration or bypass;
- boiler/hydronic valve;
- foundation seepage;
- roof/plumbing leak above;
- floor drain backup;
- cold-water pipe condensation.
Dry and isolate observations safely, then watch timing. Rain-only, cooling-only, laundry-only, or regeneration-only patterns can redirect the service call.
Meter and Leak Evidence
EPA WaterSense encourages checking household leaks. When every intentional water use is off and the utility's procedure permits, record the meter/leak indicator at two times. Movement suggests water flow but does not locate it and may reflect ice makers, humidifiers, softeners, toilets, irrigation, or automatic appliances.
Do not close the main supply if doing so conflicts with fire protection, hydronic equipment, occupancy safety, building rules, or heater instructions. A plumber can perform isolation tests safely.
Repair or Replace Decision
Repair is more plausible when
- source is an accessible external connection, valve, approved condensate part, or replaceable component;
- pressure vessel/tank opening is sound;
- cause is identified and corrected;
- repair is permitted and parts are available;
- warranty/labor economics are favorable;
- water damage and code corrections are included.
Replacement is more plausible when
- tank shell/pressure vessel leaks;
- structural corrosion or unsafe condition exists;
- repeated internal leaks indicate deterioration;
- heat exchanger failure and total repair cost are unfavorable;
- parts/support are unavailable;
- required fuel, vent, drain, electrical, or capacity changes justify a planned replacement.
Do not let an emergency force a like-for-like choice without at least recording options. ENERGY STAR recommends planning before failure because rushed replacements limit efficient choices. Use the fuel-type cost guide and tankless versus tank guide for a stable temporary situation; active unsafe leakage needs priority response.
Three Worked Leak Patterns
Pattern 1: Puddle appears after every heat cycle
A six-year-old electric storage heater has a small puddle each morning. The top is dry. A mineral trail begins at the T&P discharge termination. The valve is not capped, and there is no obvious tank-jacket water.
The useful response is not to replace the valve blindly. A plumber can measure static and dynamic water pressure, observe pressure as the tank heats, inspect the expansion arrangement and valve installation, verify temperature, and determine whether the valve itself is fouled or defective. In a closed plumbing system, heated water expansion may raise pressure if not properly accommodated.
The homeowner should record time, heating cycle, pressure information provided by the plumber, discharge volume, and whether recent backflow, pressure-reducing, meter, or expansion work occurred. The repair needs a post-heat-cycle verification.
Pattern 2: Water follows a top connection into the jacket
A heater appears to leak from the base. Before replacement, the plumber finds a slow hot-outlet connection leak. Water travels down inside the outer jacket and exits at the bottom. The pressure vessel is not yet proven failed.
Repair feasibility depends on connection corrosion, tank opening condition, access, age, and damage to insulation or electrical components. Simply tightening a corroded fitting could break it. The quote should include isolation, connection repair, inspection of affected areas, safe drying/reassembly, leak testing, and a contingency if the tank opening is damaged.
This pattern shows why “water at the bottom equals tank leak” is unreliable. The highest wet point changed the decision.
Pattern 3: Heat-pump condensate mimics a tank leak
Water appears only on humid cooling-season days while the heat-pump compressor runs. Potable-water connections are dry. The condensate hose has lifted out of its approved termination and the pan overflows.
The service scope should correct and secure the drain under the exact instructions, verify slope/height and any pump, inspect for blockage and water damage, test overflow/error behavior, and run the unit. That is different from replacing the tank. If water reached electrical or insulation areas, qualified inspection is still necessary.
Leak Rate and Timing Log
Do not risk scalding or electrical contact to collect water. When safe, place an appropriate dry indicator near—not inside—hazardous areas and photograph spread at fixed times.
| Time | Heater state | Intentional water use | Leak location | Approximate change | Weather/other equipment |
|---|
Patterns can reveal:
- continuous with supply on: pressurized potable connection or tank leak;
- only during heating: expansion, relief, condensate, warming joint;
- only during hot draw: outlet, mixing, recirculation, flow-dependent connection;
- only during rain: roof/vent/exterior entry;
- only during HVAC cooling: nearby condensate;
- only during softener regeneration or laundry: another appliance/drain;
- after shutdown but tank full: stored tank or gravity drainage remains possible.
Timing does not replace physical source verification. Water can be intermittent and travel along hidden surfaces.
Pan, Drain, Detector, and Automatic Shutoff Planning
Containment cannot make an unsafe or leaking heater acceptable, but good design reduces damage.
For a replacement or repaired installation, evaluate:
- pan material and size permitted for the heater;
- unobstructed drain to an approved visible or safe location;
- drain capacity and slope;
- floor drain condition and risk management;
- leak detector locations at likely sources, not only the far edge of the room;
- audible/local alarm when internet is unavailable;
- automatic shutoff compatibility and failure mode;
- electrical backup or notification during outage;
- ability to test without releasing large water volumes;
- condominium/landlord notification;
- access for inspection and cleaning.
An automatic valve may reduce incoming water after detection, but it does not empty a full tank and must not interfere with fire protection, hydronic systems, relief, or safe heater operation. Have the plumbing/control design reviewed for the actual system.
Do not terminate a pan or relief discharge into a hidden place where leaks remain unnoticed. Relief piping and pan drainage serve different functions and should not be casually combined.
Insurance and Restoration Boundaries
Coverage and notice obligations vary. Contact the insurer, landlord, or condominium promptly when damage may be material. Preserve evidence before demolition where safe, but do not delay emergency drying or hazard removal.
Ask restoration providers to document:
- initial moisture map;
- affected materials and water path;
- equipment placement and drying readings;
- demolition basis;
- possible asbestos/lead or other regulated material before disturbance;
- contents handling;
- final dry standard and verification;
- photographs and dates.
Water can enter wall cavities, under flooring, and into insulation beyond the visible puddle. Conversely, broad demolition should have a documented moisture or contamination basis. Do not energize wet electrical equipment or close damp cavities.
If another unit or common property is involved, document notification and access coordination. Avoid assigning fault in the technical record; record observations, diagnosis, and actions.
Repair Quote Acceptance Checklist
- Exact leak source is identified, not inferred from puddle location.
- Gas, electrical, pressure, temperature, and structural hazards are addressed.
- Cause is separated from the failed part.
- Tank-shell condition and opening corrosion are assessed where relevant.
- Expansion/pressure is evaluated for relief discharge.
- Condensate and potable-water paths are distinguished.
- Replacement parts and connection methods match the appliance/system.
- Water-damaged insulation, controls, floors, and finishes are evaluated.
- Permit/inspection needs are stated.
- Contingency price exists if disassembly reveals tank damage.
- Post-repair leak test covers both standby and operating conditions.
- Final settings, pressure/temperature findings, and warranty are documented.
Avoid accepting “stop leak” chemicals or external tank patching without explicit manufacturer approval and a qualified safety basis. Products placed in potable water can raise health, warranty, and downstream-equipment issues.
Preventive Inspection Without Over-Maintaining
At the interval in the exact manual and local service plan, visually inspect accessible:
- top/side connections for staining or corrosion;
- shutoff and expansion components;
- relief valve/discharge condition without unsafe activation;
- drain valve;
- pan, detector, and drain;
- condensate path;
- vent/combustion exterior signs for gas equipment;
- heat-pump filter and drain under its manual;
- base and nearby floor;
- recirculation and mixing connections.
Do not operate a relief valve, drain an old tank, remove an anode, or disturb corroded fittings solely because a generic annual checklist says so. Manufacturer instructions, water chemistry, prior service, valve condition, safe discharge, and professional judgment matter. Preventive maintenance should reduce risk, not create a new leak.
The companion anode and maintenance guide builds a model-specific schedule and contingency.
Replacement Quote Scope
Require:
- exact model, storage/FHR or tankless flow basis;
- fuel/electrical/vent/air/condensate scope;
- expansion and relief/discharge design;
- shutoffs, pan, drain, leak detection/automatic shutoff if selected;
- seismic restraint where required;
- permits and inspection;
- removal, refrigerant handling for HPWH where applicable, and disposal;
- floor/wall/roof/finish restoration;
- warranty registration and labor terms;
- commissioning, temperature, leak, combustion/electrical checks;
- owner training and documentation.
Avoid “bring to code as needed” without identified allowances. A leak event is the time to fix drain and containment weaknesses, not merely swap the tank.
Water-Damage Record
Document:
- discovery time and photos/video;
- highest wet point and flow condition;
- meter readings;
- shutdown/isolation actions and by whom;
- plumber diagnosis;
- affected flooring, drywall, insulation, contents, and adjacent units;
- drying/restoration measurements;
- invoices and replaced parts;
- insurer/landlord/condominium communication;
- final leak and operation tests.
Do not discard failed components or the old heater until warranty/insurance needs are understood and safe removal is arranged.
Sources and Verification
- Rheem's technical bulletin library and example use-and-care manual demonstrate manufacturer-specific relief, drain, temperature, maintenance, and troubleshooting requirements.
- EPA WaterSense's Fix a Leak guidance supports meter-based leak screening and prompt repair of household water loss.
- ENERGY STAR's water-heater buying and installation guidance provides official replacement-planning context after failure is confirmed.
The cited manufacturer documents are examples, not repair instructions for every heater. Use the exact model manual, qualified plumbing/gas/electrical service, and local requirements.
Frequently Asked Questions
Does water under the heater mean the tank is bad?
No. Trace the highest wet point. Connections, relief discharge, drain valve, condensate, nearby plumbing, and the tank can all create a puddle.
Can I cap a dripping relief-valve pipe?
No. The relief system is a safety device. Manufacturer use-and-care instructions such as Rheem's example manual warn against blocking relief discharge. Get qualified diagnosis of pressure, temperature, expansion, debris, or valve conditions.
Can a leaking water heater explode?
Water alone does not prove an explosion risk, but pressure/temperature, relief, gas, combustion, electrical, and structural symptoms can be hazardous. Stop for the safety signs and do not defeat controls.
Why does it leak only while heating?
Thermal expansion, relief discharge, condensate, opening of a warm joint, or tank behavior may be involved. Record the timing and have pressure/temperature and source evaluated.
Is condensate normal?
Condensate is expected for heat-pump and condensing equipment only through its designed collection/drain path. Water outside that path, backup, or overflow needs correction.
Can a drain-valve cap stop the leak?
It may conceal a valve outlet drip but does not repair a cracked body, tank connection, or underlying condition, and may complicate service. Use the manufacturer/qualified repair approach.
Should I replace an old heater if an external fitting leaks?
Not automatically. Evaluate the source, tank condition, corrosion, warranty, repair durability, capacity, and total retrofit economics. If replacement is confirmed, ENERGY STAR's buying and installation guidance provides official planning context.
What to Read Next
If capacity was also declining, use the hot-water-runs-out diagnostic. For a sound storage tank, build a model-specific care record with the anode rod and maintenance guide. If replacement is confirmed, compare the heat-pump water-heater site requirements before defaulting to the old technology.
Sources and Verification
Editorial Review
EnergyBS Editorial Team
EnergyBS publishes practical homeowner guides. Important program, product, and cost claims should be checked against the linked source and local project documents before you commit to work.
Related Guides
View All ArticlesWhy Hot Water Runs Out Fast: A Draw, Recovery, and Mixing Diagnosis
A homeowner diagnostic for short hotwater supply that separates fixture flow, overlapping draws, tank firsthour capacity, recovery, thermostat/mode, diptube and element faults, mixing valves, leaks, piping loss, and sediment.
Water Heater Anode Rod and Maintenance: Build a TankLife Service Plan
A modelspecific waterheater maintenance plan covering anode type and depletion, water chemistry, access, flushing, relief and leak checks, heatpump filters/condensate, tankless scale service, records, and replacement contingencies.
Heat Pump Water Heater Guide: Savings and Installation (2026)
Size and specify a heat pump water heater using firsthour rating, installation air, electrical capacity, condensate routing, operating modes, noise, and local energy prices.