Dishwasher Not Drying? Diagnose Plastics, Rinse Aid, Heat, and Venting
A controlledload dishwasher drying diagnostic that separates expected wet plastics and pooled water from cycle, rinseaid, loading, inlettemperature, dooropening, fan, vent, heater, sensor, and installation faults.
The Short Answer
Short Answer: Diagnose a wet dishwasher with one controlled load. Record exact model, cycle and dry option, rinse-aid status, item materials, loading angle, incoming hot-water condition, end-of-cycle warmth, error lights, and whether water pools only in concave items. Wet plastic can be normal because it stores less heat than ceramic, glass, or metal. Whole loads that remain cool and wet, new error codes, trips, or a drying system that suddenly changed need model-specific service.
Do not touch a heating element, remove live panels, bypass a door latch, or reach into hidden sharp/glass debris. Use owner checks permitted by the exact manual. Breaker trips, burning odor, damaged wiring, smoke, or active leakage are stop-use issues.
First Identify the Drying Design
Dishwashers can dry using one or more of:
- exposed or concealed resistance heat;
- residual heat from a hot final rinse;
- condensation onto a cooler stainless tub surface;
- fan-assisted venting;
- automatic door opening;
- mineral/adsorption systems in some designs;
- rinse aid that helps water sheet away;
- extended time after the wash phase.
A model without an exposed heater is not missing a part. A plastic tub and stainless condensation-dry tub may behave differently. Download the exact use-and-care guide before applying a generic “heating element” fix.
The Drying Evidence Path
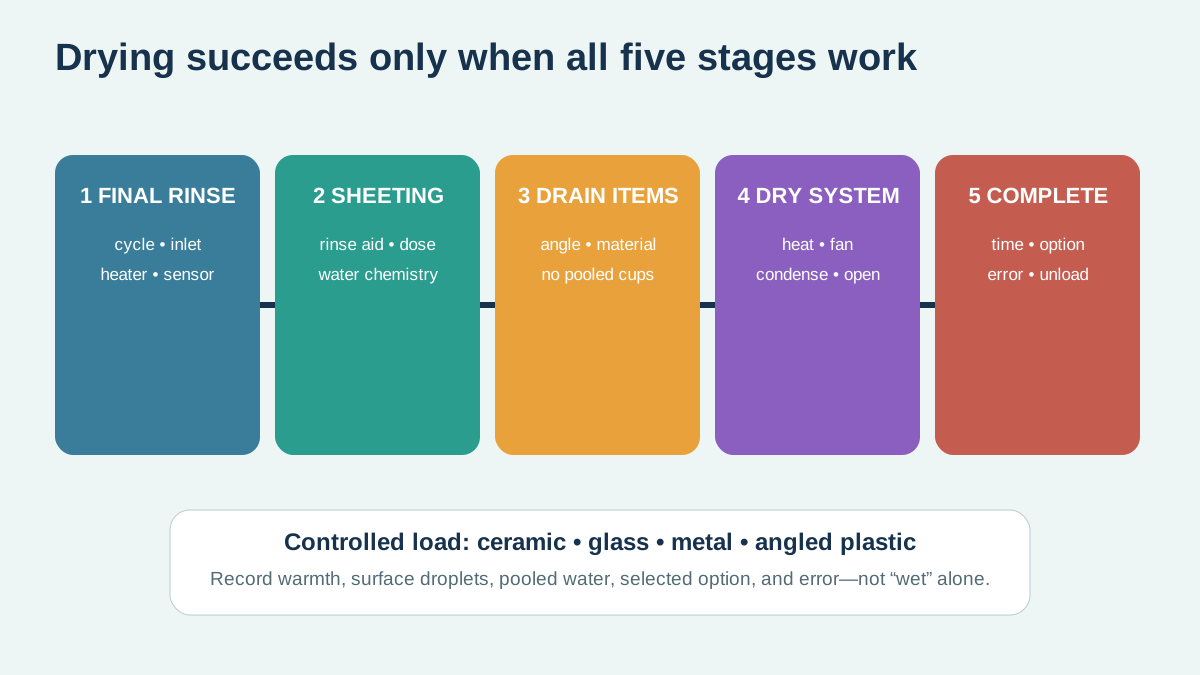
The final result depends on five linked conditions:
- sufficient final-rinse conditions under the selected program;
- rinse chemistry and water sheeting;
- items arranged so water drains instead of pools;
- the model's heat, fan, vent, condensation, or door-open process;
- adequate time and correct cycle completion.
Create a Controlled Test Load
Use clean, dishwasher-safe items that represent different materials:
- one ceramic plate;
- one glass;
- one stainless utensil;
- one lightweight plastic container on the approved rack;
- one plastic lid angled to drain;
- no deep cup placed flat;
- no wood, delicate, non-dishwasher-safe plastic, insulated item, sharp hazard, or item blocking the dispenser/arms.
Use the manual's normal cycle and standard drying option. Fill rinse aid if the model calls for it and the household accepts the product instructions. Do not change detergent, rinse aid dose, dry setting, inlet temperature, and loading simultaneously.
Record:
| Field | Test result |
|---|---|
| Model and drying design | |
| Cycle and options | |
| Rinse-aid indicator/setting | |
| Detergent and dose | |
| Incoming hot-water observation | |
| End-of-cycle error/light | |
| Tub and dishes warm/cool | |
| Ceramic/glass result | |
| Plastic result | |
| Pooled versus surface droplets | |
| Door opening/fan behavior |
Pattern Matrix
| Pattern | First branch |
|---|---|
| Plastics wet; ceramic/glass mostly dry | Material heat storage, geometry, rinse aid |
| Cup bottoms hold puddles | Loading angle and item shape |
| Everything warm but wet | Dry option, rinse aid, vent/door/fan, unloading timing |
| Everything cool and wet | Cycle, inlet/final-rinse heat, heater/control/service |
| Drying changed suddenly | Setting, rinse-aid empty, error, component or installation |
| New machine never dried well | Design expectation, commissioning, settings, inlet, loading |
| Door does not auto-open | Option, obstruction, installation, latch/control |
| Condensation on counters/cabinet | Vent/door path, installation, room and finish protection |
This matrix prioritizes evidence; it does not name a failed part.
Why Plastics Stay Wet
Plastic generally has lower thermal mass than ceramic, glass, and metal. It cools faster after the hot rinse, leaving less stored heat to evaporate droplets. Lightweight items can also flip or collect water in rims.
Improve the test by:
- placing plastic only where the manual permits;
- securing light items;
- angling concave surfaces;
- avoiding nested lids and containers;
- using the recommended rinse aid and dry option;
- allowing the model's complete dry phase;
- opening only as instructed after cycle completion.
Do not place heat-sensitive plastic near an exposed heater unless approved. “Dishwasher safe” markings and manual rack guidance matter.
Loading: Drainage Is Part of Drying
Water cannot evaporate efficiently from a cup-shaped pool. Check:
- bowls and cups face downward/angle toward spray and drainage;
- rims do not hold a trapped ring;
- utensils do not nest;
- large trays do not block air, vent, dispenser, or auto-open door;
- spray arms rotate freely before starting;
- items do not flip and fill;
- rack tines support rather than risk water;
- third-rack utensils follow model arrangement.
The existing dishwasher loading science guide maps spray and soil removal; use the same pre-start spin and obstruction check for drying.
Rinse Aid: Change One Step at a Time
Manufacturer guidance explains that rinse aid helps water sheet from surfaces instead of forming droplets. Verify:
- dispenser is filled/closed;
- indicator works as described;
- dose setting matches water conditions;
- no visible spill causes foaming;
- product is suitable for the model and household;
- change is tested over several comparable loads.
Too little can leave droplets and spots; more is not infinitely better. Adjust one increment under the manual and observe film, spots, odor, and dryness. Do not put ordinary dish soap in a rinse-aid dispenser.
Households avoiding rinse aid should set expectations according to their model and item mix rather than assuming a service fault.
Cycle and Dry Option
Eco, quick, light, air-dry, no-heat, normal, sanitize, extended, fan, and auto-open options do different work. Some dry options add time or electricity; others rely on residual heat and time.
Record the exact selected lights before start and after completion. Check whether:
- a power interruption reset the default;
- control lock or app changed an option;
- quick cycle omits or reduces drying;
- delayed start completed long before unloading;
- auto-open was disabled;
- sanitize completion indicator signals a temperature condition on the exact model;
- cycle was interrupted before drying.
Do not use sanitize as a permanent drying workaround without considering item safety, energy, and manual guidance.
Incoming Hot Water and Final Rinse
Some dishwashers rely partly on household hot water and then boost temperature. Others handle inlet conditions differently. Use the exact installation requirement.
If permitted by the manufacturer, measure kitchen hot-water performance safely before the test:
- time to reach stable hot temperature;
- delivered temperature with a proper thermometer;
- whether another fixture/appliance draws simultaneously;
- distance from water heater;
- recent heater/setpoint/mixing change.
Do not raise the water heater just to dry dishes. Scald protection and household hot-water design come first. The hot-water-runs-out guide separates capacity and temperature problems.
Door-Open and Fan Drying
If the model automatically opens the door, verify the option, installation clearance, latch, counter/cabinet protection, and absence of an obstruction. Do not force the mechanism or defeat the latch.
For manual door opening, follow the exact manual. Opening too early can release hot steam toward faces, children, cabinets, or counters. Opening when the manufacturer recommends may help moisture escape.
Fan systems should operate according to the selected cycle. New noise, no expected fan, error, moisture damage, or repeated incomplete behavior deserves service; do not dismantle the door/control.
Heater, Sensor, and Control Branch
Whole loads that remain cool, a failed sanitize/temperature indicator under the model's test, error codes, trips, or sudden performance loss can indicate a heat, sensor, pump, wiring, control, or supply issue.
Owner evidence:
- exact error code/light pattern;
- whether washing performance also declined;
- end-of-cycle warmth without touching heater;
- selected cycle/options;
- repeat controlled-load result;
- recent installation, outage, repair, or plumbing change;
- breaker/trip history.
Electrical measurements, heater continuity, live voltage, door disassembly, control diagnosis, and internal pump/fan work belong to qualified service. Do not repeatedly reset a tripping breaker.
Water Quality, Detergent, and Film
Hardness, detergent dose, rinse aid, softening, and temperature can make wet items appear spotted or filmed. Separate “not dry” from “dry but spotted.”
Record municipal/well hardness or qualified test, softener setting, detergent form/dose, and film type. Do not mix cleaning chemicals. Follow the model and product labels for cleaning cycles.
A clogged filter or weak wash can leave soil/film that complicates drying. If smell or standing water is present, use the dishwasher drain and odor guide.
Energy Tradeoff
ENERGY STAR notes that dishwasher energy includes operating the machine, heating water, and drying. Heated/extended dry may use more energy than residual or air drying, but rewashing a poorly completed load also costs energy and water.
Compare three controlled scenarios:
| Scenario | Load | Cycle/dry | Result | Redry/towel time | Energy evidence |
|---|---|---|---|---|---|
| Standard dry | Same | ||||
| Extended/heated | Same | ||||
| No-heat/door method | Same |
Use model data or qualified/appropriate circuit measurement; do not place an ordinary plug monitor on a hardwired or incompatible appliance. Select the lowest-energy option that meets hygiene, item, moisture, and household needs.
Installation Checks for a New Dishwasher
Drying complaints can reflect installation:
- unit not level, causing pooling or door issues;
- drain hose or air gap incorrect;
- hot supply or shutoff problem;
- circuit/supply issue;
- insulation removed or vent blocked;
- auto-open door hits counter/handle/cabinet;
- steam discharges against vulnerable finish;
- racks or door bind because cabinet is distorted;
- shipping/packing component remains.
Use the installation manual and installer. Do not loosen water/electrical connections as an owner test.
Repair or Replace
Repair settings, loading, rinse aid, owner-cleanable filters, or a confirmed replaceable component when safe and economical. Consider replacement when diagnosis identifies major control, pump, tub, wiring, or repeated faults; parts/support are unavailable; leakage or electrical safety is material; or installed repair cost is unfavorable relative to a suitable efficient model.
Do not replace solely because plastic is wet. Use the dishwasher repair-versus-replace guide to compare model energy/water, installation, expected use, warranty, and repair evidence.
Seven-Load Verification
Test normal variations: mixed plates, plastics, glass, cookware, light soil, heavy soil, and one eco cycle. Log dry option, rinse aid, loading, end warmth, pooled items, spots, and errors.
If only plastics remain wet, behavior may be expected. If all materials degrade over the week, escalate with evidence. If one cycle fails, use a better-matched program rather than assuming hardware failure.
Three Worked Drying Patterns
Pattern 1: Only cups and plastic lids are wet
Ceramic plates, stainless utensils, and glasses finish warm and mostly dry. The undersides of mugs hold small pools, and thin plastic lids flip during washing. There is no error and drying has always behaved this way.
The evidence points first to item geometry, material, and loading—not a failed heater. The household can angle cups, secure lightweight lids on the permitted rack, fill/adjust rinse aid under the manual, and compare the normal versus extended dry option. Replacing a heating component would not remove a cup-bottom reservoir.
Pattern 2: Every item suddenly ends cool and wet
The same normal cycle, load, detergent, and rinse aid worked last month. Now glass, ceramic, and stainless items are cool, the expected completion indicator is absent or blinking, and a repeat controlled load behaves the same.
This pattern deserves model-specific service. The technician can evaluate water fill, circulation, temperature sensing, heater/drying design, electrical supply, controls, and error history. The homeowner should preserve cycle/options, inlet observation, end state, code/light, outage/repair history, and whether washing also declined. Repeatedly selecting sanitize or resetting protection is not a diagnosis.
Pattern 3: New auto-open model wets the counter edge
Dishes dry, but the door opens at the end and steam condenses beneath a vulnerable wood counter. The machine is slightly proud of the cabinet and the protective installation detail is missing or incomplete.
The drying technology may be working correctly while the installation is not. The installer should verify placement, level, door path, required vapor protection, counter/cabinet compatibility, clearances, and approved option settings. Disabling auto-open might reduce the symptom but also change drying performance; agree on the intended system rather than accepting moisture damage.
Owner-Cleanable Parts and Chemical Boundaries
Follow the exact manual for filter, spray arm, dispenser, tub, and sensor-area care. Before cleaning:
- stop the appliance and follow electrical/water safety instructions;
- check for broken glass or sharp debris;
- photograph filter orientation and parts;
- remove only owner-serviceable components;
- use approved cleaning products and concentrations;
- never mix chlorine bleach, acids, ammonia, or unknown cleaners;
- protect stainless surfaces and seals;
- reinstall every filter, arm, and cap correctly;
- run the prescribed rinse/clean cycle.
A dirty filter or blocked spray arm mainly affects washing and drainage, but poor final rinse and residual soil can complicate drying. Cleaning should be based on a finding, not aggressive dismantling.
Do not pour ordinary hand dish soap into the machine. Excess foam can leak, interfere with pumps/sensors, and create a wet-floor problem. If the wrong product was used, follow manufacturer support rather than adding another chemical to “cancel” it.
Water Temperature Without Scalding Guesswork
Incoming temperature can affect some model cycles. Measure only under a safe method with a suitable thermometer, away from children and vulnerable users. Do not hold a hand under hot water as a temperature test.
Record:
- water-heater setpoint and central mixing arrangement;
- kitchen delivery temperature after stabilization;
- time needed for hot water to arrive;
- whether the dishwasher is connected to hot or cold as specified;
- simultaneous hot-water draws;
- seasonal inlet and recent plumbing changes.
A long hot-water branch can fill the first stage with cool standing water. Some manuals suggest running the nearby tap before start, but that uses water and is not a universal requirement. A recirculation or plumbing design issue should not be masked by wasting water indefinitely.
If delivered hot water is unexpectedly low throughout the home, diagnose the water heater and mixing system. If only the dishwasher shows a temperature fault, investigate its supply, valve, sensor, heater, and control under qualified service.
Service Call Evidence Packet
Provide:
- exact model, serial, installation date, and warranty;
- drying design if known;
- cycle and all selected options;
- rinse-aid product, setting, and refill date;
- detergent type/dose and water hardness;
- controlled-load inventory and photos;
- inlet temperature/time observation;
- end-of-cycle item material, warmth, droplets, and pools;
- error code/light and completion behavior;
- auto-open, vent, fan, and door observations;
- filter/owner maintenance performed;
- breaker, outage, leak, repair, or installation history;
- whether wash and drain performance also changed.
Ask for the diagnosis and evidence, not only a part name. The invoice should identify the failed condition, part, repair, settings, leak/electrical checks, and repeat controlled-load result. If a component tests normal, ask which use or installation condition explains the complaint.
Compare Drying Technologies at Replacement
When replacement is justified, do not buy by decibel and rack photos alone. Ask:
- Does the model use exposed/concealed heat, condensation, fan, auto-open, or another system?
- What drying option is included in the advertised energy figure?
- How does it handle plastics according to the manufacturer?
- Is rinse aid assumed?
- Does auto-open require counter protection or clearance?
- Does fan drying add noise or a service component?
- Can no-heat dry be selected?
- What cycle time includes drying?
- Are the racks angled to drain cups and containers?
- What warranty covers heater, fan, controls, tub, and leak protection?
ENERGY STAR's current criteria limit annual energy and water use for certified models, while the EnergyGuide helps compare estimated annual electricity among similar products. Those are valuable purchase filters, but neither guarantees a particular plastic-drying result in your loading pattern.
Use the repair-versus-replace dishwasher guide to normalize purchase, installation, energy/water, repair, cycle, and drying fit.
Kitchen Moisture and Finish Audit
Drying moves moisture somewhere: onto tub walls, through a vent, through an opened door, or into room air. Inspect:
- underside and edge of countertop;
- adjacent cabinet faces and hardware;
- flooring at toe kick;
- insulation/blanket installed as required;
- door seals and latch;
- vent path unobstructed by trim;
- auto-open clearance;
- condensation pattern after several cycles.
Swelling, delamination, repeated condensation, mold odor, or water at the toe kick is not merely “wet dishes.” Stop active leakage and have installation/appliance sources separated. Preserve photos before removing trim.
A Two-Week Optimization Experiment
Use four repeatable loads rather than changing habits permanently after one result.
| Test | Load held constant | Rinse aid | Dry option | Unload delay | Ceramic | Plastic | Energy/time note |
|---|---|---|---|---|---|---|---|
| Baseline | Yes | Current | Current | Current | |||
| Loading angle | Yes | Same | Same | Same | |||
| Rinse-aid step | Yes | +1 approved step | Same | Same | |||
| Dry option | Yes | Same | Extended/heat | Same |
If loading solves pools, stop. If rinse-aid adjustment improves sheeting without film, keep the minimum effective setting. If only high-energy drying works, decide whether towel/air drying, a different unloading schedule, or service fits better. If nothing changes and all materials remain cool/wet, escalate.
Do not compare energy from whole-house bills across unrelated days. Utility interval data may be useful if water heating, cooking, HVAC, and EV loads are understood, but model data and controlled cycle comparisons are often cleaner.
Keep the final chosen settings beside the manual so another household member does not unknowingly disable drying or overcorrect rinse aid. Recheck after a detergent, softener, water-heater, plumbing, or loading change. The objective is a repeatable acceptable result with the least necessary energy and chemistry, not a permanently maximized control setting.
Photograph the successful rack arrangement and record the exact cycle, dry option, and rinse-aid setting. That small household standard makes later performance changes visible instead of relying on memory.
Frequently Asked Questions
Why are plastic dishes wet but glass is dry?
Plastic retains less heat and often has rims that hold droplets. Use approved rack placement, loading angle, rinse aid, and dry option; this pattern alone may be normal.
Should I open the door after the cycle?
Follow the exact manual. Some models auto-open; others may permit manual venting after completion. Protect against hot steam and finish damage.
Does rinse aid really help drying?
Manufacturer guidance says it helps water sheet away. Use the recommended product and adjust dose gradually for water conditions.
Does “sanitize complete” prove the heater works?
Only interpret the indicator under the exact model manual. Some manufacturers use it in a diagnostic suggestion, but designs differ.
Why is a new efficient dishwasher wetter?
It may use residual heat, condensation, fan, or auto-open drying instead of a strong exposed heater. Confirm design, settings, rinse aid, loading, installation, and contracted expectations.
Can I test the element with my hand?
No. Do not touch a heating element or energized/internal parts. Use model indicators and qualified service.
What to Read Next
If odor or standing water accompanies wet dishes, follow the dishwasher smell and drain-path guide. If a confirmed component fault is costly, use the dishwasher repair-versus-replace worksheet. Improve spray exposure with the dishwasher loading guide.
Sources and Verification
Editorial Review
EnergyBS Editorial Team
EnergyBS publishes practical homeowner guides. Important program, product, and cost claims should be checked against the linked source and local project documents before you commit to work.
Related Guides
View All ArticlesDishwasher Smells or Has Standing Water? Trace the Drain Path
A safetyfirst odor and standingwater diagnostic that follows the dishwasher filter, sump, drain pump, hose, high loop or air gap, disposal connection, sink drain, door seal, supply, and installation history.
Dishwasher Repair or Replace? A Cost, Energy, and Reliability Worksheet
A diagnosisfirst dishwasher repairversusreplace worksheet covering fixed repair scope, age and condition, model energy and water, installed replacement cost, racks and cycle fit, drying, noise, leak protection, warranty, and disposal.
Dishwasher Loading Guide: Stop Rinsing Your Dishes (2026)
Prerinsing is a sin. The 'Cookie Sheet Blockade' is real. We analyze the fluid dynamics of your spray arm to understand why your dishes are still dirty.