Why Your Dryer Takes Two Cycles 2026 Tool (Guide & Data)
A symptomfirst homeowner guide to slow drying that separates wet washer output, load and cycle errors, lintscreen problems, crushed or blocked exhaust, room conditions, sensors, heat, and appliance faults.
The Short Answer
Short Answer: A dryer that suddenly needs two cycles often cannot move moisture out efficiently. Stop and investigate if the machine or laundry room is unusually hot, smells scorched or like gas, shows visible smoke, trips protection, or has weak/no exterior exhaust. Otherwise, document one normal load: how wet it leaves the washer, load size, cycle, heat, elapsed time, exterior airflow, room condition, and whether clothes end warm-wet, cool-wet, or dry before the cycle ends. That pattern separates washer, airflow, setting, sensor, and appliance causes.
CPSC warns that lint buildup can block airflow, create excessive heat, and contribute to dryer fires. Its consumer guidance says damp clothes after a typical cycle or longer-than-normal drying can signal a blocked lint screen or exhaust duct. Slow drying is therefore not merely an energy annoyance.
Do not bypass safety switches, open gas components, remove energized panels, defeat door interlocks, or operate a vented dryer disconnected indoors as a test. Use the safe observations below and call qualified service when the fault moves beyond owner maintenance.
Drying Is a Moisture-Removal Chain
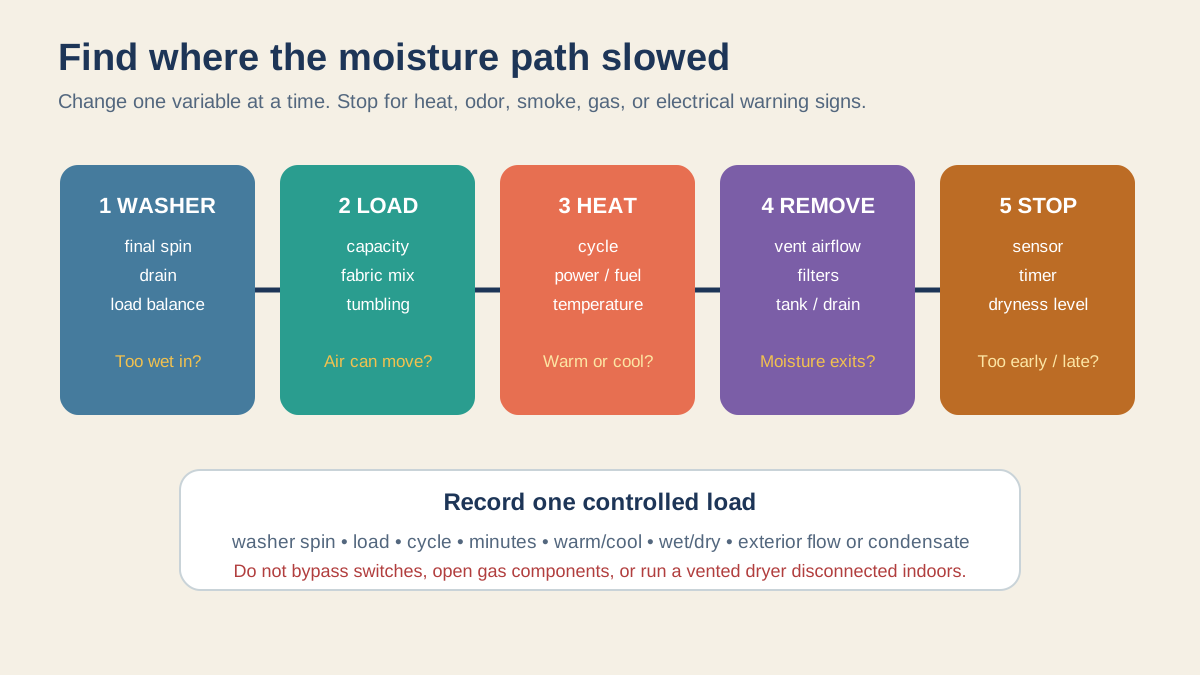
The dryer must complete five jobs:
- receive laundry with a reasonable amount of water after the washer spin;
- tumble it so wet surfaces reach moving air;
- add heat or reuse heat according to the dryer design;
- move or condense moisture;
- sense or time the endpoint correctly.
Vented dryers send moisture outdoors. Heat-pump and other ventless dryers condense it into a tank or drain. The diagnostic branch differs, but the evidence method is the same: find where the moisture path slowed.
Safety Stop Signs
Stop using the dryer and seek appropriate help when you observe:
- smoke, sparking, burning, scorched-plastic, or strong electrical odor;
- gas odor or suspected combustion problem;
- repeated breaker trips or blown fuses;
- plug, receptacle, cord, gas connector, or surrounding surface that appears damaged or overheated;
- drum that does not turn while the machine heats;
- exterior duct disconnected in a concealed area;
- severe overheating or repeated high-limit shutdown;
- water reaching electrical parts;
- a product recall or manufacturer stop-use notice for the model.
For gas odor, leave the area and follow the gas utility or emergency authority's instructions; do not operate switches or search for a leak with a flame. For smoke or fire, prioritize evacuation and emergency response.
Start With a Controlled Load
Do not diagnose with a king comforter, one towel, mixed heavy/light fabrics, or an overloaded washer. Create one repeatable test load that the manual considers normal. Use clean, well-rinsed similar fabrics and the ordinary cycle.
Record:
| Observation | Result |
|---|---|
| Dryer model and type | |
| Load description and approximate size | |
| Washer cycle and final spin | |
| Laundry dripping, very wet, damp, or well extracted | |
| Dryer cycle, temperature, and dryness level | |
| Start and end time | |
| Clothes warm-wet, cool-wet, uneven, or dry | |
| Room unusually hot or humid | |
| Exterior exhaust strong, weak, or absent (vented only) | |
| Tank/drain and filter status (ventless only) | |
| Error code or shutdown |
Change one variable at a time. Running random cycles with different loads erases the pattern.
Symptom Matrix
| End-of-cycle pattern | First branch to investigate | Why |
|---|---|---|
| Clothes hot and damp; cabinet/room hot | Exhaust restriction, load, tumbling | Heat exists but moisture/air is not leaving efficiently |
| Clothes cool and damp | Cycle choice, power/heat source, heat system | Air-fluff or a heat fault may be involved |
| Heavy seams wet, light items overdry | Mixed load, load size, sensor contact | Fabrics dry at different rates |
| Auto cycle ends early; timed cycle dries | Sensor/load/contact or setting | Endpoint may be misread |
| Both auto and timed cycles are slow | Washer extraction, airflow, heat, room, machine | Broader moisture path problem |
| New dryer is slow from day one | Installation, vent, circuit/fuel, setup, capacity | New equipment does not validate old infrastructure |
| Heat-pump dryer slow in cold room | Ambient limit, filters, load, settings | Refrigeration performance and cycle logic may be affected |
| Tank-full/drain warning | Condensate path | Moisture cannot be removed normally |
This matrix prioritizes questions; it does not diagnose a component by itself.
Branch One: Did the Washer Leave Too Much Water?
The dryer cannot cheaply correct a washer that fails to extract water. Compare the same laundry immediately after a normal wash.
Ask:
- Did the washer reach its selected final spin?
- Was the load unbalanced and repeatedly redistributed?
- Is a low-spin or delicate program selected?
- Are bulky items holding pooled water?
- Is the washer overloaded or unable to drain completely?
- Did this change begin after a washer setting or repair?
- Are clothes noticeably heavier/wetter than they used to be?
ENERGY STAR notes that efficient front-load washers can remove more water before drying, improving dryer performance. Use the highest spin suitable for the fabric and manufacturer instructions, not a universal maximum.
Run a washer spin/drain correction before paying for dryer heat or sensors. If the washer leaves standing water or cannot complete spin, address that machine first.
Branch Two: Load Size and Fabric Mix
Air needs room to move through the tumbling load. Too much laundry can form a dense mass; too little may not contact moisture sensors consistently. Sheets can wrap around smaller items. Towels, denim seams, and sweatshirt cuffs retain more water than thin synthetics.
Check:
- drum is not packed tightly;
- laundry tumbles rather than rides as one bundle;
- washer load fits dryer capacity;
- heavy and light fabrics are separated when appropriate;
- bedding follows model instructions;
- pockets, cuffs, and multilayer items are turned as recommended;
- dryer balls or accessories are approved and not treated as a repair.
If a half-size uniform load dries normally, the machine may be functional and the normal load/capacity match needs correction. Do not convert that observation into “the vent is fine”; an airflow restriction can become more visible with larger wet loads.
Branch Three: Cycle and Dryness Settings
Verify that the chosen cycle actually adds heat and is intended for the load. Air/fluff cycles do not. Eco, delicate, low-temperature, steam, refresh, and timed cycles have different endpoints.
Review:
- selected temperature;
- sensor versus timed program;
- dryness target;
- wrinkle or cool-down phase;
- energy-saving options;
- control lock or saved favorite;
- remote app settings;
- recent software or household changes.
Use the manual for the exact model. A longer displayed estimate at the beginning may adjust as sensors read the load; a timer reaching zero does not prove a specified dryness was achieved.
If sensor dry stops early on a tiny or mixed load, use the manual's recommended load/cycle and check owner-cleanable sensor surfaces only by the approved method. Fabric-softener residue can affect some exposed sensor bars, but not every model uses the same arrangement.
Branch Four: Lint Screen and Screen Housing
Clean the lint screen before or after every load as the manufacturer directs. CPSC explicitly recommends this. Inspect it for tears, warping, heavy film, or failure to seat.
A screen can look clear while airflow is reduced by residue. Follow the model's permitted cleaning method; do not apply flammable solvents or reinstall a wet filter when prohibited. Inspect the accessible housing with the appliance off under the manual, without pushing tools into moving or energized parts.
If the screen accumulates far less lint than usual, lint may be bypassing it, laundry may differ, or airflow may be weak. If it suddenly accumulates much more, fabric condition or load may explain it. Record the change.
Branch Five: Transition Duct Behind the Dryer
For a vented dryer, inspect the visible connector after safely stopping and moving the appliance only if you can do so without damaging gas, electrical, drain, or stacking connections.
Look for:
- crushed or flattened duct;
- sharp kinks;
- excessive slack and loops;
- plastic or foil accordion material;
- loose or disconnected joints;
- screws or obstructions projecting into the air path;
- lint escaping into the room;
- dryer pushed too close to the wall;
- moisture or staining near joints.
CPSC recommends rigid or corrugated semi-rigid metal rather than plastic or foil accordion duct because the latter can risk lint and kink or crush more easily. Use materials and connections permitted by the dryer instructions and local requirements.
Do not pull a gas dryer abruptly. A damaged connector is a serious hazard. Use a qualified installer if access is constrained.
Branch Six: The Full Exhaust Route
The wall opening behind the dryer is only the beginning. Trace the route to the outdoors: horizontal duct, vertical riser, concealed chase, roof or wall termination, elbows, screen, flap, and shared-building conditions.
While the dryer operates normally and no stop sign exists, observe the exterior termination from a safe location. CPSC advises checking that exhaust air escapes. Weak or absent flow, a flap that does not open, lint staining, or unusually long dry time supports a restriction or disconnection investigation.
Do not climb onto a roof, enter unsafe attics/crawlspaces, or use improvised blowers that can compact lint, separate hidden joints, or create airborne debris. A long, vertical, concealed, shared, or damaged route is professional-cleaning/inspection territory.
The route must follow both local requirements and the exact dryer's installation table. The dryer vent routing guide explains developed length, elbow effects, termination, access, and quote documentation.
Branch Seven: Room Air and Pressure
A vented dryer needs replacement air. In a very tight room or home, a closed door, clogged grille, strong range hood, bath fan, or other exhaust may alter airflow or combustion safety. Do not simply open a window and declare the design solved.
Record whether performance changes with:
- laundry-room door position;
- other exhaust appliances operating;
- HVAC operation;
- season and outdoor conditions;
- a newly air-sealed envelope;
- a replaced door or closed transfer grille.
Gas dryers require the combustion and makeup-air conditions in their instructions and code. Suspected backdrafting, combustion odor, soot, or abnormal flame behavior requires qualified evaluation.
Ventless and heat-pump dryers have ambient-temperature, clearance, enclosure, and drainage conditions. A cold garage or overheated closet can impair performance. Verify the exact allowed range.
Branch Eight: Does the Dryer Make Heat?
End-of-cycle clothing temperature is only a clue. Cool clothes may result from a designed cool-down phase; warm clothes do not prove full heat output.
Safe owner checks are limited to:
- confirm cycle is not air-only;
- confirm household protection has not obviously tripped;
- read error codes;
- observe whether heat appears during the heated portion;
- compare a manual-approved test load;
- verify fuel service is not knowingly off.
Electric dryers can sometimes tumble with a partial power-supply problem while heating does not operate normally. Gas ignition, valves, burners, thermostats, elements, fuses, wiring, and controls are service work. Do not open energized panels or repeatedly reset a breaker that trips.
Give the technician model/serial numbers, symptom table, cycle, elapsed time, vent observations, and whether the washer output is normal.
Branch Nine: Moisture Sensing and Cycle Termination
If clothes are dry well before a sensor cycle ends, the machine may be over-drying. If an auto cycle stops with damp clothes while a properly chosen timed cycle works, sensor contact, load composition, residue, settings, or a component may matter.
Before service:
- use the manual-recommended auto cycle;
- use a normal same-fabric load;
- clean accessible sensor bars only as instructed;
- avoid changing several dryness settings at once;
- note whether the displayed estimate changes;
- record whether certain loads fail consistently.
Sensor behavior cannot be diagnosed accurately from one mixed load. Preserve the evidence instead of defaulting permanently to a second timed cycle, which can waste energy and overdry lighter garments.
Ventless and Heat-Pump Dryer Branch
Do not look for exterior airflow on a ventless machine. Check the closed-loop moisture path:
- primary and secondary lint filters are installed and clean;
- owner-accessible condenser or heat exchanger is maintained exactly as directed;
- water tank is empty and seated;
- drain hose is not kinked, frozen, displaced, or above permitted routing;
- room temperature and enclosure conditions are allowed;
- load and cycle fit the machine;
- air inlets/outlets and service clearances are open;
- error codes are recorded.
Do not wash, vacuum, brush, or disassemble a heat exchanger unless the manual authorizes that action. Some fins are delicate and some condensers are not owner-serviceable.
If shopping for a replacement, use the heat-pump dryer comparison guide to compare model energy, throughput, drainage, and maintenance.
A One-Hour Evidence Plan
- Check recalls and read safety warnings for the exact model.
- Clean and inspect the lint filter by the manual.
- Verify washer final spin and choose a repeatable normal load.
- Record cycle, temperature, dryness level, start time, and room condition.
- For vented equipment, inspect visible transition duct without straining utilities.
- Observe exterior exhaust safely during operation.
- For ventless equipment, check filters, tank/drain, ambient condition, and clearances.
- Record end state: warm-wet, cool-wet, uneven, overdry, error, or shutdown.
- Stop if any hazard sign appears.
- Send the log and photos to the appropriate vent professional, installer, or appliance technician.
Do not run repeated full cycles as a diagnostic if the machine is overheating or airflow is absent.
Energy Cost of the Second Cycle
A second cycle can nearly double dryer energy for that load, but calculate rather than assume. Use model data, utility interval evidence, or qualified measurement suitable for the circuit.
Annual avoidable cost = extra kWh per affected load × affected loads per year × marginal electricity price
For gas, add extra fuel and electricity. Also consider conditioned air exhausted from the home, but label any estimate separately because it depends on weather, leakage, HVAC efficiency, and replacement-air path.
Avoidable energy is useful for prioritization; fire and equipment-safety concerns come first. A low utility rate does not make a blocked exhaust acceptable.
When to Clean, Repair, or Replace
Clean or correct use when
- the manual identifies owner-cleanable filters/sensors;
- a safe accessible transition issue is found;
- load, washer spin, or cycle is the cause;
- a qualified vent service finds and clears an appropriate route.
Request appliance service when
- heat is absent or abnormal;
- the drum, blower, controls, sensors, drain system, or refrigeration circuit may be faulty;
- protection trips or errors recur;
- internal cabinet cleaning is due;
- slow drying persists after documented airflow and use checks.
Request vent redesign when
- the route exceeds the selected dryer's instructions;
- plastic/foil, crushing, repeated blockage, hidden disconnection, poor termination, or inaccessible geometry recurs;
- the dryer was relocated without a route review;
- cleaning treats the symptom but not the routing defect.
Consider replacement when
- diagnosis identifies a costly failure relative to age and condition;
- parts or safe repair are unavailable;
- capacity no longer fits the washer/household;
- ventless conversion avoids a difficult exhaust project;
- total repair, operating, and installation cost favors a new model.
Do not replace before proving the vent. A new vented dryer connected to the same restriction can remain slow and unsafe.
Service Call Worksheet
Provide:
- model, serial, age, and fuel/type;
- exact symptom and when it began;
- cycle, load, and elapsed time;
- washer extraction observation;
- clothes temperature/moisture pattern;
- filter and owner maintenance completed;
- vent route, exterior flow, and last professional service;
- room temperature/door/other exhaust conditions;
- error codes, trips, odors, or noise;
- recent moves, renovations, vent cleaning, or repairs;
- photos that do not expose you to unsafe access.
Ask the technician to document diagnosis, measurements, part numbers, vent findings, repair, and post-repair test. “Cleaned dryer” or “replaced thermostat” without explaining the failure chain is hard to evaluate later.
Verify the Repair With the Same Load
Do not judge a repair by an empty-drum startup. Repeat the controlled load used before service, with the same washer spin, fabric mix, approximate mass, cycle, dryness setting, and room conditions where practical. Record elapsed time, exterior flow or condensate behavior, end-state moisture, cabinet/room symptoms, and energy evidence if safely available.
A strong result is not merely “the drum gets hot.” It is a complete normal cycle that removes the expected moisture without abnormal heat, odor, shutdown, error, or redry. For a vent correction, request before-and-after route findings and confirmation that joints, transition, termination, and access were restored. For an appliance repair, request the failed component or diagnostic explanation and the post-repair test.
Watch the next five ordinary loads. Separate towels, clothing, and bedding in the log because they challenge the system differently. If only one load type remains slow, capacity, fabric grouping, tangling, or cycle selection may be more relevant than a general failure. If every load slowly regresses, repeated lint accumulation, a loose joint, an exterior flap, an internal fault, or another unresolved cause deserves follow-up.
Preserve invoices and photos with the appliance manual. Future technicians can distinguish a recurring vent problem from a new heater, sensor, blower, washer, or installation issue. Evidence also prevents paying repeatedly for the same generic cleaning when the route needs redesign.
Sources and Verification
- CPSC's dryer safety publication supports checking lint, the exhaust path, termination, and periodic cleaning while treating overheating and absent flow as safety concerns.
- DOE's laundry guidance provides federal consumer context for load practice, washer extraction, and dryer energy.
- ENERGY STAR's clothes-dryer page supports model-efficiency and buying comparisons.
- Whirlpool's long-dry-time troubleshooting is manufacturer guidance for checking load, lint screen, venting, and installation factors; the exact dryer manual remains controlling.
Gas, electrical, internal appliance, roof, concealed-vent, and overheating diagnosis belongs to qualified service. Verify model-specific instructions rather than applying one brand's steps universally.
Frequently Asked Questions
Why is my dryer hot but clothes stay wet?
Heat may exist while moisture removal is restricted by load, tumbling, lint screen, transition duct, full exhaust route, room air, or a blower problem. Stop if overheating or airflow is absent and inspect safely.
Can I run the dryer without the vent to test it?
Do not operate a vented dryer exhausting into the room. It releases heat, moisture, lint, and for gas equipment combustion products. Use qualified airflow/vent evaluation.
How often should a dryer vent be cleaned?
Follow the dryer manufacturer and site-specific professional recommendation. Frequency depends on loads, route length, bends, material, termination, and observed lint. CPSC's dryer safety guidance advises periodic exhaust cleaning rather than establishing one interval for every home.
Why does timed dry work but sensor dry stops early?
Load size/mix, sensor contact, residue, dryness setting, or a sensor/control fault may be involved. Repeat with a manual-approved normal load and permitted sensor cleaning before service.
Can dryer sheets make the dryer slow?
Residue can affect some lint screens or sensor bars, but the effect and cleaning method are model-specific. Inspect under the manual; do not assume sheets explain weak exterior airflow or overheating.
Why is a brand-new dryer slow?
Installation can be the cause: crushed connector, long or blocked old vent, wrong circuit/fuel setup, enclosure, drain, load/capacity mismatch, or incorrect cycle. Verify the entire installed system.
Is a long heat-pump dryer cycle a fault?
Not necessarily. ENERGY STAR's heat-pump dryer guidance explains the technology, but expected duration remains model- and cycle-specific. Compare the exact manual, load, ambient condition, filters, drainage, and error codes.
What to Read Next
Before repairing the dryer, verify the upstream washer with the drain-and-spin diagnostic; unusually wet loads can dominate drying time. Plan a durable exhaust correction with the dryer vent routing and length guide. If replacement is justified, compare energy, capacity, cycle time, drainage, room conditions, and service using the heat-pump dryer versus vented dryer guide. Track the bill impact with the smart-meter data guide.
Sources and Verification
Editorial Review
EnergyBS Editorial Team
EnergyBS publishes practical homeowner guides. Important program, product, and cost claims should be checked against the linked source and local project documents before you commit to work.
Related Guides
View All ArticlesDryer Vent Routing and Length 2026 Tool (Guide & Data)
A modelspecific homeowner worksheet for dryer exhaust route length, elbows, materials, transition duct, exterior termination, cleaning access, penetrations, makeup air, contractor scope, and postinstallation verification.
Heat Pump Dryer vs Vented Dryer 2026 Tool (Guide & Data)
A householdspecific comparison of heatpump, vented electric, and gas dryers using model energy data, laundry volume, utility rates, cycle time, drainage, room conditions, vent cost, maintenance, and clothing care.
How to Read Your Smart Meter 2026 Tool (Guide & Data)
Your smart meter records your energy usage every 15 minutes. Here's how to access that data and use it to find efficiency opportunities.