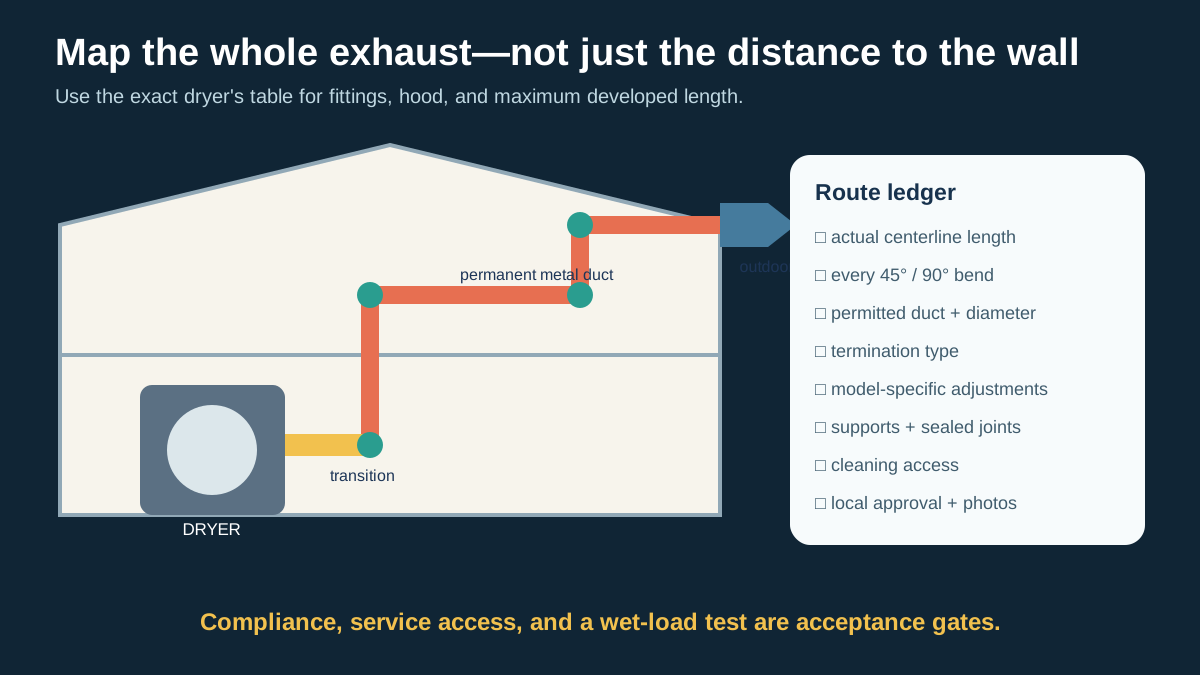
Dryer Vent Routing and Length: Plan a Safe, Serviceable Exhaust
A modelspecific homeowner worksheet for dryer exhaust route length, elbows, materials, transition duct, exterior termination, cleaning access, penetrations, makeup air, contractor scope, and postinstallation verification.
The Short Answer
Short Answer: Plan a dryer exhaust from the exact dryer's installation instructions and local requirements, using the shortest practical route to an approved outdoor termination, the permitted metal duct and transition, few bends, sealed supported joints, no fasteners that catch lint, and access for inspection and cleaning. Record actual and developed length using the selected model's table. Do not apply a universal “35-foot maximum” or generic elbow deduction when the manufacturer specifies something different.
CPSC warns that lint buildup can block airflow, cause excessive heat, and contribute to fires. It recommends periodic cleaning and replacing plastic or foil accordion duct with rigid or corrugated semi-rigid metal, consistent with the dryer's instructions. A good route is not merely short; it is correctly sized, protected, accessible, weather-tight, and verified with the appliance installed.
This guide is a planning and quote tool. Cutting rated walls, roofs, masonry, gas/electrical work, concealed-duct cleaning, and code compliance may require qualified trades and permits.
Why Dryer Vent Rules Seem to Conflict
Homeowners often find one page stating a maximum distance and another listing a different value. Several layers can apply:
- the exact dryer manufacturer's installation table;
- local adopted building, mechanical, fuel-gas, or fire requirements;
- duct material and diameter;
- hood/louver type;
- number and type of bends;
- transition connector limits;
- booster equipment, if permitted and designed;
- multifamily or rated-assembly rules;
- roof, wall, snow, pest, and property-line conditions.
An example manufacturer manual may show a table with different allowable lengths by hood and elbow count. That demonstrates the method, not the limits for another dryer. Obtain the current instructions for the exact model that will be connected.
Build the Route Record
Draw the centerline from the dryer exhaust outlet to the exterior termination.
Record:
| Segment | Actual length | Material/diameter | Bend or fitting | Accessible? | Condition |
|---|---|---|---|---|---|
| Dryer to wall transition | |||||
| Wall to vertical riser | |||||
| Vertical riser | |||||
| Attic/basement run | |||||
| Final wall/roof run | |||||
| Exterior termination |
Add every elbow, offset, reducer, connector, access point, and concealed joint. Photograph exposed work and mark hidden routes on a floor plan before finishes close.
Actual Length Versus Developed Length
Actual centerline length is the measured path of the duct. Developed or effective length accounts for bends and fittings using the method required by the applicable instructions or rule. Bends add resistance and can collect lint; different tables treat them differently.
Use this worksheet without inserting generic deductions:
| Item | Count/length | Model-specific adjustment | Adjusted contribution | Source page |
|---|---|---|---|---|
| Straight duct | ||||
| 90-degree bends | ||||
| 45-degree bends | ||||
| Termination type | ||||
| Other allowed fittings | ||||
| Total developed length | ||||
| Maximum allowed for exact model |
If a contractor writes only “under code maximum,” ask for the selected dryer's allowed route and the local basis. The tighter applicable requirement governs.
Choose the Shortest Practical Route
The ideal route is usually direct to an exterior wall with few bends, but building constraints matter. Compare at least two concepts:
Sidewall route
Potential benefits include shorter length, ground-level exterior inspection, and easier cleaning. Risks include snow, vegetation, decks, walkways, property lines, recirculation near openings, staining, physical damage, and a visually poor location.
Roof route
It may be necessary for an interior laundry room. It adds vertical lift, attic access, roof penetration, weathering, safe exterior service, and possible snow/debris concerns. A roof termination that is difficult to reach can be neglected.
Downward or crawlspace route
It can avoid upper-storey finishes but introduces crawl access, moisture, pests, sagging, damage, and a low exterior termination. Confirm the entire route remains supported and serviceable.
New chase or soffit
A dedicated accessible chase can outperform a convoluted hidden path. Price framing, firestopping, air sealing, finish, access panels, and appearance.
The shortest geometric line is not always permitted. Avoid structural members, utilities, rated assemblies, and unsafe exterior locations.
Duct and Transition Materials
CPSC advises replacing plastic or foil accordion-type duct with rigid or corrugated semi-rigid metal because plastic/foil can risk lint and is more susceptible to kinking or crushing. Follow the exact dryer's permitted materials and local requirements.
Separate two pieces:
- Permanent exhaust duct: the installed route through the building.
- Transition duct: the short connection between dryer and permanent duct.
The transition must allow the appliance to be installed and serviced without becoming a long coil. It should not be concealed in walls, floors, or ceilings when prohibited. Protect it from crushing when the dryer is pushed back. A recessed connection box or approved close-clearance solution can help in tight spaces, but verify model instructions and cleanability.
Do not use screws or other protrusions into the air stream where they can catch lint when prohibited. Joints should face and seal as required for exhaust flow, using approved connection methods—not ordinary cloth-backed “duct tape.”
Diameter and Shape
Use the diameter and shape specified by the dryer. Reducing the duct or crushing a round transition into a flat opening changes area and resistance. Decorative registers, screens, pest mesh, and improvised reducers can restrict flow and risk lint.
Where a listed/approved rectangular or oval close-clearance connector is proposed, ask:
- Is it permitted by the dryer instructions and local authority?
- What equivalent-length effect applies?
- Can it be opened and cleaned?
- Does it maintain area through the tightest section?
- Can the dryer be moved without separation?
Do not assume a component is appropriate because it is sold beside dryers.
Elbows, Supports, and Joints
Use the fewest turns possible and prefer smooth, gradual changes allowed by the design. Every bend should remain accessible or documented.
Support duct so it does not sag, separate, vibrate, or collect condensation/lint. Expansion, vibration, framing movement, and appliance service can stress joints. Do not rest a route loosely on ceiling insulation or suspend it from unrelated utilities.
For concealed work, photograph:
- every joint and support;
- direction and sealing;
- clearances from heat/electrical/plumbing;
- penetrations and firestopping;
- insulation where required;
- access locations;
- route dimensions.
The photo record makes future cleaning and renovation safer.
Exterior Termination
The termination must open with dryer airflow, close when off, resist weather and pests without trapping lint, and remain inspectable. Many dryer instructions prohibit screens.
Evaluate:
- hood or louver permitted by the exact table;
- clearance above expected snow and landscaping;
- separation from doors, windows, air intakes, fuel equipment, and property features under local requirements;
- roof runoff, wind, ice, and prevailing weather;
- staining of siding or masonry;
- safe cleaning access;
- bird/rodent design without fine mesh;
- flap movement after painting or caulking;
- ability to observe airflow.
A stuck, painted-shut, snow-covered, nested, or lint-matted termination can make a good interior duct perform poorly.
Penetrations and Building Envelope
The duct crosses the home's water, air, thermal, and sometimes fire-control layers. Detail each one.
Exterior wall
Provide structural opening, water-shedding flashing or seal compatible with cladding, air sealing at the air barrier, pest resistance, and interior finish. Do not rely on a surface bead of incompatible sealant as the only water detail.
Roof
Use a roof assembly and flashing method suitable for the roof material and slope. Coordinate with a roofer when warranty or complex roofing is involved. Preserve safe service access and prevent condensate or rain entry.
Garage or rated separation
Penetrations through fire-resistance or separation assemblies need approved details. Do not cut and foam a rated wall based on generic advice.
Attic or cold space
Temperature differences can create condensation. Follow applicable insulation and vapor/water management requirements without hiding joints that need access. Confirm the route does not compress attic insulation or create an air leak around the penetration.
Laundry-Room Air and Combustion
A vented dryer exhausts air from the building. Replacement air enters somewhere. In a tight room or home, inadequate openings or competing exhaust can affect performance and, with combustion appliances, safety.
Document:
- room and closet openings required by the dryer;
- door undercut or grille design, if applicable;
- range hood, bath fan, central vacuum, and other exhaust operation;
- natural-draft water heater, furnace, fireplace, or other combustion equipment nearby;
- post-air-sealing changes;
- gas-dryer combustion requirements.
Do not use a homeowner “tissue test” as combustion safety clearance. A qualified combustion-safety assessment may be appropriate when strong exhaust and atmospherically vented equipment interact.
Ventless heat-pump dryers avoid a conventional exhaust but still require electricity, condensate drainage or tank handling, ambient conditions, clearance, and maintenance. Compare that alternative with the heat-pump dryer versus vented guide when a compliant route is expensive.
Cleaning Access Is a Design Requirement
CPSC recommends periodic dryer vent and exhaust-duct cleaning. A route cannot be maintained well if no one can reach it or verify reassembly.
Plan:
- safe dryer pull-out space;
- accessible transition connection;
- cleanout/access points where the route and local requirements support them;
- ability to reach the exterior termination;
- a cleaning method compatible with the duct and joints;
- protection of the home from lint/debris;
- inspection after cleaning;
- documentation of hidden sections.
Do not assume a rotary brush can negotiate every bend without separating a joint or becoming stuck. The cleaner should know the route, material, diameter, bends, and termination before selecting a method.
Existing Vent Audit
Before connecting a new dryer, inspect the old route:
- material and diameter;
- actual/developed length;
- crushed transition;
- plastic/foil sections;
- screws or lint-catching joints;
- disconnected concealed duct;
- leakage into wall, attic, crawlspace, or room;
- corrosion, holes, or water entry;
- lint buildup and past cleaning record;
- exterior flap operation;
- screens or nests;
- route compliance with the new model.
A new dryer does not certify an old vent. If drying was slow, preserve the symptom log from the two-cycle dryer diagnostic and require correction plus a post-work load test.
Contractor Quote Worksheet
Require written scope for:
| Scope item | Included | Method/product | Acceptance record |
|---|---|---|---|
| Exact dryer/model table reviewed | |||
| Existing route inspection/removal | |||
| Duct diameter and material | |||
| Actual and developed length | |||
| Elbows/fittings | |||
| Supports and joint sealing | |||
| Transition connector | |||
| Wall/roof penetration | |||
| Firestopping/rated assemblies | |||
| Exterior hood/termination | |||
| Air/water/pest sealing | |||
| Finish repair and painting | |||
| Cleaning access | |||
| Permit/inspection | |||
| Installed airflow/performance check | |||
| Photos and route record |
Identify exclusions such as asbestos-suspect material, masonry, roofing warranty work, electrical/gas relocation, hidden damage, scaffolding, lift, painting, and common-property approval.
Multifamily, Condominium, and Shared-Building Questions
An apartment or condominium route may cross common property, rated corridors, shafts, exterior walls, roofs, or another unit's boundary. The homeowner may not have authority to clean, alter, or inspect the full path.
Before ordering equipment or cutting finishes, obtain:
- condominium/strata/landlord approval process;
- as-built mechanical drawings and unit route identification;
- responsibility for common and in-unit duct sections;
- permitted dryer type and exhaust connection;
- rated-shaft and penetration requirements;
- exterior appearance rules;
- scheduled common-riser inspection or cleaning records;
- confirmation that the duct is dedicated or part of an approved engineered system;
- access and shutdown coordination;
- insurance and contractor qualification requirements.
Do not connect to an unknown grille, bath exhaust, kitchen duct, utility chase, or another dryer's path. A shared engineered laundry exhaust may use controls and components unlike a simple house vent; it requires the building's approved design and maintenance program.
When the existing route cannot accept the proposed dryer or common-property approval is impractical, a heat-pump ventless model may be worth comparing. It still needs approval, drainage or tank handling, electrical fit, ambient conditions, clearance, and service access.
Survey Before the Quote
Give every contractor the same site packet:
- dryer model under consideration;
- laundry-room and exterior photos;
- floor plans with approximate route concepts;
- known joist, stud, roof, masonry, and utility constraints;
- existing vent diameter, material, termination, and cleaning record;
- room dimensions, door, cabinet, and appliance clearances;
- nearby combustion and exhaust appliances;
- condominium, heritage, or exterior restrictions;
- desired finish standard;
- safe access constraints.
Ask the contractor to trace the route rather than price from the straight-line distance between laundry and outside. A borescope, drawings, access opening, or other professional investigation may be appropriate, but agree to invasive work and restoration first.
Mark uncertainty explicitly. Examples: “north wall cavity not opened,” “roof termination inaccessible during snow,” or “common shaft ownership unconfirmed.” Put a decision price and authorization step beside each unknown. A quote that silently assumes an unobstructed empty cavity is not fixed scope.
Route Selection Scorecard
After every route passes model and local gates, score the tradeoffs.
| Criterion | Weight | Route A | Route B | Route C |
|---|---|---|---|---|
| Developed-length margin | 20 | |||
| Number/accessibility of bends | 15 | |||
| Exterior termination quality | 15 | |||
| Cleaning and inspection access | 15 | |||
| Envelope/rated penetration risk | 10 | |||
| Finish and structural disruption | 10 | |||
| Condensation/weather exposure | 5 | |||
| Installed cost | 10 |
Score from 0 to 5, multiply, and divide by 5. Add notes. Compliance, manufacturer limit, structural safety, exterior clearance, and required approvals are pass/fail gates; points cannot rescue a failure.
Leave design margin where practical. A route sitting exactly at a limit can become noncompliant when the appliance is moved six inches, a different hood is installed, or an undocumented bend appears. Do not create margin by ignoring fittings.
Cleaning and Inspection Record
Create a permanent log instead of relying on a generic annual reminder:
| Date | Loads/week | Dry-time change | Exterior flap/flow | Transition condition | Service performed | Findings/repair |
|---|
CPSC advises periodic cleaning but site conditions determine need. A short straight metal duct used twice weekly differs from a long vertical route used daily. Manufacturer instructions, lint rate, observed airflow, dry time, route geometry, pets/fabrics, and professional findings shape the interval.
After cleaning, confirm the transition and termination are reconnected, hidden joints have not separated where they can be inspected, the flap opens, and a normal wet load performs as expected. Record the service method. Aggressive equipment inappropriate for the duct can damage joints or lodge tools.
Treat increasing drying time as an inspection trigger, not a substitute for a calendar. The CPSC alert specifically identifies damp clothes after a typical cycle or longer drying as a possible blocked screen or duct sign.
Booster Fans and Long-Route Proposals
A dryer exhaust booster is not a generic permission to exceed the model's instructions. If proposed, require:
- proof it is permitted by the dryer manufacturer and local authority;
- listing and suitability for lint-laden dryer exhaust;
- design airflow and route calculation;
- automatic interlock/control method;
- failure indication or alarm required by the design;
- access for fan and duct cleaning;
- electrical and fire/rated-assembly scope;
- effect on dryer warranty;
- commissioning and maintenance records.
A booster adds a motor, sensor/control, power use, noise, lint surface, and failure mode. Compare it with a shorter reroute or ventless heat-pump dryer. Never use an ordinary inline bath fan in a dryer exhaust.
If a contractor proposes a proprietary engineered long-duct system, obtain the complete approved design rather than mixing components and rules from unrelated systems.
Worked Example: Three Routes
A hypothetical second-floor laundry room is twelve feet from an exterior sidewall in plan.
Route A: direct sidewall
It crosses two joist spaces and exits above a porch. Actual length is short, but the proposed hood would sit near an operable window and under an area that drifts with snow. Local clearance and exterior conditions may disqualify it.
Route B: attic to roof
It rises, turns through the attic, and exits the roof. It avoids the window but adds bends, vertical distance, cold-space condensation considerations, roof flashing, and difficult cleaning access. It must pass the selected dryer's table and roof-service plan.
Route C: new interior chase to lower sidewall
It is longer than A but uses fewer sharp turns, an accessible basement run, and a ground-level termination in a permitted location. A framed chase and finish work cost more initially, yet cleaning and future repair are easier.
The winning route is not automatically shortest actual length. Compare developed length, allowed termination, envelope details, access, and lifetime maintenance.
Post-Installation Verification
Before final payment:
- verify exact dryer and manual used;
- record actual/developed length and source table;
- inspect exposed duct, transition, supports, and joints;
- confirm dryer is not crushing the connector;
- verify exterior flap operation and no screen/restriction prohibited by instructions;
- confirm wall/roof and interior penetrations are finished;
- confirm permits and rated details where applicable;
- run a normal test load or manufacturer-prescribed installation check;
- observe exterior exhaust from a safe location;
- check for lint/air leakage at accessible joints;
- provide route diagram and photos;
- provide cleaning/access instructions.
Do not use an empty hot drum as the only acceptance test. A wet normal load challenges heat and moisture transport.
Common Mistakes
Applying a universal maximum length
Fix: use the exact model's current table and local requirements, documenting the tighter result.
Hiding a long transition in a wall
Fix: separate the permitted short appliance connector from permanent building duct.
Using fine pest screen
Fix: use a permitted termination that resists pests without trapping lint; follow the instructions.
Adding a booster fan casually
Fix: determine whether it is permitted, listed/designed for the application, interlocked, maintained, alarmed where required, and accounted for by the authority and dryer instructions. A booster should not mask a poor route.
Ignoring the new dryer
Fix: re-check route limits whenever the model changes. A vent acceptable for one dryer may not be accepted for another.
No cleaning plan
Fix: include safe access and route documentation at design time, not after lint accumulates.
Sources and Verification
- CPSC's dryer fire-safety publication supports metal exhaust material, avoiding plastic/foil accordion duct, lint removal, and periodic exhaust cleaning.
- CPSC's clothes-dryer standards page provides current federal product-safety context.
- DOE's laundry guide provides federal consumer efficiency context.
- Whirlpool's example installation instructions demonstrate model-specific developed-length and fitting tables.
- LG's venting and installation guidance provides another manufacturer example of airflow and route checks.
Manufacturer examples show why the exact dryer manual matters; they are not route permission for another model. Verify adopted local code, fire separation, roof/wall flashing, combustion, make-up air, and trade-licensing requirements.
Frequently Asked Questions
What is the maximum dryer vent length?
There is no single homeowner-safe number for every installation. Use the exact dryer's installation table plus local requirements, accounting for duct, fittings, termination, and any stricter rule.
Is 35 feet always allowed?
No. It is a frequently repeated code-style number, but manufacturer tables and local rules can differ and elbow/hood treatment matters. Document the applicable route for the exact model.
Can a dryer vent go through the roof?
It may be allowed, but it adds developed length, flashing, weather, condensation, lint, and service-access concerns. Verify model and local requirements and use a permitted roof termination.
Can I use flexible foil duct behind the dryer?
CPSC's dryer safety publication recommends rigid or corrugated semi-rigid metal instead of plastic or foil accordion material. Use the transition material specifically permitted by the exact dryer and local requirements.
Should a dryer vent have a screen?
Many product instructions prohibit screens because they risk lint. Use an approved hood or louver and pest approach under the exact manual; Whirlpool's example instructions illustrate why termination rules are model-specific.
Can two dryers share one vent?
Do not assume so. Shared exhaust can create backflow, lint, fire, control, and code issues. Use a specifically designed and approved system under local requirements and equipment instructions.
Does a ventless dryer solve every routing problem?
It removes the conventional exterior exhaust requirement but introduces condensate, ambient, electrical, heat, clearance, capacity, cycle-time, and maintenance decisions. Compare the complete installation.
How do I know the vent works after cleaning?
Inspect reassembled joints and termination, observe exterior flow safely, and repeat a controlled normal load. Qualified services may use appropriate airflow or pressure methods for the equipment and route.
What to Read Next
If slow drying triggered the project, use the dryer takes two cycles diagnostic to preserve before/after evidence. If the route is expensive or infeasible, compare the full product and installation decision with the heat-pump dryer versus vented dryer guide. For a recently tightened home, review air sealing and pressure interactions before ignoring replacement air and combustion.
Sources and Verification
Editorial Review
EnergyBS Editorial Team
EnergyBS publishes practical homeowner guides. Important program, product, and cost claims should be checked against the linked source and local project documents before you commit to work.
Related Guides
View All ArticlesWhy Your Dryer Takes Two Cycles: Diagnose Slow Drying Without Guessing
A symptomfirst homeowner guide to slow drying that separates wet washer output, load and cycle errors, lintscreen problems, crushed or blocked exhaust, room conditions, sensors, heat, and appliance faults.
Heat Pump Dryer vs Vented Dryer: Cost, Drying Time, Space, and Energy
A householdspecific comparison of heatpump, vented electric, and gas dryers using model energy data, laundry volume, utility rates, cycle time, drainage, room conditions, vent cost, maintenance, and clothing care.
The Physics of Air Sealing: Why Your RValue Doesn't Matter (If You Don't Seal)
Insulation is just a sweater. Air sealing is the windbreaker. We explain the physics of the Stack Effect, why Rvalues lie, and how to stop your home from leaking energy like a sieve.