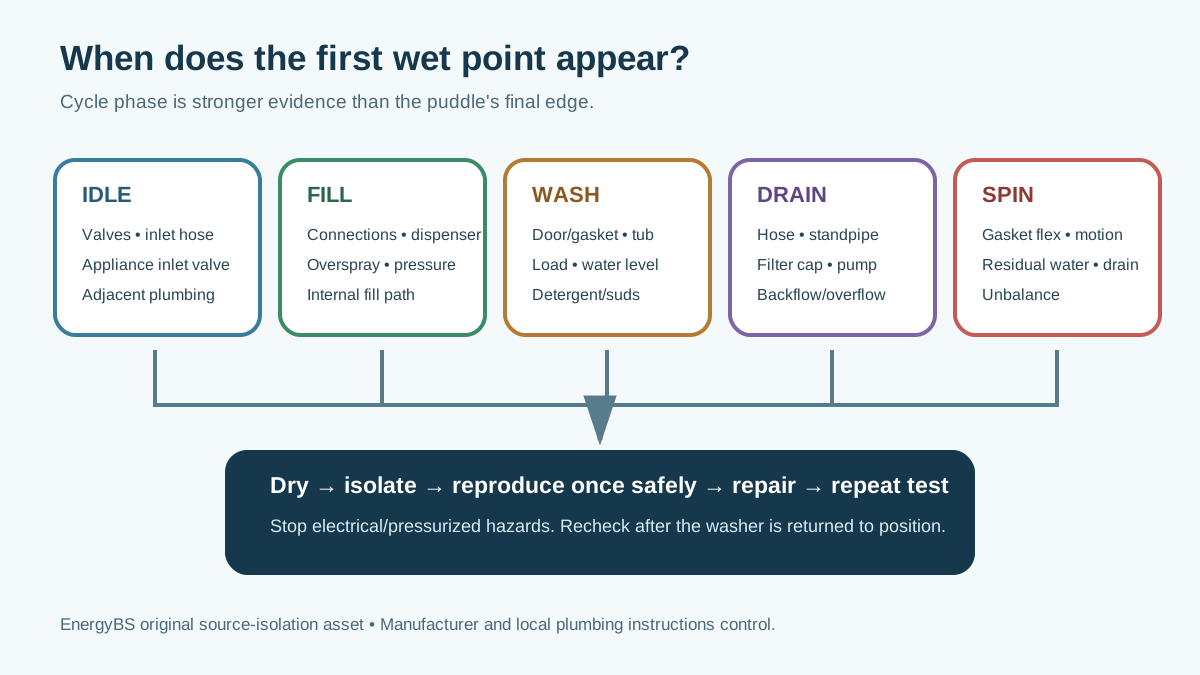
Washing Machine Leaking Water? Map Fill, Wash, Drain, and Idle Timing
Trace a washer leak by first wet point and cycle timing to separate household valves and drains, inlet hoses, dispensers and suds, door/gasket paths, pump filters, drain hoses, internal components, and overspray or spills.
Direct Answer
Trace a washer leak by first wet point and cycle timing to separate household valves and drains, inlet hoses, dispensers and suds, door/gasket paths, pump filters, drain hoses, internal components, and overspray or spills.
The Cycle Phase Identifies the Water System
Short answer: Stop the washer, keep people away from the wet electrical area, photograph the first wet point, and close the washer supply valves if a pressurized leak is suspected and the valves are safely accessible. Dry the floor, then determine whether water returns while idle, during fill, tumbling/agitation, drain, or high-speed spin. Check only owner-accessible hoses, valves, dispensers, door/gasket surfaces, standpipe, and filter caps described by the exact manual. A leak while idle suggests a different path from drain-only overflow or suds at spin. Do not keep running a known leak to make it easier to see.
Water travels along cabinet seams, hoses, flooring, pedestals, and gravity. The puddle's final edge can be far from its source. Cycle timing plus the highest first wet point is the most useful evidence.
Make the Laundry Area Safe
Do not touch a wet plug, receptacle, power strip, control, stacked dryer connection, or exposed wiring. If there is shock risk, arcing, smoke, heat, or burning odor, keep clear and use appropriate emergency/electrical help. Do not reach behind a running machine standing in water.
For a non-electrical leak:
- pause/stop only through normal controls if safe;
- close hot and cold washer valves if a supply-side leak is plausible and valves operate safely;
- protect nearby rooms and the ceiling below;
- photograph water before cleanup;
- note the cycle phase, remaining time, load, detergent, and error;
- dry separate candidate areas;
- do not move a stacked, pedestal-mounted, full, or violently unbalanced machine without qualified handling.
A valve that leaks at its stem, will not close, or serves other equipment is a plumbing problem. Do not force it. If the tub contains water, use the washer drain-and-spin guide rather than opening an unplanned filter path.
Build the Timing Matrix
| Leak timing | Candidate paths | First safe evidence |
|---|---|---|
| Returns while washer is off/idle | House valve, inlet hose, appliance inlet valve, adjacent plumbing | Close dedicated supplies; dry and time each connection |
| Only during fill | Inlet connections, dispenser, internal fill hose, overspray, pressure | Observe accessible rear/top/front areas without removing covers |
| During wash/agitation | Door/lid seal, tub/boot, dispenser residue, oversuds, internal hose/tub | Record load, water level, suds, first wet seam |
| Only while draining | Drain hose, standpipe overflow, pump/filter cap, internal drain path | Watch receiving drain and accessible hose/filter area |
| During high-speed spin | Door/boot flex, oversuds, drain path, loose internal water, unbalance | Stop abnormal motion; record direction and load |
| After cycle | Residual gasket water, dispenser drip, slow connection leak, drain backflow | Dry and recheck at timed intervals |
Do not treat this as a parts table. One leak can cross phases, and combination washer-dryers may have additional condensate paths. Use the model's water diagram and service procedures.
Rule Out Water That Is Not From the Washer
Inspect the laundry sink, faucet, floor drain, water heater, softener, boiler, humidifier, HVAC condensate, exterior wall, ceiling, and drain cleanout. Water can run beneath flooring or along a shared wall. Check whether the puddle appears when the washer has been isolated and unused.
EPA WaterSense recommends using no-use water-meter observations as one method to identify household leakage (EPA Fix a Leak Week). A moving meter does not name the washer; toilets, irrigation, and other fixtures must be excluded.
Also distinguish detergent spill, mop water, pet water, and dryer condensation from a plumbing leak. Clean the area completely and establish a dry baseline.
Idle Leak: Pressurized Supply Branch
The hot and cold supply remain pressurized when household valves are open, even when the washer is off. Inspect accessible:
- valve bodies and stems;
- hose connections at wall and washer;
- hose jacket for bulges, cuts, abrasion, rust, or dampness;
- rubber washers/seals visible under the approved disconnection procedure;
- hose contact with sharp cabinet edges;
- automatic shutoff or flood-safe device status;
- nearby plumbing joints.
Do not tighten a hose while pressurized or twist the valve/piping in the wall. Shut supplies and follow the installation manual. Replace hoses with the type, temperature/pressure rating, washers, and connection method approved for the washer and local plumbing. “Stainless braided” describes a cover, not the quality of every connector or inner tube.
If closing both dedicated valves stops recurrence after drying, the pressurized branch strengthens. Reopen one supply at a time only when safe and allowed to isolate hot versus cold. A plumber should address building valves, piping, pressure, and drainage; appliance service should address appliance inlet components. State the boundary in the quote.
Fill-Only Leak
Supply connection or inlet valve
A connection may leak only when flow changes pressure or the appliance valve energizes. Observe accessible points with a flashlight from a dry safe position. Do not remove the top or rear panel while energized.
Dispenser overflow or misdirection
Detergent, softener, bleach, additive, or auto-dose reservoirs can clog, foam, be overfilled, use the wrong product viscosity, or be assembled incorrectly. Remove and clean only as the manual describes. Use the correct compartment and MAX line. Do not mix cleaning chemicals.
LG's current front-load guidance notes that excess or unsuitable detergent can create suds and dispenser/rear leakage and that detergent dosing varies by product (LG leak troubleshooting). Apply the exact washer and detergent instructions.
Fill spray or internal hose
Water appearing from a cabinet seam during fill can involve an internal dispenser-to-tub hose, vent, clamp, valve, or spray path. Do not assume the seam is the failed part. A technician should remove panels under the service procedure, reproduce the fill safely, and identify the first internal wet point.
Wash or Agitation Leak
Front-load door and gasket
Inspect hair, thread, buttons, grit, hardened residue, folds, cuts, punctures, and fabric trapped between glass and gasket. Clean the accessible gasket and glass with the manufacturer-approved method. A small amount of retained water in a gasket fold can be normal; water crossing the seal or reaching the floor is not.
LG advises checking debris at the door/gasket and requesting service for a torn or persistently leaking gasket (LG front-load leak guide). Do not patch a torn boot with household adhesive or keep using a door that cannot seal.
Top-load lid, tub ring, and overspray
Water near the top can come from excessive loading, off-balance splash, fill spray, dispenser, tub ring, or internal hose. Stop a machine that bangs or walks. Do not reach under the lid or bypass the switch. Record water level, load type, and whether a small approved test load repeats the symptom.
Oversuds
Foam can emerge from vents, dispensers, door areas, or drain systems and leave a puddle that looks like clear water after bubbles collapse. Record detergent type, dose, load soil, water hardness if known, additive, and whether non-HE detergent was used. Follow only the model's official recovery and tub-clean instructions.
Tub or internal circulation path
Leaks beneath the central cabinet during wash can involve pump housing, recirculation hose, tub seam, heater seal, bearing/tub seal, or other model-specific components. These require controlled access. A new part should be supported by direct wet-point evidence.
Drain-Only Leak
Standpipe or sink overflow
Watch the receiving drain. If water rises to the rim, spills, or backs out, stop the washer. The appliance may be pumping correctly into a restricted or undersized building drain. LG notes that drain backflow can be mistaken for a washer leak (LG drain-leak guidance).
Do not seal the washer hose airtight into a standpipe unless the installation instructions and local rules allow the arrangement. Do not extend, reduce, or insert it based on a generic dimension; use the exact model's height and insertion limits.
Drain hose
Inspect restraint, insertion, splits, rub points, kinks, and connections. A hose can leak only when the pump produces flow. Moving the washer may worsen a brittle hose, so close supplies and plan access.
Pump filter or residual drain cap
If a leak began after filter cleaning, inspect whether the filter and emergency-drain cap are fully seated under the manual procedure and whether the seal/threads are clean and undamaged. LG lists improper reassembly as a leak path on applicable front loaders (LG leak support). Do not overtighten or substitute a seal.
Internal pump or hose
A technician should distinguish pump housing, clamp, hose, tub outlet, and cabinet migration. Ask for a loaded drain test after repair, not just a dry visual inspection.
Spin-Only or Movement-Related Leak
High-speed motion can flex a damaged gasket, move trapped water, expose an unbalanced tub-to-hose interference, or shake an external connection. It can also coincide with high pump flow. Record whether water appears before the drum accelerates, during maximum speed, or as it decelerates.
Stop violent movement. Verify shipping bolts were removed, feet and locknuts are set, the pedestal/stack kit is approved, and the floor is adequate under the installation manual. Do not hold a moving washer in place with your body.
Use a Controlled Empty Test Only After Safety Checks
If the official manufacturer procedure recommends an empty rinse or diagnostic cycle, and there is no known pressurized/electrical/structural hazard:
- dry all candidate locations;
- place separate absorbent indicators where they cannot block vents or contact electrical/moving parts;
- keep the drain visible;
- start the approved test;
- record the first indicator to wet and cycle timestamp;
- stop immediately when leakage appears;
- close supplies after the test if the leak is unresolved.
LG currently recommends an empty rinse test in its general front-load leak sequence (LG troubleshooting). That does not authorize repeated flooding or apply to a machine with unsafe electrical or mechanical symptoms.
Property-Damage and Moisture Check
Inspect baseboard, cabinet toe kicks, flooring seams, wall penetrations, the room below, and adjacent storage. Water can remain under vinyl, laminate, pedestal drawers, or sound insulation. Stop the leak first, then use appropriate drying/moisture assessment. Do not aim uncontrolled heat at hoses, plastics, wiring, or the appliance.
In a rental, condominium, or multi-unit building, follow emergency shutoff and notification procedures. Identify whether the building valve/drain or appliance component failed. Preserve photographs, invoices, and moisture readings without assuming insurance or legal responsibility.
Use Water-Supply Isolation to Separate Idle Leaks
When an idle leak is present and the shutoffs are safely accessible, closing the washer's hot and cold supplies according to household/manufacturer procedures can provide useful evidence. Dry the area, mark the water edge, and observe without running a cycle.
| Supply state | Leak continues? | Stronger branch |
|---|---|---|
| Both open | Yes | Supply connection, hose, inlet valve, adjacent plumbing, or unrelated source |
| Both closed | Stops | Pressurized washer supply path; inspect valve/hose boundary |
| Both closed | Continues | Residual appliance water, drain/condensate, adjacent source, or hidden migration |
| One open at a time | Changes | Hot/cold branch evidence, only if the manual/plumbing setup permits testing |
This is not permission to operate a washer with a known leak. Old shutoffs can fail or begin leaking when moved. Do not force a seized/corroded valve, disconnect a pressurized hose, or leave a diagnostic setup unattended. A plumber should handle questionable valves and building piping.
Inspect Fill Hoses as an Installed System
The visible hose surface is only one part of the risk. Record:
- manufacturer, material, age/date marking, and listed application;
- length and bend radius;
- abrasion against cabinet, wall, pedestal, or dryer;
- bulges, cracking, rust, fraying, flattening, or discoloration;
- connector alignment and evidence of cross-threading;
- washer/gasket condition specified for the fitting;
- shutoff valve and wall connection condition;
- tension when the washer is pulled out and pushed home;
- temperature/supply connection correctness;
- whether flood-control hose features require a specific reset or orientation.
Do not assume “stainless braided” means unlimited life or correct installation. Do not stack extra washers, use thread seal tape where a hose washer makes the seal, or tighten until fittings deform. Follow the appliance, hose, and valve instructions; have damaged or uncertain plumbing corrected professionally.
After any move, inspect with the washer in final position. A connection can remain dry while pulled forward and leak once the hose is kinked or side-loaded behind the cabinet.
Distinguish Condensation, Suds, and Clear Supply Water
Clear water is not automatically a supply leak. Condensation can form on cold inlet components in a warm humid room. Suds can travel through a vent or dispenser, collapse, and leave nearly clear water. Drain or tub water may carry little visible soil.
Document rather than taste or touch unnecessarily:
- temperature of nearby surfaces with a safe appropriate method;
- foam or slippery film;
- detergent product and dose;
- room humidity and cold-water conditions;
- exact first wet point;
- whether water appears with fill, tumble, drain, or idle time;
- colour/odor without direct inhalation;
- whether nearby sink, water heater, dehumidifier, or pipe is wet.
If contaminated wastewater, sewage, or cleaning chemical may be present, avoid exposure and tell the technician/restoration professional. Do not mix cleaners to “sanitize” an active leak.
Four Worked Leak Patterns
Leak begins immediately after filter cleaning
Water appears at the lower service door only during drain. The emergency hose cap or pump-filter seal may be mis-seated, dirty, damaged, or cross-threaded. Stop, cool/drain safely, and repeat only the exact reassembly procedure. Do not add plumbing tape or overtighten a plastic cap.
Water appears behind the washer while idle
The drum is dry and no cycle has run. Supply remains pressurized. Close safe shutoffs, dry, and observe the hose/valve boundary without moving a heavy machine alone. Continued leakage with supplies closed suggests residual/adjacent sources and needs a wider inspection.
Standpipe overflows only during high-flow drain
Water rises around the drain hose rather than emerging from the cabinet. Stop the cycle. Preserve hose depth/height photos. The building drain may be restricted or unable to accept flow; chemical drain cleaner can create additional hazards and should not be sent through the washer path.
Front-door drip during wash
Check clothing trapped at the seal, residue on glass/gasket, visible tear, door alignment, excess suds, and load interference. Do not remove the retaining ring or force the latch. A loaded leak test after qualified repair must prove the seal under real motion.
Document Hidden-Damage Boundaries
Water can travel under floating floors and emerge far from the source. Mark the first water edge and time, then inspect the room below, baseboards, cabinet sides, pedestal, drywall, and floor transitions. A surface that feels dry later can conceal moisture.
Stop active water first. Use appropriate moisture assessment and drying rather than a household heater aimed at the appliance. Preserve pre-cleanup photos, shutoff time, cycle phase, service findings, and restoration readings. In multi-unit housing, follow prompt notification rules because delay can expand damage beyond the laundry room.
Repair Verification Checklist
Require the work order to state:
- first failed location and cycle phase;
- household versus appliance boundary;
- failed component and causal condition;
- hose/material/part numbers;
- water-pressure or drain finding when relevant;
- detergent/load contribution if supported;
- floor/cabinet moisture observation;
- idle pressure test;
- fill, wash, drain, and spin test results as applicable;
- filter/cap/door reassembly check;
- parts and labor warranty.
After the machine is returned to position, recheck hoses and valves; pushing it back can kink or tension a connection. Close supply valves when the manufacturer and household procedures call for it, and ensure everyone knows their location.
Front Load, Top Load, and Combination Units Leak Differently
Front-load washer
The watertight front opening adds a boot/gasket, door glass, latch/hinge alignment, and often an accessible residual-drain/filter area. Inspect the lower gasket fold after a cycle, but do not pull it away from clamps or probe drain openings. A pedestal can hide the first wet point and route water to the front.
Top-load washer
There is no front door boot, but fill spray, tub ring, dispenser, lid area, internal hoses, overflow, suspension motion, and high water-level/load interaction matter. Do not open the lid and reach into an operating basket. A leak near the front does not prove a pump; water may travel along the cabinet base.
All-in-one washer-dryer
Combination appliances can add condensate, drying-air, heat-exchanger, lint-management, and sometimes heat-pump paths. Identify whether water appears during washing, draining, or drying. Do not interpret a drying condensate line through a washer-only diagram. Use a technician qualified for the exact technology.
Stacked laundry center
Water may originate in the upper/lower unit or shared connections. Access and stability are higher risk. Do not unstack without the approved procedure and enough trained people/equipment. Protect dryer electrical or gas connections.
Inlet Hose and Valve Replacement Scope
Do not accept “new hoses included” without specifications. Record:
- hose manufacturer/model and approval;
- hot/cold temperature and pressure rating;
- length without tension or coils that kink;
- connector material and washer/seal;
- compatibility with recessed boxes and shutoffs;
- routing away from sharp edges and vibration;
- whether automatic-shutoff/flood-stop devices are allowed by the washer;
- connection and inspection responsibility;
- replacement/inspection interval stated by the hose and washer makers.
Some flood-stop hoses react to flow patterns and can restrict normal fill if incorrectly selected or installed. Some electronic shutoff valves require sensors, power, connectivity, and periodic testing. Never assume a safety accessory is compatible because thread size matches.
Household pressure is not diagnosed by feel
Low or high pressure can affect fill and valve behavior, but numbers and test conditions must come from the exact washer, valve, hose, and local plumbing requirements. A plumber should measure static and dynamic pressure with suitable equipment. Do not partially close a valve as a permanent pressure regulator unless a qualified design specifically calls for it.
Drain Pan and Leak Detector Planning
A pan can collect a limited leak and direct it to an approved drain, but it can also hide water, obstruct service, crack, lack a drain, or overflow during a full hose failure. Verify:
- pan material and load support;
- drain connection, risk/prime/backflow requirements;
- threshold height versus appliance installation;
- access to level feet and filter;
- sensor placement at likely first wet points;
- ability to inspect and dry;
- no interference with a pedestal, vibration, or air path.
A smart valve can reduce exposure only if sensors detect water, the valve can close both supplies, power/connectivity is reliable, household members know the response, and the system is tested. The smart leak-detector guide helps plan the control chain.
Neither a pan nor detector authorizes continued use of a known leak. They are layers after correct installation and maintenance.
Property and Insurance Evidence Packet
Without assuming coverage, preserve:
- first discovery time and cycle phase;
- wide and close photos before cleanup;
- valve positions and isolation time;
- model/serial and installation date;
- hose/valve/standpipe photos;
- service and plumbing invoices;
- moisture readings from qualified assessment;
- damaged materials and contents;
- drying equipment dates;
- communications with owner, manager, insurer, or neighbor below.
Do not discard a failed hose or fitting until the responsible parties say evidence is no longer needed, unless retaining it is unsafe. Do not alter the scene merely to assign blame. Stop water and dry the building first.
New-Installation Leak Acceptance Test
Before the installer leaves:
- verify shipping restraints and level;
- open supplies while observing both wall and machine connections;
- run the official installation/calibration cycle;
- watch dispenser and door/lid during fill/wash;
- watch the standpipe during maximum discharge;
- inspect filter/residual-drain caps;
- observe high-speed stability;
- pause and inspect under/behind where accessible;
- return the machine to final position;
- recheck every external connection;
- document dry results and installer responsibility.
A leak that begins only after push-back often points to a hose kink, stretched connector, or disturbed drain route. Test in the final geometry.
After Repair: 48-Hour Observation Plan
Use the washer normally only after the provider completes the prescribed test. For the next several cycles, vary one representative load at a time and inspect the repaired phase. Keep separate dry indicators near accessible connections. Close supplies between use if the manufacturer's household procedure recommends it and no automatic system depends on a different setup.
Record idle, fill, wash, drain, and spin results. If moisture returns, stop and photograph the first wet point. Do not tighten or disassemble the repair before the provider sees the recurrence; preserve warranty evidence.
Keep the dated observation log with the invoice. Include the exact load, cycle, detergent dose, supply-valve position, and first wet location. If the same phase stays dry across several representative cycles, that is stronger acceptance evidence than one empty test. If a different phase leaks, treat it as a new source-isolation question rather than assuming the repaired part failed.
Frequently Asked Questions
Why does the washer leak only while draining?
The drain hose, standpipe, pump-filter cap, pump, or internal drain hose becomes active then. Watch the receiving drain; LG notes that drain backflow can resemble a washer leak in its official support.
Can too much detergent make a washer leak?
Yes. Excess suds can escape from vents, dispensers, door paths, or the drain system. Use the correct detergent and model/load dose. LG includes oversudsing in its manufacturer leak checks.
Should I tighten a leaking inlet hose harder?
Not blindly. Shut the supply safely, inspect threads, washers, hose, and valve, and follow the installation torque/method. Overtightening can damage plastic or deform a seal; a leaking building valve may need a plumber.
Why did the washer leak after I cleaned the pump filter?
The filter, seal, threads, or residual-drain cap may not be seated correctly or may be damaged. Follow the exact reassembly and leak-test procedure; LG identifies these paths on applicable models (LG).
Can I keep using a washer with a small leak?
An active leak can reach electricity, damage materials, worsen suddenly, and obscure its source. Stop and isolate it rather than normalizing the puddle.
Will a smart leak detector prevent damage?
It may alert or trigger an approved shutoff, but placement, valve compatibility, power, connectivity, and response matter. It does not repair the washer. Read the smart leak-detector guide.
Where do I check for washing-machine recalls?
Use the exact model and serial with the manufacturer and CPSC washing-machine recall page. Follow official stop-use wording.
What to Read Next
If water remains in the tub, use the drain-and-spin sequence. If residue or odor accompanies the leak, use the front-load washer cleaning guide. Compare a diagnosed major repair with the washer repair-versus-replace worksheet. Add early warning with the smart leak-detector guide.
Sources and Verification
Cycle-phase and component examples use official LG general leak and LG front-load leak guidance. These do not replace the exact model manual. Household leak context comes from EPA WaterSense; washer efficiency terminology comes from ENERGY STAR; recall status must be confirmed through CPSC. Local plumbing/electrical rules and qualified diagnosis control repair.
Sources and Verification
Editorial Review
EnergyBS Editorial Team
EnergyBS publishes practical homeowner guides. Important program, product, and cost claims should be checked against the linked source and local project documents before you commit to work.
Related Guides
View All ArticlesWashing Machine Won't Drain or Spin? Separate the Water Path From the Spin Problem
A safe, modelspecific diagnostic for standing water, soaked clothes, drain errors, and nospin complaints that separates cycle, load, suds, hose, standpipe, filter, pump, door/lid, balance, and drive evidence.
FrontLoad Washer Smells Musty? Remove Residue and Moisture Without Mixing Cleaners
A modelspecific frontload washer odor plan covering retained laundry and moisture, detergent dosing, gasket and dispenser cleaning, pumpfilter and drain checks, tubclean cycles, chemical safety, ventilation, recurrence tracking, and service escalation.
Washing Machine Repair or Replace? A FiveYear Cost, Water, and Reliability Worksheet
Compare a diagnosed washer repair with a fully installed replacement using repair certainty, warranty, downtime, leak risk, model energy and water data, dryer effects, fit, hookups, delivery, and responsible haulaway.