FrontLoad Washer Smells Musty? Remove Residue and Moisture Without Mixing Cleaners
A modelspecific frontload washer odor plan covering retained laundry and moisture, detergent dosing, gasket and dispenser cleaning, pumpfilter and drain checks, tubclean cycles, chemical safety, ventilation, recurrence tracking, and service escalation.
Direct Answer
A modelspecific frontload washer odor plan covering retained laundry and moisture, detergent dosing, gasket and dispenser cleaning, pumpfilter and drain checks, tubclean cycles, chemical safety, ventilation, recurrence tracking, and service escalation.
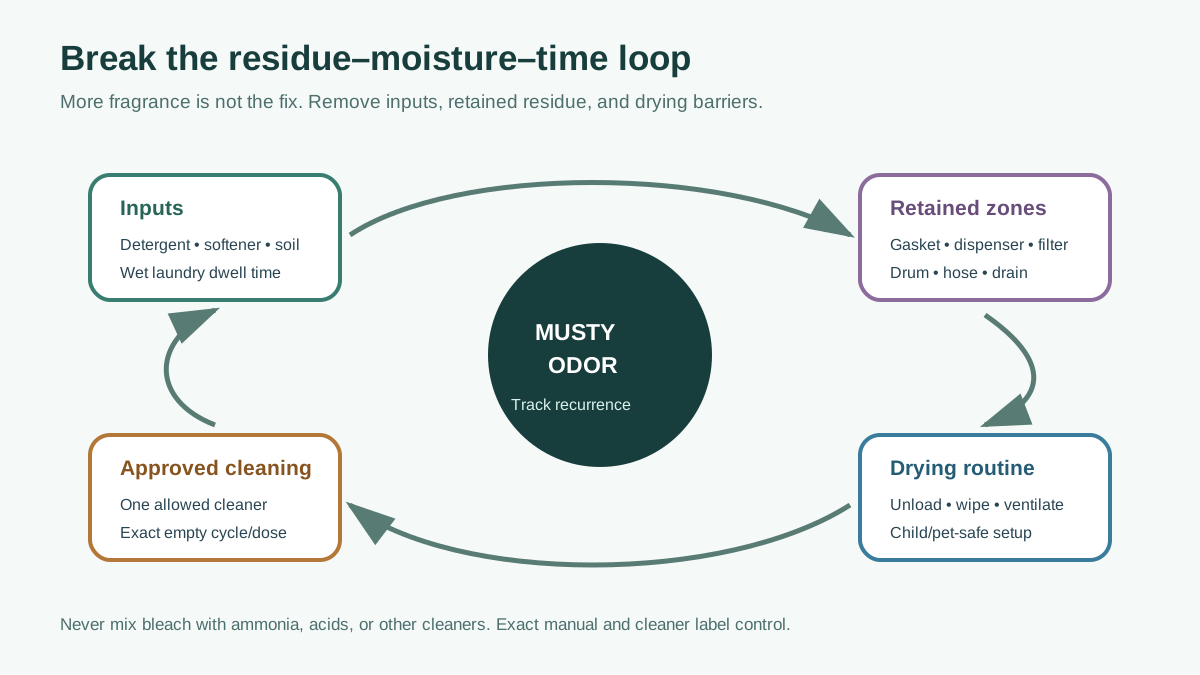
Break the Residue–Moisture–Time Loop
Short answer: Remove laundry promptly, inspect and clean the door glass/gasket and dispenser using only the exact model's approved method, verify the washer drains, and clean an owner-accessible pump filter only as the manual directs. Run the empty Tub Clean/Self Clean cycle with the cleaner and dose specified by the manufacturer—never a mixture of products. After use, allow the drum, gasket, and dispenser to dry where the household can do so safely. Correct excess detergent or softener and track recurrence. Persistent sewage, burning, solvent, gas-like, or drain-related odor needs the appropriate service or plumbing response, not more fragrance.
Musty odor is usually a system condition, not a single dirty spot. Water, detergent, softener, body soil, lint, pet hair, and time can create residue in the gasket, dispenser, drum, drain path, or filter. Closing the wet cabinet slows drying. Adding more detergent can feed the residue rather than clean it.
Stop Before Cleaning if the Odor Signals a Hazard
Do not run a cleaning cycle when there is:
- burning electrical, hot insulation, or melting-rubber odor that persists;
- smoke, arcing, a hot receptacle, or repeated breaker trips;
- natural-gas or fuel odor from another appliance/utility;
- solvent or unknown chemical fumes;
- water at electrical parts;
- violent motion, grinding, or a damaged drum/door;
- an official stop-use recall;
- symptoms after incompatible cleaners may have been mixed.
Leave the area and contact emergency, poison-control, utility, electrical, or appliance help appropriate to the condition. Do not “flush out” a dangerous mixture by starting the washer. CDC bleach safety says never mix bleach with ammonia or any other cleanser (CDC mold-cleanup fact sheet). Manufacturer instructions may prohibit or limit other products because appliance materials and cycles vary.
Identify the Odor and Its First Location
| Odor/evidence | Candidate branch | First action |
|---|---|---|
| Musty, strongest at gasket | Retained moisture, lint/hair, residue, hidden fold | Inspect and clean per manual; dry and track |
| Sour at dispenser | Detergent/softener residue, stagnant product, misassembly | Remove/clean only as instructed |
| Strongest at pump-filter door | Retained water/debris, poor drainage, loose cap | Follow exact safe drain/filter procedure |
| Sewer-like at standpipe | Dry/failed risk, drain biofilm, hose insertion/seal, plumbing | Inspect plumbing arrangement; use plumber if needed |
| Odor only on clothing | Load left wet, washer residue, detergent/rinse issue, source fabric | Separate machine and laundry tests |
| Burning/rubber/electrical | Foreign object, friction, motor/drive/electrical issue | Stop use and diagnose safely |
| Chemical after cleaning | Product residue or incompatible mixture | Ventilate/leave and follow product/poison guidance |
Do not identify mold species by color or smell. “Moldy” is a descriptive odor, not a laboratory diagnosis. The practical goal is to remove visible residue with approved methods, restore drainage and drying, and escalate material damage or persistent growth.
Document Before You Mask It
Photograph visible residue, the gasket folds, dispenser, error codes, filter area, and standpipe. Record:
- when the odor appears: after wash, after days closed, during drain, or on hot cycles;
- laundry residence time after completion;
- detergent/softener type and measured dose;
- common water temperature and cycle;
- Tub Clean history and exact cleaner;
- drain errors, slow draining, or standing water;
- leak history;
- room humidity and ventilation;
- whether odor transfers to an empty wet white towel test allowed by the manual.
Fragrance beads, extra softener, and scented cleaner can hide the symptom while adding residue. Establish the baseline without layering products.
Step 1: Remove Laundry and Dry Accessible Water
Take clothing out promptly. Rewash according to textile care and detergent guidance if it sat wet long enough to smell; do not dry odor into fabric before deciding. Wipe accessible standing water from the door glass and gasket using the material and method approved by the washer maker.
Inspect the full gasket fold without stretching, puncturing, or removing it. Look for hair, lint, coins, small socks, pins, and residue. Sharp objects require gloves/tools only as allowed; damaged rubber or a persistent leak needs service. Do not push debris into drain holes.
LG notes that front-load door sealing can risk moisture and residue when the door stays closed and recommends removing laundry and allowing drying on supported models (LG musty-odor guidance). Keep a door ajar only when it does not create a child, pet, access, fire-door, or walkway hazard and the manufacturer permits it.
Step 2: Correct Detergent and Softener Inputs
High-efficiency detergent is designed for low-water machines, but “HE” does not mean unlimited dosing. Dose for the product concentration, load size, soil, water hardness, and washer instructions. Auto-dose reservoirs also require the correct concentration setting and cleaning.
Common residue inputs include:
- filling to a cap line intended for a much larger load;
- using non-HE detergent in an HE washer;
- adding detergent both manually and through auto-dose;
- using excessive fabric softener;
- pouring viscous product into the wrong compartment;
- mixing powder/liquid inserts incorrectly;
- cold cycles that do not dissolve a particular product/load well;
- repeated quick cycles that do not match heavy soil;
- soap or homemade formulations not approved for the machine.
LG's official odor page links excess detergent/softener with buildup and recommends HE detergent for front loaders (LG odor support). That does not establish one tablespoon or one pod for every household; follow the exact product labels.
Step 3: Clean the Dispenser and Housing
Remove inserts and the drawer only as the manual describes. Photograph orientation first. Clean product channels, siphon caps, and accessible housing surfaces with approved materials. Rinse and dry before correct reassembly. Do not scrape sensors, valves, nozzles, or soft plastic with metal tools.
Check that:
- every insert returns to the correct compartment;
- the liquid cup is installed/removed as required for the detergent form;
- siphon components seat fully;
- no product exceeds MAX;
- auto-dose tanks and lines follow their maintenance procedure;
- the drawer closes without trapped debris.
A dispenser that retains stagnant product after cleaning or leaks during fill may need appliance service, not stronger chemical.
Step 4: Inspect the Drain Path
Odor can originate from water that does not leave the machine or from the household drain.
Pump filter
Only some models have an owner-accessible pump filter. If the manual provides a procedure, cool hot water, shut down as instructed, use the residual-drain hose and adequate containment, clean debris, inspect the seal, and fully reseat both filter and drain cap. Run the official leak test afterward. A loose filter can turn an odor task into a flood.
LG states that a clogged pump filter can contribute to poor drainage and retained-water odor on applicable models (LG odor/buildup guidance). Do not infer that every top-loader has an accessible filter.
Drain hose and standpipe
Compare hose height, insertion, restraint, and air-gap/seal arrangement with the installation instructions. A hose pushed too far, an airtight improvised seal, siphoning, backflow, or a plumbing risk problem can create sewage-like odor. Do not pour drain chemical through the washer. A plumber should evaluate the building drain and risk when the smell is strongest there or other fixtures are involved.
If the machine leaves standing water or will not finish, use the drain-and-spin diagnostic before running repeated cleaning cycles.
Step 5: Run the Exact Empty Cleaning Cycle
Tub Clean, Clean Washer, Self Clean, and similar cycles differ in temperature, water level, rotation, time, and permitted chemistry. Use the exact name and procedure in the manual.
The safe sequence
- Empty the drum completely.
- Remove visible foreign objects.
- Clean gasket/dispenser/filter as instructed.
- Choose only one approved cleaner.
- Put it in the specified location at the specified dose.
- Do not add laundry or ordinary detergent unless explicitly instructed.
- Run the dedicated cycle without interruption.
- Complete any required rinse.
- Inspect for leaks or remaining residue.
- Dry and ventilate as safely permitted.
LG's current tub-clean guide recommends a washer tub cleaner following its package instructions and describes powder, liquid, and tablet placement for supported products (LG Tub Clean). Whirlpool's procedure may specify different placement and chemistry. The model manual wins.
Never improvise a chemical cocktail
Do not combine bleach, vinegar/acids, ammonia, tub cleaner, detergent, peroxide, or other household products. Even two individually familiar cleaners can produce toxic gas or damage seals/metals. Flush/rinse only as the product and appliance instructions direct. If mixing occurred and anyone has symptoms, leave the exposure and contact emergency/poison guidance.
More cleaner is not more cleaning
Excess product can oversuds, fail to rinse, leak, attack materials, or leave odor. Do not run back-to-back high-chemical cycles beyond official guidance. If the first approved sequence does not improve the condition, find the retained-residue/drain/service cause.
Step 6: Establish a Drying Routine
After each wash, where safe and manufacturer-approved:
- remove laundry promptly;
- wipe standing gasket/door water;
- remove foreign objects;
- leave door and dispenser positioned for ventilation;
- keep the drum empty between uses;
- address room humidity or exhaust problems;
- do not block appliance vents;
- keep children and pets from accessing the drum.
“Leave the door open” is not universally safe. A shared hallway, accessible child/pet environment, fire-rated laundry enclosure, or mobility path may require a manufacturer door prop, scheduled drying, or another safe arrangement. Never let anyone climb into an appliance.
Test Whether the Washer or Laundry Is the Source
After an approved cleaning and stable drainage, run the manufacturer's allowed empty rinse, then a small load of clean white cotton towels with the correct detergent and cycle. Smell the dry towels before loading, immediately after wash, and after prompt drying. Record whether odor is in the empty drum, wet towels, dryer, basket, closet, or water supply.
If only certain fabrics smell, inspect their care, prior storage, body oils, and detergent compatibility. If cold and hot water themselves smell, test the supply at nearby fixtures and involve plumbing/water professionals. If odor appears only after drying, inspect the dryer airflow and cleanliness using the slow-drying moisture-path guide.
When Cleaning Is Not Enough
Arrange model-qualified service when:
- musty odor persists after the exact approved cleaning sequence;
- visible residue or growth is behind inaccessible parts;
- the gasket is torn, permanently deformed, or leaking;
- the machine does not drain fully;
- the filter repeatedly fills with abnormal material;
- water leaks internally or under the cabinet;
- bearings, tub seals, heater, pump, hoses, or internal deposits are suspected;
- burning/rubber/electrical odor persists;
- error codes recur;
- a recall or service program may apply.
Ask the technician to document drain performance, retained-water locations, gasket/dispenser/filter condition, internal hose/tub evidence, leak test, and post-cleaning rinse. Replacing only a gasket may not solve residue elsewhere; cleaning only the tub may not solve a failed drain.
Deepen the Source Test Without Adding More Chemistry
If the first approved cleaning reduces but does not eliminate odor, do not immediately double product or run repeated maximum-temperature cycles. Re-map the first location where odor returns:
| First return location | Evidence to investigate |
|---|---|
| Dispenser/cavity | Product concentration, siphon insert, auto-dose setting, hardened residue, slow flush |
| Door-gasket fold | Trapped item, blocked accessible drain holes, tear, persistent moisture, inaccessible residue |
| Pump-filter access | Incomplete drainage, filter debris, cap/seal, drain-pump or hose condition |
| Standpipe | risk/vent/drain issue, hose insertion or airtight seal, wastewater backup |
| Drum only after loads | Load soil, dose, cycle, water temperature/hardness, rinse/extraction |
| Dry laundry only | Dryer, hamper, closet, textile, delayed removal, or storage source |
| Control/motor area | Stop use; electrical/mechanical service branch |
Use the same nose carefully from normal standing distance; do not inhale deeply from a drain, chemical container, or electrical area. Photograph residue and water before wiping it away.
Audit Water Hardness, Dose, and Rinsing Together
Detergent labels often vary dose with concentration, load size, soil, and water hardness. The washer may also change water and rinse behaviour by cycle. Record all inputs instead of relying on “one pod” or a cap line as universal.
For three comparable loads, log:
- textile and approximate mass;
- soil type;
- detergent product/concentration and measured dose;
- softener/booster/sanitizer use;
- municipal or tested water hardness;
- selected cycle, temperature, rinse, and spin;
- visible suds late in cycle;
- wet-laundry odor immediately after completion;
- time until unloading and drying;
- empty-drum odor after ventilation.
If lowering an excessive dose within product and appliance instructions improves rinsing and odor, maintain the minimum effective dose for that condition. If laundry remains dirty, do not keep reducing blindly; review load size, cycle, temperature, soil pretreatment, water, and machine performance.
Clean the Gasket Without Damaging It
Use only the exact permitted cleaner, concentration, contact time, wiping method, and personal protection. Gently inspect accessible folds with the machine stopped and power handled as directed. Remove hair, lint, coins, tissues, and small garments using safe tools where needed.
Do not:
- pull the gasket beyond its designed movement;
- remove retaining bands;
- probe hidden drain holes with wire;
- use abrasive pads that roughen the sealing surface;
- leave cleaner pooled longer than directed;
- close the door on wet chemical residue;
- claim dark staining is a particular organism without testing.
A torn, swollen, hardened, detached, or leaking gasket is a service condition. Ask whether residue extends behind it and how the rest of the water path will be cleaned so replacement does not treat only the visible surface.
Separate Standpipe Odor From Washer Odor
With the washer empty and dry, compare odor at the drum opening and at normal standing distance from the standpipe. Note gurgling, nearby slow drains, risk history, hose insertion depth, and whether the hose is sealed airtight contrary to instructions.
Do not remove a hose from an active full washer or put your face over a drain. Do not pour fragrance, bleach, acid, or drain opener into the standpipe as a diagnostic. A plumber can verify risk seal, venting, blockage, and local installation; an appliance technician can verify retained water and hose/pump conditions. Sometimes both boundaries need correction.
Worked Reset: From Fragrance Masking to Stable Baseline
A household uses concentrated detergent to the cap line, softener, and scent beads in small cold-water loads. Laundry sits for two hours, and the door remains closed. The gasket and dispenser are visibly filmed, but drainage is normal.
The controlled reset is not “add a stronger cleaner.” It is:
- photograph and clean the owner-accessible dispenser/gasket by the manual;
- run the exact empty maintenance cycle with one approved product;
- correct detergent concentration and dose for small loads/water;
- pause softener/fragrance during the test;
- unload promptly and dry/vent safely;
- compare identical towel loads over two weeks;
- escalate if residue, leak, drainage trouble, or odor returns from an inaccessible point.
This sequence creates information. Changing every chemical while leaving wet laundry and a closed machine creates none.
Original Four-Week Recurrence Log
| Week | Loads | Detergent/dose | Tub clean or maintenance | Door/dispenser drying | Drain/leak issue | Odor 0–5 |
|---|---|---|---|---|---|---|
| Baseline | ||||||
| 1 | ||||||
| 2 | ||||||
| 3 | ||||||
| 4 |
If odor improves then returns, the log can reveal detergent, wet-laundry dwell time, a drain event, or missed maintenance. If it never changes, reconsider the source rather than escalating fragrance.
Distinguish Washer Odor From Water-Supply Odor
Fill a clean glass from a nearby cold tap and, if safely available, the hot tap. Do not drink questionable water. Compare odor immediately and after the water sits. If sulfur, metallic, earthy, fuel, or sewage odor exists at multiple fixtures, the source may be the water heater, well, municipal supply, plumbing, drain, or building—not the washer.
Record whether odor appears:
- only on hot washes;
- only after the washer sits;
- at every cold-water fixture;
- only when the drain pump runs;
- only in the laundry closet;
- only in certain fabrics;
- only after the dryer.
A plumber or water professional can assess supply and drain conditions. Do not add disinfectant to household plumbing or a well based on a laundry smell alone. Follow public-health/water-provider guidance for water safety.
Room Humidity and Ventilation Matter
A washer in a damp unventilated closet dries slowly. Check for dryer exhaust leakage, bathroom moisture, plumbing seepage, exterior condensation, or a blocked room grille. Use a hygrometer as trend evidence, not proof of mold. Keep required appliance/closet clearances and do not add a fan or heater that creates electrical/fire/condensation problems.
For a vented dryer, verify the exhaust reaches outdoors and the duct is safe using the dryer vent-routing guide. For a heat-pump dryer or combo, follow condensate, filter, heat-exchanger, and room-condition requirements. Dryer moisture in the room can keep the washer wet.
Top-Load Washer Odor Is a Different Geometry
Top loaders do not have a front door boot, but residue can collect beneath the wash plate/agitator, tub ring, dispenser, lint filter, balance ring area, and outer tub. Do not remove an agitator or wash plate merely to clean odor unless the manual makes it owner service. Some fasteners, seals, and splines require exact tools and reassembly.
Use the top-load Tub Clean/Clean Washer cycle and product placement in the exact manual. Do not carry front-load gasket-cleaner concentrations into a top loader. If flakes or residue repeatedly appear after approved cleaning, capture a sample/photo for service and describe prior products; do not run endless chemical cycles.
Chemical Safety Beyond “Never Mix”
- Read the washer manual and cleaner Safety Data/label warnings.
- Ventilate as directed without exposing children/pets.
- Wear specified eye/skin protection.
- Measure—do not estimate or double the dose.
- Never transfer cleaner into a beverage container.
- Do not mix products in the dispenser, drum, or drain.
- Rinse measuring tools only as the label directs.
- Store products in original labeled containers.
- If exposure occurs, follow the label and poison/emergency guidance.
Bleach can damage some appliance materials when used incorrectly; acids can attack metals; excess foaming cleaner can leak; fragrance can trigger sensitivity. “Natural” does not mean compatible. One approved product and one approved cycle is the safe boundary.
Build a Model-Specific Maintenance Card
Copy these fields from the manual rather than a generic calendar:
| Task | Exact method/product | Trigger or interval | Last completed |
|---|---|---|---|
| Gasket/door/lid | |||
| Dispenser/auto-dose tank | |||
| Pump filter/residual hose | |||
| Tub Clean/Self Clean | |||
| Inlet screens/hoses | |||
| Drain hose/standpipe | |||
| Combination dryer filters/condensate |
Manufacturer reminders can be based on cycle count rather than calendar time. Heavy pet hair, oily workwear, frequent low-temperature cycles, or high use may warrant the manual's more frequent condition-based checks. Never exceed chemical-cleaning frequency without official support.
Odor After a Long Vacancy or Storage
If a washer sat unused:
- inspect for pests, damaged hoses, corrosion, standing water, and freezing damage;
- verify valves, drain, power, and installation before energizing;
- follow the manufacturer's return-to-service procedure;
- clean accessible dispenser/gasket/filter areas;
- run the approved empty cleaning/commissioning cycle;
- inspect for leaks through every phase;
- test with a small washable load before valuable clothing.
Do not operate a washer that froze until a qualified inspection confirms water components are intact. A hose or pump crack may not leak until fill or drain begins.
What a Deep-Clean Service Should Specify
If owner maintenance fails, ask the provider to define:
- accessible and internal components cleaned;
- parts removed and replaced seals/fasteners;
- chemistry and rinse method compatible with the model;
- drain and filter findings;
- gasket/tub/hose condition;
- leak test after reassembly;
- loaded wash and odor verification;
- mold/remediation boundary if surrounding building material is involved;
- warranty and recurrence plan.
“Sanitized” should not be an unsupported promise. Ask what was cleaned, how residue was removed/rinsed, and how the result was verified.
Keep the provider's cleaner name, concentration, cycle, removed parts, photographs, and rinse verification with the service record. If odor returns, that documentation shows whether the same zone was treated and prevents incompatible chemistry from being layered over an unknown prior product.
Frequently Asked Questions
Can I mix bleach and vinegar to clean a washer?
No. Do not mix bleach with acids, ammonia, or other cleaners. CDC says never mix bleach with ammonia or any other cleanser (CDC). Use one model-approved product exactly as directed.
How often should I run Tub Clean?
Use the exact manufacturer's interval or machine reminder. LG currently describes monthly maintenance for supported models and a specific recovery sequence for existing musty odor (LG Tub Clean); another model may differ.
Should I leave the front-load washer door open?
Manufacturers often recommend ventilation/drying, but do so only where the manual permits and it is safe for children, pets, mobility, and the room. LG explains the moisture rationale in its musty-odor guidance.
Does washer odor prove black mold?
No. Odor and color do not identify an organism or species. Remove residue safely with approved methods, correct retained moisture/drainage, and seek professional evaluation when growth or health concerns persist.
Can too much detergent cause odor?
Yes. Unrinsed detergent and softener can contribute to buildup. LG includes dosing, dispenser cleaning, gasket cleaning, filter checks, and Tub Clean in its odor/buildup procedure.
Why does the washer smell like sewage?
Inspect the standpipe, drain hose insertion/seal, risk, backflow, and other plumbing sources. Do not mask it with tub cleaner; a plumber may need to evaluate the building drain.
Where do I check washing-machine recalls?
Search the full model and serial with the manufacturer and CPSC washing-machine recall category, then follow the official remedy.
What to Read Next
Resolve incomplete drainage with the washer drain-and-spin guide. Trace water on the floor with the washer leak-source map. If inaccessible residue or a major failed component produces a large quote, use the washer repair-versus-replace worksheet. Check downstream drying with the two-cycle dryer guide.
Sources and Verification
Cleaning and maintenance claims use official LG odor/buildup, LG Tub Clean, LG musty-odor, and Whirlpool cleaning guidance. They are product-specific; the exact model manual and cleaner label control. Chemical-mixing safety comes from CDC, and recalls must be verified through CPSC. Persistent plumbing, electrical, or health concerns require the appropriate qualified professional.
Sources and Verification
Editorial Review
EnergyBS Editorial Team
EnergyBS publishes practical homeowner guides. Important program, product, and cost claims should be checked against the linked source and local project documents before you commit to work.
Related Guides
View All ArticlesWashing Machine Won't Drain or Spin? Separate the Water Path From the Spin Problem
A safe, modelspecific diagnostic for standing water, soaked clothes, drain errors, and nospin complaints that separates cycle, load, suds, hose, standpipe, filter, pump, door/lid, balance, and drive evidence.
Washing Machine Leaking Water? Map Fill, Wash, Drain, and Idle Timing
Trace a washer leak by first wet point and cycle timing to separate household valves and drains, inlet hoses, dispensers and suds, door/gasket paths, pump filters, drain hoses, internal components, and overspray or spills.
Washing Machine Repair or Replace? A FiveYear Cost, Water, and Reliability Worksheet
Compare a diagnosed washer repair with a fully installed replacement using repair certainty, warranty, downtime, leak risk, model energy and water data, dryer effects, fit, hookups, delivery, and responsible haulaway.