Window Air Conditioner Sizing and Installation: A RoombyRoom Worksheet
A roombyroom window AC worksheet that adjusts capacity for area, ceiling, sun, people, kitchen loads, enclosure leakage, airflow, electrical supply, window support, drainage, noise, and installed operating cost.
The Short Answer
Short Answer: Start with the room's measured area and ENERGY STAR's capacity chart, then adjust for ceiling height, sun and shading, occupants, kitchen heat, open connections, envelope leakage, and where supply air can actually travel. Before ordering, verify the exact model's window type and dimensions, support/anchoring method, exterior clearance, drainage orientation, electrical circuit and plug, building rules, delivery route, noise, CEER, and local service. Bigger is not automatically better: an oversized on/off unit can short-cycle and leave the room cool but humid.
Do not balance a unit loosely on a sash, improvise a shelf, defeat window guards, cut a grounding pin, use an extension cord, or assume foam side panels provide structural support. A falling unit, overloaded receptacle, trapped emergency egress, or unsafe installation outweighs any cooling benefit.
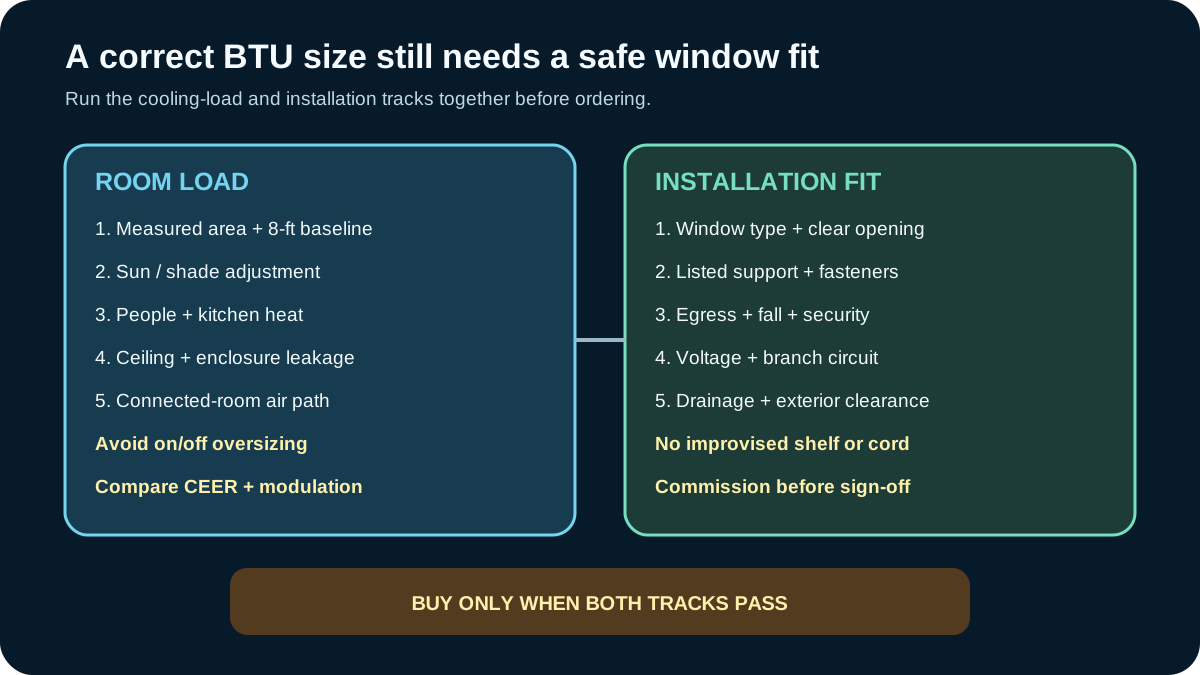
Size the Room and the Installation Together
Cooling capacity is only useful if the unit:
- fits the window and wall geometry;
- is supported and anchored as its installation instructions require;
- rejects heat outdoors with required clearance;
- drains condensate as designed;
- can direct cool air into the occupied zone;
- runs on a safe compatible branch circuit;
- does not block required egress or a window safety device;
- meets landlord, condominium, heritage, and local rules;
- can be installed and removed without injury.
A capacity chart answers “how much cooling?” It does not answer “can this exact product be installed safely here?” Run both tracks before purchase.
The Room-Load and Window-Fit Map
Complete this worksheet:
| Input | Measurement/evidence |
|---|---|
| Room length × width | |
| Ceiling height | |
| Connected open area | |
| Window orientation and shade | |
| Regular occupants | |
| Kitchen/equipment/solar heat | |
| Window type and clear opening | |
| Sill/storm-window geometry | |
| Exterior clearance | |
| Receptacle voltage/branch circuit | |
| Support/fastener material | |
| Required egress/security | |
| Condensate path below | |
| Noise-sensitive neighbours/rooms |
Photograph the opening from inside and outside. Measure in at least three places because old windows and sills may not be square.
Step 1: Establish Baseline Capacity From Area
ENERGY STAR's current consumer guidance starts with floor area for a room with an 8-foot ceiling:
| Area to cool | Baseline capacity |
|---|---|
| 100–150 sq ft | 5,000 Btu/h |
| 150–250 sq ft | 6,000 Btu/h |
| 250–300 sq ft | 7,000 Btu/h |
| 300–350 sq ft | 8,000 Btu/h |
| 350–400 sq ft | 9,000 Btu/h |
| 400–450 sq ft | 10,000 Btu/h |
| 450–550 sq ft | 12,000 Btu/h |
| 550–700 sq ft | 14,000 Btu/h |
| 700–1,000 sq ft | 18,000 Btu/h |
The official chart continues to larger spaces, but a single window unit's air distribution, noise, electrical needs, and egress impact may become limiting before a nominal capacity does. Large or multiroom loads may deserve a professional comparison with a mini-split or other system.
For an L-shaped room, divide the floor into rectangles/triangles and add their areas. Include connected space only if air actually exchanges and that space must be cooled; do not include a closed hall merely to justify a larger unit.
Step 2: Apply Published Adjustments Carefully
ENERGY STAR advises adjustment to the area baseline:
- reduce capacity by 10% for a heavily shaded room;
- increase capacity by 10% for a very sunny room;
- when more than two people regularly occupy the room, add 600 Btu/h for each additional person;
- for a kitchen, increase capacity by 4,000 Btu/h;
- consider directional airflow when installation is near a corner.
Apply these to the chart baseline and show the arithmetic. Do not stack vague “safety factors” on top of every adjustment.
Example:
- 340 sq ft bedroom baseline: 8,000 Btu/h;
- very sunny: +800 Btu/h;
- three regular occupants: +600 Btu/h;
- screened result: 9,400 Btu/h.
This falls between common nominal sizes. Compare a variable-speed model's modulation range, actual sun control, ceiling, air distribution, and model selection rather than automatically rounding to the largest available unit.
Step 3: Account for Ceiling Height and Volume
The ENERGY STAR chart assumes an 8-foot ceiling. A 12-foot loft has 50% more air volume and often more exterior wall/roof exposure, but multiplying capacity by 1.5 can still overstate the load because surfaces, infiltration, and internal gains—not air volume alone—drive heat.
For a modestly higher ceiling, treat height as a reason to review the next size or obtain a room load calculation. For vaulted ceilings, top-floor rooms, roof exposure, large glass areas, or unusual construction, use a professional calculation rather than a simple volume multiplier.
Record whether the occupied zone is at floor level, a loft, or both. Cool air can settle while hot air stratifies above; a ceiling fan may improve mixing when used safely and correctly, but it does not add cooling capacity.
Step 4: Audit Solar Gain and Shading
“Sunny” should describe actual exposure during the cooling period. Log:
- window direction;
- direct sun hours;
- exterior overhangs, trees, adjacent buildings, and awnings;
- interior blinds/curtains;
- glass area and type if known;
- roof/top-floor exposure;
- afternoon indoor temperature before cooling;
- whether shading can be improved without blocking egress.
Exterior shading often stops heat before it crosses glass; interior coverings still help but can risk heat at the window. Do not let fabric contact a hot unit, block intake/discharge, or interfere with condensate and controls.
If a room only overheats from late-afternoon sun, compare shading and pre-cooling with permanent oversizing.
Step 5: Count Connected Rooms and Air Paths Honestly
A window unit does not pressurize cool air through closed doors and around multiple corners like a designed duct system. A unit in a bedroom may cool that room well while the hall remains hot.
Map:
- doorway size and whether it stays open;
- corner between unit and target area;
- stair/open loft path;
- supply direction and return-air route;
- fan placement if used;
- doors closed for privacy, pets, fire safety, or sound;
- hot adjacent spaces leaking air inward.
Do not size one room unit for an entire apartment without a distribution plan. Two correctly sized zones may provide better comfort and redundancy, but require safe electrical circuits and more window/maintenance impacts.
Step 6: Check the Building Envelope
The chart cannot see:
- single-pane leaky windows;
- uninsulated roof/wall;
- open fireplace damper;
- failed weatherstripping;
- large air leakage to attic/corridor;
- disconnected exhaust or dryer vent;
- unsealed unit side panels;
- hot ducts or pipes in the room.
Correct safe accessible leakage and shading before adding a permanent capacity premium. Air seal only with compatible materials and without blocking drainage, ventilation, combustion air, egress, or required clearances.
If the room cannot hold temperature overnight when sun and occupancy loads fall, investigate outdoor-air leakage and equipment performance rather than assuming solar load.
Why Oversizing Can Feel Cold and Clammy
ENERGY STAR and DOE warn that an oversized room AC can cool the thermostat area quickly and cycle off before adequate moisture removal. Symptoms include:
- short compressor cycles;
- cool temperature with high relative humidity;
- uneven hot/cold zones;
- noise from frequent starts;
- poor efficiency at light load;
- larger purchase price and heavier installation;
- cold discharge blowing directly on occupants.
Variable-speed/inverter room units can modulate instead of switching only between full output and off. That can improve temperature stability, sound, and part-load efficiency, but the unit still needs a reasonable maximum capacity and minimum modulation for the room.
Do not deliberately undersize for dehumidification either. A unit that runs continuously but never reaches a safe/comfortable temperature is not a good humidity strategy.
Compare CEER and Annual Energy, Not Marketing Watts
ENERGY STAR uses Combined Energy Efficiency Ratio (CEER) for room air conditioners. Higher CEER indicates more cooling output per unit of electrical input under the defined test, including standby/off-mode considerations.
For shortlisted exact models, record:
| Model | Capacity Btu/h | CEER | Variable speed | Label annual kWh/cost | Voltage/amps | Noise data |
|---|---|---|---|---|---|---|
| A | ||||||
| B | ||||||
| C |
Use annual kWh and your marginal electricity price rather than the label's assumed dollar rate:
Annual cost = annual kWh × local marginal $/kWh
For a usage-specific screen:
Energy = average input kW while operating × hours
But variable-speed average power and cycling depend on weather and load. Rated input is not a promise of constant draw, and nominal capacity divided by CEER is only a screening relationship.
DOE's federal purchasing example shows how lifetime operating cost can justify an efficiency premium, but its climate, hours, price, and lifetime assumptions are not automatically your household case.
Verify Window Type and Opening
Common products may be designed for:
- double-hung vertical sash;
- horizontal slider;
- casement window;
- through-wall sleeve;
- U-shaped/saddle configuration.
A standard double-hung unit is not automatically safe in a slider or casement opening turned sideways. Lubrication, condensate, compressor mounts, controls, and support are designed for a specific orientation.
Measure:
- clear opening width and height with the sash in installed position;
- sill depth, slope, material, and exterior projection;
- inside/outside level difference;
- storm-window frame or lip;
- screen removal;
- sash condition and lock engagement;
- exterior wall/brick/metal below;
- upper-storey access;
- required side-panel extension;
- model chassis dimensions and weight.
Use the exact installation guide before purchase. Product-page dimensions can omit brackets, side panels, handle projections, or required clearances.
Structural Support and Fall Prevention
CPSC has specifically collected incident data on room air conditioners falling from windows. Treat support as structural work, not décor.
The model instructions may require brackets, rails, sash locks, screws, anti-tip devices, or specific fastener locations. Building rules may require a support bracket that does not drill exterior masonry or façade.
Verify:
- sill and sash are sound, not rotten or loose;
- fasteners match wood, metal, vinyl, masonry, or other substrate as specified;
- bracket capacity exceeds the exact unit under its listing/instructions;
- the unit cannot be pushed inward or outward;
- upper sash cannot lift unexpectedly;
- exterior support does not endanger people/property below;
- installation withstands wind and window movement;
- seasonal removal has a two-person/manual-handling plan.
Never rely on books, loose blocks, foam, side curtains, or the sash alone unless the manufacturer explicitly defines that support method. Do not drill into hidden wiring, plumbing, structural reinforcement, or prohibited façade.
Preserve Egress, Child Safety, and Security
A bedroom window may be required emergency escape/rescue opening. A window AC can block it. Window guards/opening-control devices, fall prevention, landlord rules, fire code, and security also interact.
Ask the local authority/qualified professional:
- Is another compliant egress opening available?
- Does the installation reduce required clear dimensions?
- Can firefighters/rescuers access the room?
- Does a child-safety device remain effective?
- Can the sash be forced from outside?
- Does the unit create a climb/fall hazard?
- Is a seasonal permit or inspection required?
Do not defeat a window guard or opening-control device to fit cooling equipment. Choose another window, a permitted product type, or another cooling strategy.
Electrical Supply: Read the Nameplate and Plug
Verify exact voltage, amperage, plug configuration, overcurrent protection, grounding, LCDI/GFCI device instructions, and dedicated-circuit requirements.
Owner-accessible checks:
- receptacle matches the plug without adapter;
- cord reaches without tension or extension cord;
- receptacle is firm, undamaged, dry, and properly located;
- circuit is not already heavily loaded;
- no heat, discoloration, buzzing, arcing, or repeated trips;
- test/reset device is used according to instructions;
- cord is not pinched by sash, furniture, or sharp metal;
- smart plug/timer is not used unless specifically rated/approved for the exact load and application.
Do not replace a breaker with a larger one, change a receptacle, defeat the grounding pin, or bypass a cord protection device. A qualified electrician should evaluate capacity, wiring, grounding, and required protection.
High-capacity units may require a different voltage/circuit. Price that before ordering; a product that cannot be powered safely is not a bargain.
Drainage and Outdoor Tilt
Room AC condensate management varies. Some designs retain water for condenser-slinger efficiency; others drain differently. The installation may require a specific slight outward orientation or level position. Follow the exact instructions—do not drill a drain hole or remove a plug unless authorized.
Check:
- required chassis angle/level;
- drain outlets remain open;
- exterior dripping will not damage façade, stain a neighbour's window, create ice/slip hazards, or violate rules;
- side panels and seal materials do not dam water;
- storm-window geometry does not force inward drainage;
- vegetation/debris cannot block the base pan;
- indoor water is not contacting the receptacle or wall.
Water entering indoors, persistent musty odor, visible internal growth, or recurrence after correct installation deserves service and recall checking. CPSC has issued air-conditioner recalls involving water drainage/mold concerns; model and serial determine applicability.
Air Seal Without Trapping Water or Blocking Service
Use the kit and approved supplementary materials. Seal:
- side-panel gaps;
- meeting rail between sashes;
- top/bottom cracks identified in instructions;
- nonstructural air paths around the chassis.
Do not cover intake/outlet, base-pan drains, service labels, cord device, fasteners, or required clearances. Avoid permanent foam/adhesive that prevents emergency removal or damages a rental window without permission.
After installation, use a smoke-free visual method such as a tissue held safely near nonmoving gaps to locate drafts; do not put material near the fan or use flame/incense.
Plan Airflow, Thermostat Sensing, and Noise
Supply air needs a clear path. Avoid curtains, furniture, blinds, plants, and beds blocking intake/discharge. Aim louvers according to the manual, not directly at a sleeping infant, older adult, or anyone sensitive to cold drafts.
The unit's thermostat may sense air near the window, which can be hotter or cooler than the occupied zone. Some models use remotes with sensing features; verify how and when they operate.
For noise, compare standardized indoor sound data when available, then consider:
- variable-speed low setting;
- compressor vibration through old sash;
- bracket/window resonance;
- rain and condensate sound;
- street-noise leakage through panels;
- bedroom sound tolerance;
- exterior sound near neighbours;
- app beeps/lights and night mode.
A rigid, correctly supported installation often sounds better than a loose one. Do not wedge the chassis with materials that compromise support or drainage.
Commission the Installation
Build an approval packet for a rental or condominium
Do not order first and ask permission later. Give the owner, property manager, or condominium reviewer a compact packet with the exact model, weight, dimensions, window type, support bracket and fastening method, exterior appearance, condensate path, electrical requirement, sound data, seasonal removal plan, installer insurance where required, and proof that egress/window-safety rules remain satisfied. Ask who is responsible for sill, façade, glass, screen, water, or floor damage and whether drilling is prohibited.
Photograph the window and finishes before installation. Keep written approval and the model installation guide. If a non-drilling bracket is required, it still must be compatible with the exact window and unit; “landlord approved” is not the same as structurally listed or correctly installed. A portable unit may avoid a heavy chassis in the opening, but it still needs a permitted exhaust panel, condensate plan, compatible circuit, and a comparison using its own rated performance—not the window-unit BTU label.
Use a checklist with the installer:
- model/serial and recall check;
- bracket/rail/fastener inspection;
- sash lock and egress decision;
- exterior clearance and drainage;
- cord/receptacle/protection device;
- side/meeting-rail seals;
- intake/discharge clearance;
- filter installed;
- controls and remote;
- compressor/fan sound;
- indoor/outdoor temperature observations;
- condensate after operation;
- no indoor leak or unstable movement;
- owner removal and cleaning instructions.
Do not judge full cooling in the first minutes after delivery/startup. Follow transport-orientation and startup waiting instructions, then log room temperature and relative humidity through representative weather.
A Seven-Day Performance Log
| Day/time | Outdoor temp/humidity | Indoor start/end | Setpoint/mode | Compressor behaviour | kWh if safely measured | Condensate/noise |
|---|---|---|---|---|---|---|
| 1 | ||||||
| 3 | ||||||
| 7 |
Use a meter only if the exact plug, voltage, current, startup, environment, and device rating permit. Never use an adapter or extension solely for measurement.
Interpret patterns:
- reaches target with moderate/stable runtime: likely reasonable sizing;
- short cycles with high humidity: oversizing, sensor location, mode, airflow, or installation;
- continuous high output and rising room temperature: undersizing, extreme load, air leakage, blocked heat rejection, or equipment fault;
- cold near unit, hot elsewhere: distribution problem;
- indoor water: installation/drainage/service issue;
- plug/receptacle heat or trip: stop and get electrical evaluation.
Seasonal Removal, Storage, and Disposal
Window units are heavy and awkward. Follow the manual, use two people or appropriate lifting help, disconnect safely, protect floors, and expect retained condensate. Do not stand below an upper-storey unit during removal.
Clean/dry/store in the required orientation and environment. Protect coils/fins, cord, remote, bracket, fasteners, and manual; label the hardware for that exact model.
For end of life, do not cut refrigerant lines or remove the compressor. EPA says refrigerant-containing appliances require proper recovery during disposal. Use an established retailer, municipal program, or qualified recycler.
Frequently Asked Questions
What size window AC do I need for 350 square feet?
ENERGY STAR's room-AC guidance uses an 8-foot-ceiling baseline of 8,000 Btu/h for 300–350 sq ft and 9,000 for 350–400. Adjust for sun, shade, people, kitchen use, ceiling, envelope, and distribution before choosing an exact model.
Is a bigger window AC more efficient?
Not automatically. Oversized on/off units can short-cycle and remove humidity poorly. Compare reasonable capacity, CEER, variable-speed range, and installed operation.
Can I install a window AC without a bracket?
Only if the exact listed installation instructions and local/building rules specify a safe support method without one. Never improvise or rely on foam/side curtains.
Can I plug it into an extension cord?
No unless the manufacturer explicitly permits a specific arrangement; most room AC instructions require direct connection to a compatible receptacle. Do not use adapters or defeat protection.
Should a window AC tilt outward?
Follow the exact model instructions. Some require a defined orientation; others are designed differently. An improvised tilt can harm support or drainage.
Can one window AC cool several rooms?
Only if capacity and air paths match. Closed doors, corners, stairs, and privacy needs often prevent reliable distribution. Measure each target zone.
Does ENERGY STAR tell me the quietest model?
It is an energy-performance certification. Some recognized efficient models publish low-noise data, but compare exact sound specifications and installation resonance separately.
What to Read Next
Compare whole-home and room strategies with the central AC versus window-unit guide. If costs are unexpectedly high after commissioning, use the summer electric-bill interval guide. If interior glass or walls collect moisture, follow the window condensation diagnostic.
Sources and Verification
Capacity adjustment, CEER, and efficiency claims use ENERGY STAR room-air-conditioner guidance, its key product criteria, and DOE FEMP purchasing guidance. Falling-unit risk and recall status must be checked with CPSC and the exact manufacturer. Refrigerant disposal uses the EPA homeowner FAQ. The exact model manual, window/building conditions, local rules, and qualified installer control an individual project.
Sources and Verification
Editorial Review
EnergyBS Editorial Team
EnergyBS publishes practical homeowner guides. Important program, product, and cost claims should be checked against the linked source and local project documents before you commit to work.
Related Guides
View All ArticlesCentral AC vs. Window Units: Compare the Cooling Boundary, Not Just Efficiency Ratings
A measurementfirst comparison of central air conditioning and window units using occupied rooms, SEER2, CEER, duct and enclosure losses, humidity, installation constraints, and a fiveyear cost ledger.
Why Is My Electric Bill So High in Summer? A 60Minute Diagnosis
A billfirst troubleshooting workflow that separates price changes, billingperiod effects, weatherdriven cooling, baseload growth, pool and waterheating loads, and HVAC faults before money is spent.
Winter Window Condensation: Find the Cause and Fix Humidity, Airflow, or the Window
Use condensation location, outdoor temperature, indoor humidity, surface temperature, and room conditions to separate normal coldsnap fogging from failed glass, leaks, and mold risk.