Tankless Water Heater Descaling Guide: How to Flush the Heat Exchanger, Step by Step
Descaling a tankless water heater means circulating four gallons of undiluted, foodgrade white vinegar through the heat exchanger for at least an hour to dissolve the lime scale that hard water leaves behind. The procedure here follows Rinnai's Installation and Operation Manual (section 6.3, Flushing the Heat Exchanger) valve by valve: power off, isolation valves closed, a pump pushing vinegar in through the cold service valve at about four gallons per minute, out through the hot service valve, a fiveminute freshwater rinse, and the inline inlet filter cleaned before the unit goes back in service. Rinnai is direct about why it matters: failure to flush will cause damage to the heat exchanger, and damage caused by lime buildup is not covered by the warranty. The guide covers the tools, the safety order, the schematic of the flush loop, how often to do it, the mistakes that turn a onehour job into a leak, and the DIYversuspro math (a professional flush runs $150 to $350, Angi).
Quick Checks
- 1The recipe is the manufacturer's: four gallons of undiluted virgin, food-grade white vinegar, circulated for at least 1 hour at about four gallons per minute (Rinnai manual, section 6.3).
- 2Skipping the flush is the expensive option. Rinnai states failure to flush will damage the heat exchanger, and lime build-up damage is not covered by the warranty. A replacement heat exchanger runs $500 to $1,300 (Angi).
- 3No isolation (service) valves, no flush. If your unit was installed without them, have a plumber install a set first; Rinnai strongly recommends them, and every future flush depends on them.
- 4Clean the in-line filter at the cold inlet as part of the same job, exactly as the manual's rinse sequence ends. A clean exchanger behind a clogged filter still delivers weak flow.
- 5DIY cost after the first year is a few gallons of vinegar; the pump, two hoses, and bucket are bought once. A professional flush runs $150 to $350 (Angi) and makes sense when valves are missing, the unit is under a service plan, or gas-side checks are due at the same visit.
Tankless Water Heater Descaling Guide: How to Flush the Heat Exchanger, Step by Step
By EnergyBS Editorial Team | October 21, 2026
The Short Answer
Short Answer: Descaling (also called flushing) a tankless water heater means isolating the unit from the house plumbing and circulating four gallons of undiluted, food-grade white vinegar through the heat exchanger with a small pump for at least one hour, then rinsing with fresh water for five minutes and cleaning the inlet filter. That is the manufacturer's own procedure (Rinnai Installation and Operation Manual, section 6.3), and the reason is lime: hard water deposits scale on the exchanger, the scale insulates it, and the unit runs hotter, louder, and less efficiently until it starts shutting down. Rinnai's warning is printed in the manual in plain language: failure to flush will cause damage to the heat exchanger, and damage caused by lime build-up is not covered by the warranty. The job takes about 90 minutes of mostly waiting, needs a pump, two hoses, a bucket, and a set of isolation valves, and costs $150 to $350 to hire out (Angi).
The job in ten steps:
- Gather the kit: submersible pump, two hoses, a 5-gallon bucket, 4 gallons of undiluted food-grade white vinegar.
- Turn the unit off at its controller and disconnect electrical power.
- Close the shutoff valves on the hot and cold water lines to isolate the unit.
- Open the service (purge) ports carefully to release residual pressure.
- Connect the pump hose to the cold-side service valve and the drain hose to the hot-side service valve, both hose ends managed at the bucket.
- Open both service valves and start the pump; confirm circulation with no leaks.
- Circulate the vinegar for at least 1 hour at about 4 gallons per minute.
- Stop the pump and rinse: run fresh water through the unit for 5 minutes to a drain.
- Remove and clean the in-line filter at the cold water inlet, then reinstall it.
- Close the service valves, reopen the shutoffs, disconnect the hoses, restore power, and test hot water at a tap.
This guide lives in our water heating library. It assumes a gas or electric tankless unit installed with isolation valves; brand manuals vary in valve labels and display prompts, and your manual wins any disagreement with a general guide, including this one.
1. Why Scale Builds Up, and What It Costs to Ignore
A tankless heat exchanger is a tight coil of metal tubing with water flashing to temperature as it passes through. Every gallon of hard water leaves a trace of calcium and magnesium behind, and the hottest surfaces collect it fastest. Scale is a mineral insulator laid down exactly where heat has to cross into water, so the exchanger's metal runs hotter to deliver the same water temperature. The symptoms arrive in a predictable order: the unit gets louder (a rumbling or kettling noise as water boils against hot deposits), hot water temperature starts to swing at the tap, flow falls because the scaled passages are narrower, and eventually the unit's own temperature sensors shut it down or throw an error code. Manufacturers build the reminder in: Rinnai units carry a Service Soon (SS) indicator that displays when a flush is due, and other brands use their own service codes.
The economics are one-sided. The flush itself is vinegar, an hour of pump time, and your attention. The failure it prevents is a heat exchanger, at $500 to $1,300 for repair or replacement in Angi's 2026 repair data, plus the possibility that the manufacturer declines the claim entirely, because Rinnai states in the manual that lime damage is excluded from warranty coverage. Angi's maintenance guidance matches the manuals: descale at least once a year, especially in hard water areas. Homes on softened water can stretch the interval; the SS reminder or your brand's equivalent is the authority, not the calendar alone.
2. What You Need, and the One Thing That Stops the Job
The kit:
- A submersible utility pump. The manual's procedure circulates at four gallons per minute, so choose a pump rated at or above that at a few feet of lift; the common small utility pumps sold for this job meet it.
- Two hoses with washing-machine-style fittings (a standard flush kit bundles pump, hoses, and bucket fittings together if you prefer one box).
- A 5-gallon bucket.
- Four gallons of undiluted virgin, food-grade white vinegar. Food grade is specified because this solution touches the surface your drinking and bathing water will touch an hour later.
- Towels, a small container for drips, and gloves if you dislike vinegar on your hands.
The requirement: isolation (service) valves. The flush works by taking the heater out of the house's plumbing circuit and substituting the bucket loop. That is only possible if the installation includes isolation valves with service ports on the hot and cold lines under the unit, the standard valve kit most tankless installs include. Rinnai strongly recommends them in the manual for exactly this reason. Look under your unit before you buy anything: you want a shutoff valve on each line plus a capped service port with a handle on each. If the ports are not there, stop here and hire the first flush out: a plumber installs the valve set once, and every flush after that is the procedure below. Cutting into the lines yourself to add valves is a bigger job than the flush it enables.
Safety order, non-negotiable: power off at the controller and at the disconnect or breaker before any valve moves, because a unit that fires with no water flow can damage itself in seconds; expect the water in the unit and lines to be hot; open service ports slowly because the loop can hold pressure; and if your unit is gas, you are not touching the gas line at any point in this procedure, only the power and the water valves.
3. The Procedure, Step by Step
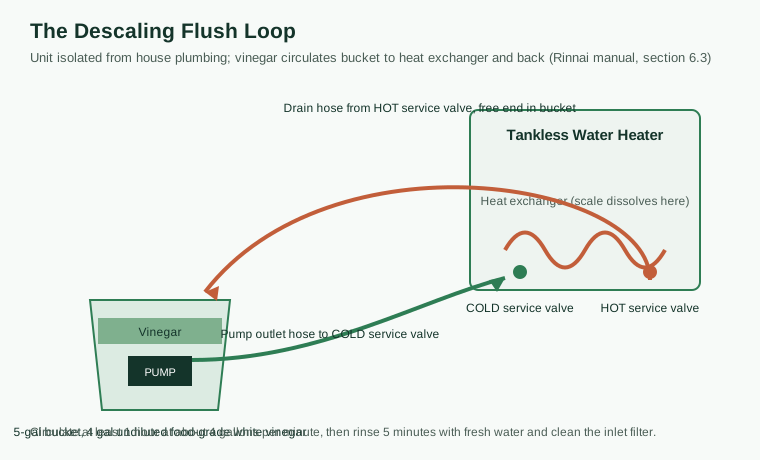
The steps below follow Rinnai's manual sequence (its valve labels are V1 to V4; your brand's labels and layout may differ, and the logic is identical):
Isolate. Turn off power at the controller, then disconnect electrical power to the water heater. Close the shutoff valves on both the hot and cold water lines. The house plumbing is now separated from the unit.
Connect. Ease the service port caps open to bleed any residual pressure, catching the small amount of water that escapes. Connect the pump's outlet hose to the cold water line's service valve. Connect the drain hose to the hot water line's service valve, with its free end in the bucket. Put the pump in the bucket and pour in the four gallons of vinegar so the pump is submerged. The loop you have built is: bucket, pump, cold service port, heat exchanger, hot service port, drain hose, bucket.
Circulate. Open both service valves. Start the pump and immediately walk the loop checking every connection for leaks; a hose that pops off under pump pressure sprays vinegar, not water, so the first minute deserves your full attention. Then let it run for at least 1 hour at about four gallons per minute (Rinnai). Some Rinnai models supervise the flush themselves: the controller display counts down from 60 minutes and beeps at the end. The vinegar will discolor as it works; that is dissolved scale and debris leaving the exchanger. Keep the pump submerged the whole time, topping up is not normally needed because the loop is closed.
Rinse. Turn off the pump. Move the drain hose's free end from the bucket to a sink or outside drain. Close the cold-side service valve and open the cold shutoff valve (do not open the hot shutoff yet). Fresh house water now flows through the unit and out the drain hose: let it run for five minutes (Rinnai). This is the step that carries loosened grit and residual vinegar out of the exchanger.
Filter. Close the cold shutoff again. Remove the in-line filter at the cold water inlet (it sits in the cold connection at the unit), rinse out the residue it has caught, and put it back. This filter is the exchanger's bodyguard; a surprising share of "the flush did not help" stories end here, at a filter nobody cleaned.
Restore. Close the hot-side service valve and open the hot shutoff. Disconnect the hoses, recap the service ports, and confirm both shutoffs are fully open. Restore electrical power and turn the unit on at the controller. Run a hot tap for a few minutes: flow should be strong, temperature steady, and any vinegar smell gone within the first minutes of flushing the lines to the tap.
4. How Often, and How Water Quality Changes the Answer
The manual's answer is the SS service reminder: when the unit says flush, flush. The planning answer, for a home that wants a calendar instead, comes from Angi and the manufacturers together: at least once a year, and more often in hard water. Water hardness is the whole variable. A home on naturally soft water or behind a working water softener feeds the exchanger a fraction of the minerals, and the interval stretches; a home on hard well water can scale a neglected exchanger in a single heating season. Rinnai's manual adds the structural answer for hard-water homes: "scale build-up will affect the performance of the water heater; water should be treated," and it offers a scale-control system that feeds scale-inhibiting compounds into the cold supply. If you are flushing twice a year to keep up, price treatment or softening against the labor; our water softener installation cost guide covers that side of the decision.
Keep a simple log: date of each flush, how the vinegar looked coming out, and anything the inlet filter caught. The log turns the frequency question from folklore into your home's data within two or three cycles.
5. Mistakes That Turn an Hour Into a Leak
- Firing the unit dry. Starting a flush with the power still connected risks the burner or elements firing into an empty or air-locked exchanger. Power off first, always, and refill and purge air through a hot tap before judging the result.
- Opening service ports under pressure. Crack them slowly and expect a spurt. The ports have been holding house pressure; treat them that way.
- The wrong vinegar. Scented, diluted, or cleaning-strength industrial products are not the manual's "undiluted virgin, food grade, white vinegar." The food-grade spec exists because the loop contacts potable water surfaces.
- Running the pump dry. An unsubmerged pump overheats and dies mid-flush, leaving vinegar sitting in the exchanger. Set the bucket where you can see the level.
- Skipping the rinse or the filter. Unrinsed vinegar leaves an acidic taste at the taps, and an uncleaned inlet filter keeps the flow weak after a perfect flush. The manual's sequence ends with the filter for a reason.
- Forgetting the state you left things in. A service valve left open or a shutoff left closed announces itself as no hot water or a leak at the port cap. Walk the valve list once more before you put the tools away: service valves closed and capped, shutoffs open, power on.
6. DIY or Hire It Out
The DIY consumable is four gallons of vinegar per flush, and the pump, hoses, and bucket are a one-time purchase that pays back against the professional price quickly: a plumber's descaling service runs $150 to $350 (Angi). Hire it out when any of these is true: the unit has no isolation valves (the visit installs them and does the first flush), the unit is gas and due for its broader combustion and venting checks at the same visit, the home's water is hard enough that you are flushing twice a year and would rather hand it off, or the unit is showing error codes that a flush alone may not explain. DIY confidently when the valves are present, the unit runs normally between reminders, and you are comfortable working methodically around hot water and house pressure. Either way, record the date; the next SS reminder is easier to trust when the last flush is written down.
7. When the Flush Does Not Fix It
Descaling fixes scale. If the flush was done correctly and the symptoms survive it, the problem was never only scale, and the manual-plus-Angi evidence points to the next suspects in order:
Flow still weak everywhere. Re-check the inlet filter first (Section 3); it is the most common miss. Then check the aerators and showerheads: a flush can mobilize grit that lodges at the fixtures, which is a five-minute fix with a wrench and a rinse, and it masquerades as a unit fault because it appears right after the service.
Temperature swings or shutdowns with clean flow. Now the unit's sensing and ignition side is suspect. Angi's repair data prices sensor or thermostat replacement at $150 to $400 and ignition or burner repair at $200 to $800, and both are classic follow-on faults on units that ran scaled for a long time: the exchanger overheated around the scale, and the parts that manage temperature and flame aged faster for it. These are technician jobs, with error codes from the controller as the starting evidence, so write the codes down before you power-cycle them away.
Kettling noise that returns within weeks. The flush removed loose scale but the water is laying it down as fast as it is removed, or a layer bonded too hard for vinegar to clear in one pass. The answers are a second flush with fresh solution, and then the structural fix from Section 4: treat or soften the water, because descaling a unit fed by very hard water is bailing a boat with the leak unplugged.
Any leak at the exchanger. Vinegar does not cause leaks, but it can reveal one: scale sometimes plugs pinhole corrosion, and dissolving the plug unmasks it. A heat exchanger that weeps after a flush was already at the end of its life, and the $500 to $1,300 replacement figure (Angi) is the honest next conversation, along with the warranty question, where your flush log becomes the document that matters.
Frequently Asked Questions
How often should I descale my tankless water heater?
At least once a year as the planning rule (Angi), more often in hard water, and whenever the unit's service reminder appears (Rinnai's SS, Service Soon, indicator). Homes on softened water may stretch the interval; let the reminder and your flush log decide.
What kind of vinegar should I use?
Undiluted virgin, food-grade white vinegar, four gallons of it, per Rinnai's manual. Do not substitute scented or diluted products. Some manufacturers also approve citric-acid or proprietary descaling solutions; your manual's wording governs your unit.
How long does the vinegar need to circulate?
At least one hour at a flow rate of about four gallons per minute (Rinnai). Some models count the flush down on the controller display from 60 minutes. Heavily scaled units may justify a second hour with fresh vinegar, judged by how dirty the first batch ran.
Will descaling void my warranty?
The risk runs the other way: Rinnai states that failure to flush causes heat exchanger damage and that damage caused by lime build-up is not covered by the warranty. Documented, regular descaling is warranty protection, performed by you or by a plumber.
What if my unit has no isolation valves?
Then the flush cannot be done as designed. Have a plumber install an isolation valve kit with service ports (Rinnai strongly recommends them) and do the first flush in the same visit. After that, the procedure in this guide applies.
What are the signs my tankless unit is overdue for a flush?
Temperature that swings hot and cold at the tap, falling hot-water flow at multiple fixtures, new rumbling or kettling noises from the unit, and shutdowns or error codes. Each has other possible causes, but together, on a unit past its reminder, they describe scale until proven otherwise.
Do I clean anything besides the heat exchanger?
Yes: the in-line filter at the cold water inlet, which the manual's rinse sequence ends with, and on gas units the air intake filter screen, cleaned per your manual. The inlet water filter is the one most often skipped and most often the remaining cause of weak flow.
How much does a professional descale cost?
$150 to $350 for a professional descaling or flushing service in Angi's 2026 repair data. Compare that with the DIY consumable, four gallons of vinegar, plus a one-time pump, hose, and bucket kit, and with the $500 to $1,300 cost of the heat exchanger replacement that descaling prevents.
Is descaling the same for electric tankless units?
The loop, solution, and timing are the same, because the enemy (lime on a heat exchanger) is the same. Valve labels and the filter location differ by model, and electric units have no combustion side to inspect. Follow your manual's flushing section where it differs from this general sequence.
The Bottom Line
Descaling is the rare maintenance job where the manufacturer prints the whole recipe: isolate the unit, circulate four gallons of food-grade white vinegar for at least an hour at about four gallons per minute, rinse five minutes, clean the inlet filter, restore, and write down the date. Do it when the unit asks (the SS reminder) or at least yearly in hard water, and the heat exchanger the warranty will not cover for lime damage never becomes the $500 to $1,300 repair. For the rest of tankless ownership, our tankless installation cost guide prices the unit itself, and the anode rod maintenance guide covers the equivalent cheap insurance for a tank.
What to Read Next
Tankless Water Heater Installation Cost 2026: Prices, AddOns and PaybackUse this next to compare the cost, incentive, installation, or operating-risk angle before you make a home energy decision.Sources and Verification
- Rinnai Tankless Water Heater Installation and Operation Manual, section 6.3, Flushing the Heat Exchanger (the water heater includes a service reminder (Service Soon, SS) indicating it is time to flush and service the water heater; failure to flush the appliance will cause damage to the heat exchanger; damage caused by lime buildup is not covered by the water heater's warranty; Rinnai strongly recommends installation of isolation valves to allow for flushing; procedure: turn off power at the controller and disconnect electrical power; close the shutoff valves on both the hot and cold water lines; connect the pump outlet hose to the cold water line at the service valve and the drain hose to the hot water line at the service valve; pour four gallons of undiluted virgin, food grade, white vinegar into a pail; open both service valves; operate the pump and allow the vinegar to circulate for at least 1 hour at a rate of four gallons per minute; rinse as follows: move the drain hose to a sink or drain, close the coldside service valve and open the cold shutoff so water flows through the water heater for five minutes; remove the inline filter at the cold water inlet and clean out any residue, then replace it; close the hotside service valve, reopen the hot shutoff, and disconnect all hoses; the manual also notes scale buildup will affect performance and that water should be treated, offering a scale control system fed into the cold water supply)
- Angi How Much Does It Cost to Repair a Tankless Water Heater? [2026 Data] (mineral buildup from hard water can clog a tankless water heater and reduce efficiency; descaling removes these deposits, preventing damage to the heat exchanger and other parts; descaling is recommended at least once a year, especially in areas with hard water; professional descaling services cost $150 to $350; heat exchanger repair or replacement, the failure descaling prevents, costs $500 to $1,300; sensor or thermostat replacement costs $150 to $400 and ignition or burner repair $200 to $800, the two repairs most often quoted when a scaled unit starts throwing faults)
Editorial Review
EnergyBS Editorial Team
EnergyBS publishes practical homeowner guides. Important program, product, and cost claims should be checked against the linked source and local project documents before you commit to work.
Related Guides
View All ArticlesTankless Water Heater Installation Cost 2026: Prices, AddOns and Payback
A tankless water heater costs $1,400$5,600 installed in the US in 2026, and C$2,800$6,500 for a typical Canadian gas install. This guide breaks down unit, labor, venting, gasline and panel addons, sizes the unit, and runs 20year payback math with stated assumptions against a new tank.
Water Softener Installation Cost 2026: What Installation Really Costs
Installing a wholehouse water softener in 2026 typically costs $1,200 to $3,800 in the US for a saltbased ion exchange system, with most homeowners paying near $1,500. This guide prices singletank, dualtank and saltfree systems, works through graincapacity sizing, covers salt and regeneration running costs, Canada pricing, and a quote checklist.
Water Heater Anode Rod and Maintenance 2026 Tool
A modelspecific waterheater maintenance plan covering anode type and depletion, water chemistry, access, flushing, relief and leak checks, heatpump filters/condensate, tankless scale service, records, and replacement contingencies.