EnergyBS
    Mini-splits

    How to Organize a Ductless Mini-Split System: Zones, Head Count, and Controls

    A ductless mini-split system is organized by zones, not by rooms: each indoor head is its own zone with its own temperature setting, and the job is deciding which rooms share a head and which need their own. The Building America Solution Center notes it often does not make sense to put a head in every room, because even the smallest heads can exceed a small room's load. This guide works the five decisions in order group rooms into zones, count heads, size each zone, pick the outdoor unit, organize the controls with a worked four-zone house, the 130 percent connected-capacity rule, and installed-cost bands by zone count from our mini-split installation cost guide.

    EnergyBS Editorial TeamUpdated Published 11 sources33 min read
    How to Organize a Ductless Mini-Split System: Zones, Head Count, and Controls

    Quick Checks

    • 1Organize by zones, not by rooms: a zone is a set of rooms that share a door pattern, a load, and a schedule. Rooms that pass all three tests can share one head.
    • 2The Building America Solution Center notes it often does not make sense to put a head in every room, because even the smallest heads can exceed a small room's load. A head in every room is the expensive default, not the plan.
    • 3Count heads from the floor plan, not the room count: open living, kitchen and dining usually form one zone, while bedrooms with doors that close at night usually need their own.
    • 4Check the outdoor unit's connected-capacity ceiling before adding heads: many multi-zone units allow connected indoor capacity up to 130% of the outdoor rating, but the outdoor unit still delivers at most 100% of its rated capacity when every head calls at once.
    • 5One remote per head is the default control setup. A central controller or a smart controller per head (Mitsubishi kumo cloud, Sensibo, Flair Puck) is what turns four remotes into one system you can actually run.
    • 6Map the zones before getting quotes. Our installation cost guide puts a single-zone install at $2,500 to $6,000, two zones at $4,500 to $8,000, three zones at $6,500 to $11,000 and five zones at $10,000 to $15,000 (HomeGuide project data), so each zone you add or cut moves the price by thousands.
    On this page(14 sections)Show
    1. How to Organize a Ductless Mini-Split System: Zones, Head Count, and Controls
    2. The Short Answer
    3. 1. The Four Decisions
    4. 2. Step 1: Group Rooms Into Zones
    5. 3. Step 2: Count the Heads
    6. 4. Step 3: Size Each Zone
    7. 5. Step 4: Pick the Outdoor Unit
    8. 6. Step 5: Organize the Controls
    9. 7. Worked Example: A Four-Zone House
    10. 8. What the Organization Does to the Price
    11. 9. Five Organization Mistakes
    12. 10. The Organization Worksheet
    13. Frequently Asked Questions
    14. Related Reading

    How to Organize a Ductless Mini-Split System: Zones, Head Count, and Controls

    By EnergyBS Editorial Team | November 8, 2026

    The Short Answer

    Short Answer: Organize a ductless mini-split system by zones, not by rooms. A zone is a group of rooms that share a door pattern, a heating and cooling load, and a daily schedule, and each zone gets one indoor head with its own temperature setting. The Building America Solution Center puts the starting point plainly: it often does not make sense to install an indoor unit in every single room, because even the smallest heads can deliver far more heating or cooling than a small room needs. Open living, kitchen and dining areas usually form one zone. Bedrooms with doors that close at night usually need one head each. The outdoor unit is then picked to serve the zones you drew, not the other way around, and the controls are what turn several independent heads into one system you can run without hunting for remotes.

    Once the zones are set, the per-room detail (which wall, what height, where the air throws and how the drain falls) is in our ductless mini-split head placement guide.

    The rest of this guide works the decisions in the order a good installer works them. Group the rooms into zones first. Count heads from the zones. Size each zone. Pick the outdoor unit and its architecture. Organize the controls last, because the control plan depends on how many zones exist and who uses them.

    Organize it in six steps:

    1. Sketch the floor plan and mark every room you want conditioned. Skip hallways, closets and utility rooms; they borrow air from the rooms around them.
    2. Group rooms into zones with three tests: do the doors stay open between them, do their loads and sun exposure look alike, and do people use them on the same schedule? Rooms that pass all three can share a head.
    3. Count one head per zone, then check the exceptions: closed bedrooms, sunrooms, additions, finished basements and upper floors that run warm usually break away into their own zones.
    4. Size each zone with a room-by-room load calculation (Manual J is the standard). A rough installer shortcut of about 20 BTU per square foot gets a first estimate; the load calculation is what the quote should be built on.
    5. Pick the outdoor unit: one multi-zone outdoor unit for clustered zones, or separate single-zone systems where rooms are spread out or line runs get long. Check the connected-capacity ceiling and the port count before assuming a head can be added later.
    6. Decide how the zones are controlled: one remote per head is the default, a central controller or a smart controller per head is the upgrade, and the schedule you actually keep is worth more than the controller you buy.

    1. The Four Decisions

    A ductless mini-split system is four decisions stacked on each other, and each one constrains the next. Getting them in the wrong order is how homes end up with a head in every room, an outdoor unit that cannot run them all at once, and four remotes nobody can find.

    The first decision is the zones: which rooms are conditioned together. A zone is not a room. It is a set of rooms that can share one temperature setting without anyone being uncomfortable. The Building America Solution Center states the zoning idea in one sentence: ductless units allow zoned heating and cooling because each indoor unit operates independently of the others, so different areas of the home can be set to different temperatures, and some units can even be turned off while others keep running. That independence is the whole point of the system. A zone map that ignores it wastes it.

    The second decision is the heads: how many indoor units, of what size, and of what type. Wall-mounted, floor console, ceiling cassette and concealed ducted heads all do the same job with different air patterns and different looks. The count follows the zones. The size follows the load. The type follows the room.

    The third decision is the outdoor unit and its architecture: one multi-zone outdoor unit serving several heads, or several single-zone systems, each with its own outdoor unit. The two architectures behave differently when every head calls at once, when one head is added later, and when a line run gets long. Section 5 works the comparison.

    The fourth decision is the controls: how each zone is set, scheduled and adjusted. Every head ships with its own remote. That is a workable control system for one zone and a drawer full of remotes for four. The control plan is where the system either becomes easy to live with or becomes a set of temperatures nobody touches.

    Our companion guides cover the two decisions this guide does not repeat in full. Where each head goes on the wall works the placement problem: throw, return air, doors, sensors, condensate and service access, with a worked four-candidate wall comparison. The Manual J sizing guide covers the load calculation itself. This guide is the step before both of them: deciding what the system is made of.

    2. Step 1: Group Rooms Into Zones

    Start with a floor plan, even a rough sketch, and walk the house room by room. For each room, note three things: whether its door stays open or closed in normal use, how much sun and load it carries, and when people are in it. Rooms that match on all three can share a zone. Rooms that fail any one of the three need their own head, or a deliberate workaround.

    The door test is the one most zone maps get wrong. A hallway head can serve two bedrooms only while their doors stay open. At night, when bedroom doors close, the hallway head serves a hallway. The Building America Solution Center describes the workaround for rooms without heads: small air transfer fans that move conditioned air from a room with a head into a room without one, with a return path such as a vent between the rooms or undercut doors so the air can come back. That is a real option for a guest room or a home office that is used on and off. It is not a substitute for a head in a bedroom where someone sleeps with the door closed every night.

    The load test is about sun and exposure. A south-facing room with large windows and a shaded north bedroom do not share a load, even if they share a hallway. One head cannot hold both at the same temperature at 3 p.m. in July. Neither can it hold a sunroom and the room next to it: the sunroom's glass load is a different job from the rest of the house, and installers treat it as its own zone for that reason.

    The schedule test is about when rooms are used. A home office that is occupied 9 to 5 and a bedroom that is occupied 10 p.m. to 6 a.m. are two different schedules, and putting them on one head means heating or cooling one of them while it sits empty. The savings in a zoned system come from this test more than from any other: turning a zone off, or setting it back, while nobody is in it.

    Room group Door pattern Load Schedule Zone call
    Open living, kitchen, dining No doors between them Shared, one large space Used together, day and evening One zone, one head
    Primary bedroom Door closed at night Its own load, often sun-facing Night Its own zone
    Two small bedrooms, doors closed at night Closed at night Similar size, similar exposure Night, same hours Usually two zones; see the shared-head workaround below
    Home office Door closed for calls Small, equipment heat Weekday daytime Its own zone, or a transfer-fan share
    Sunroom or addition Often separated by a door or step Heavy glass load Intermittent Its own zone
    Finished basement Stairwell, often a door Cool, steady load Evening or occasional Its own zone, often its own single-zone system
    Guest room, used monthly Door closed when empty Small Rare Share by transfer fan, or leave unconditioned

    Two bedrooms with similar size and the same night schedule look like a sharing candidate, and sometimes they are. Sharing works when the door between them and the head stays open, or when a transfer fan and a return path are built in deliberately. If the household will not live with open doors at night, the share is a fiction, and the second bedroom needs its own head. Write the door habit down before the zone map is drawn, not after the heads are installed.

    Stairs deserve their own line on the sketch. A single head on the main floor does not heat the upstairs bedrooms, and a head at the top of the stairs does not cool the main floor. Warm air rises and cold air sinks, so one head cannot serve two floors, and the zone map should treat each floor as its own problem from the start.

    Advertisement

    3. Step 2: Count the Heads

    Once the zones are drawn, the head count is mostly arithmetic: one head per zone. The judgment is in the exceptions, and the exceptions are where the money goes.

    Start with the framework the trade uses as a first pass. A 1,500 square foot ranch with an open layout may need two heads, while a 1,500 square foot two-storey with closed-off bedrooms may need four or five, because air only travels so far through a doorway. That square-footage comparison comes from installer guidance, and it makes the point the zone map already made: layout and doors decide the count, not floor area. Use it as a sanity check on the zone map, not as a substitute for it.

    House type Typical zone count What the zones usually are
    Open-concept 1-storey, 2 bedrooms 2 to 3 Main living area; primary bedroom; second bedroom or a shared head
    2-storey, 3 bedrooms 3 to 4 Open main floor; primary bedroom; one or two heads for the other bedrooms
    2-storey, 4 bedrooms plus office 4 to 6 Main floor; primary bedroom; two to three more bedrooms; office if used daily
    Ranch with finished basement 3 to 4 Main floor living; bedrooms; basement as its own zone
    House with sunroom or addition Add 1 The sunroom or addition is its own zone in nearly every layout
    Small apartment or single addition 1 One room or one open space; a single-zone system

    This table is a planning framework, not a sizing standard. Two houses with the same bedroom count can land on different head counts because their doors, stairs and sun exposure differ. The table's job is to catch a zone map that is obviously light or obviously heavy before quotes are requested.

    Three rules keep the count grounded in the house as it is actually used. First, a bathroom, closet or hallway never gets its own head; those spaces borrow air from the rooms around them. Second, a room that is used rarely does not need a head of its own; a transfer fan or an open door covers a guest room that is occupied a few nights a month. Third, a head count that matches the room count exactly is a warning sign, not a plan. The Building America Solution Center's caution applies here: even the smallest heads can overshoot a small room's load, so a head in every room means paying for capacity the rooms cannot use, then living with the short cycling and humidity that follows.

    The other direction matters too. A zone map with too few heads shows up as a hallway head asked to serve bedrooms, or one head asked to serve two floors. Both fail for the same reason: air does not travel through closed doors or down stairwells on request. A head that serves a hallway serves a hallway.

    4. Step 3: Size Each Zone

    Sizing is where a zone map turns into equipment, and it is the step most often skipped in favour of a rule of thumb. The rule of thumb has its place: installers often start with roughly 20 BTU per square foot, then adjust for ceiling height, sun exposure, insulation and climate. A 300 square foot bedroom starts at about 6,000 BTU on that shortcut. A 720 square foot open main floor starts at about 14,400 BTU. Those are starting estimates, and they are the right shape for a first conversation. They are not a sizing method.

    The sizing method is a room-by-room load calculation, ACCA Manual J, which accounts for the walls, windows, orientation, insulation, air leakage and internal gains of each room. Our Manual J sizing guide works through what the calculation needs and why a quote built without one deserves a question. A contractor who sizes from square footage alone is guessing in the direction of the rule of thumb, and the rule of thumb is systematically wrong in the rooms that matter most: the sunny room, the top-floor room, the room over an unheated garage.

    The size that comes back from the calculation will often be smaller than the smallest head available, and that is the central sizing problem in ductless design. Common indoor head sizes run 6,000, 9,000, 12,000, 18,000 and 24,000 BTU. A small bedroom with a 3,500 BTU cooling load gets a 6,000 BTU head because nothing smaller exists, which means the head is roughly 1.7 times the room's load. That oversizing is normal and usually harmless on its own, because the inverter compressor ramps down: the Building America Solution Center notes inverter compressors can ramp down to as little as 10% of rated capacity. The problem starts when several oversized heads hang off one outdoor unit and only one of them is calling, because the outdoor unit has its own minimum output, and a single small head calling alone can sit below it. That is a Section 5 problem, and it is the reason the zone map and the outdoor unit are chosen together rather than separately.

    Three sizing notes that belong on the zone map itself. First, size for the load the room actually carries, including the sun: a west-facing room with large windows can carry double the load of the same-sized room facing north, and the shortcut cannot see that. Second, heating and cooling loads are different numbers, and in a cold climate the heating load usually governs; a head that covers the cooling load may not cover the January load, which is why cold-climate performance data matters and why our cold-climate heat pump guide exists. Third, write the load next to each zone on the sketch. A zone map without loads on it is a drawing, not a plan, and a contractor who is handed loads can quote against them instead of re-deriving them from a walk-through.

    5. Step 4: Pick the Outdoor Unit

    The outdoor unit decision has two parts: how many outdoor units, and how big. The architecture question comes first, because it changes the price, the look of the house, and what happens when a head is added later.

    A multi-zone system connects two or more indoor heads to one outdoor unit. Mitsubishi Electric's MXZ multi-zone series offers individual zone control for as many as eight indoor units from a single outdoor unit, and its MXZ-5B model, at 42,000 BTU per hour, cools or heats up to five zones. Fujitsu's multi-zone line runs from two-zone units up to an eight-zone model, the AOU48RLXFZ1. One outdoor unit means one pad, one electrical circuit and one box on the outside wall, which is why multi-zone is the default for a whole-home conversion where the zones are clustered on one or two floors.

    Separate single-zone systems mean one outdoor unit per head. That costs more in equipment and outdoor space, and it looks worse on the wall, but each system is independent: one head calling does not affect the others, there is no shared capacity ceiling, and a failure in one system leaves the rest of the house running. The case for single-zone is strongest where zones are spread out: a finished basement at one end of the house and a sunroom at the other, or a detached garage conversion 60 feet from the main house. Long line runs are the tell. Mitsubishi's MXZ-5C42NA3 specification sheet puts the farthest piping run at 82 feet and the maximum height difference at 49 feet with the outdoor unit above the indoor units. A zone beyond those limits on the chosen model needs its own system, whatever the zone map says.

    Architecture Best when Watch out for
    One multi-zone outdoor unit Zones clustered on one or two floors; whole-home conversion; one outdoor location works Shared capacity ceiling; one failure stops all zones; adding a head later needs a free port and capacity headroom
    Several single-zone systems Zones spread across the property; long line runs; a phased install, one room at a time More outdoor units and circuits; higher equipment cost; more wall penetrations
    Mixed: multi-zone plus one single-zone Most zones clustered, one outlier zone far away or added later Two systems to maintain; the outlier zone priced as its own job

    The capacity rule that governs a multi-zone outdoor unit is the connected-capacity ceiling. Many multi-zone units allow the connected indoor capacity to exceed the outdoor unit's rated capacity, up to 130%, because not every head runs at full output at the same time. Fujitsu's multi-zone manuals state the allowed range as 100% to 130% of connected capacity, and note that when all indoor units call at once, each unit's output falls so the total does not exceed the outdoor unit's capacity. Mitsubishi's MXZ-5C42NA3 specification sheet makes the same point with numbers: a 42,000 BTU per hour outdoor unit allows 12,000 to 51,000 BTU per hour of connected indoor capacity, and the sheet states plainly that the outdoor unit cannot provide more than 100% of its rated capacity even though the connected capacity is higher. The practical reading is simple. A 36,000 BTU outdoor unit with 42,000 BTU of heads connected is a normal, workable system on a day when the bedrooms and the living room do not all peak together. The same system on the hottest afternoon of the year, with every head calling, delivers 36,000 BTU spread across the zones, not 42,000. Size the outdoor unit for the hour when every zone matters, not the hour when only one does.

    Adding a head later is the question to settle before the outdoor unit is bought, not after. Three things have to be true: a free port on the outdoor unit (a five-zone unit with five heads connected has none), connected-capacity headroom under the ceiling, and a line-set route from the new head to the outdoor unit that fits the model's length and height limits. Fujitsu's eight-zone model needs branch boxes and separation tube assemblies, while its two-, three- and four-zone models do not, which is the kind of detail that changes the cost of adding a zone later. If a future head is likely - a basement finish, a new addition - the time to buy the port and the capacity headroom is with the first install, when the outdoor unit is already being chosen.

    6. Step 5: Organize the Controls

    Every head ships with its own handheld remote, and the Building America Solution Center notes that ductless indoor units are controlled individually by handheld remote controllers. That is a complete control system for a one-zone install. For a four-zone house it is four remotes, four sets of batteries, and four temperature settings that drift apart because nobody remembers which remote belongs to which room. The control plan is the part of the organization that decides whether the zones get used as zones.

    There are three levels, and they stack.

    The base level is the remotes that come in the box, one per head, each with its own schedule if the model supports one. Label each remote with the room it controls. It sounds trivial and it is the step most often skipped; a remote labelled "upstairs - primary" gets used, and an unlabelled one gets left in a drawer. Keep a spare set of batteries with the remotes, not in another room.

    The middle level is a central controller from the equipment manufacturer. Mitsubishi's kumo cloud system works through a wireless interface (model PAC-USWHS002-WF-2) fitted to a compatible indoor unit, and gives app control of the system from a phone, with voice control through Amazon Alexa and Google Assistant, and it can run alongside the MHK1 wall controller on compatible units. Fujitsu and Daikin sell their own equivalents. A central controller's job is to make the system operable from one place: set the whole house back at night, bring the bedrooms up before bedtime, check every zone's setting without walking to each room. It does not add capacity or change the zone map. It makes the zone map usable.

    The top level is a third-party smart controller, one per head, that talks to the head by infrared and to the house by Wi-Fi. Sensibo's Air and Air Pro work with any remote-controlled heat pump, one unit per head, and add seven-day schedules, timers, geo-fencing and temperature and humidity monitoring from the app; Sensibo states compatibility with more than 10,000 air conditioner models. Flair's Puck replaces the remote, controls the head through the Flair app, senses temperature where the user sits with its RoomSense feature, and works with more than 200 brands of mini splits, window units and portables, with Alexa and Google Assistant integration. Cielo's Breez Plus and Breez Max do the same IR-to-Wi-Fi job for mini-splits, portables and window units. Mysa makes a thermostat-style controller for mini-split heat pumps. The pattern is the same in every case: one controller per head, because the head is the zone, and the controller's job is to give that zone a schedule and a sensor that sits where people sit, not where the head is mounted.

    Control option What it does Cost shape Best for
    Handheld remote per head Sets one head; schedule if the model supports it Included with the head One or two zones; a household that sets and forgets
    Manufacturer central controller (kumo cloud and equivalents) One app for the whole system; voice control; works with the wall controller One interface per head, plus the app Three or more zones; a household that wants one place to run the system
    Third-party smart controller per head (Sensibo, Flair Puck, Cielo Breez, Mysa) App control, schedules, geo-fencing, temperature and humidity sensing per zone One device per head Mixed-brand houses; renters; zones where the remote's sensor reads the wrong spot

    Two control details belong in the plan before anything is bought. First, the temperature sensor's location matters as much as the setting: a head's built-in sensor reads the air at the head, which is usually the warmest or coolest spot in the room, and a remote or smart controller with its own sensor reads where people sit. Our placement guide covers sensor placement in full, and the control choice is where that section gets applied. Second, the schedule is worth more than the controller. A zone set back by 2 degrees for eight empty hours a day saves more than any controller feature, and a controller nobody programs saves nothing. Write the schedule per zone on the zone map: bedrooms 20 degrees at night, living area set back during the workday, office on during work hours only. The numbers are placeholders until the household picks its own; the point is that the schedule is written down before the first heating bill arrives.

    7. Worked Example: A Four-Zone House

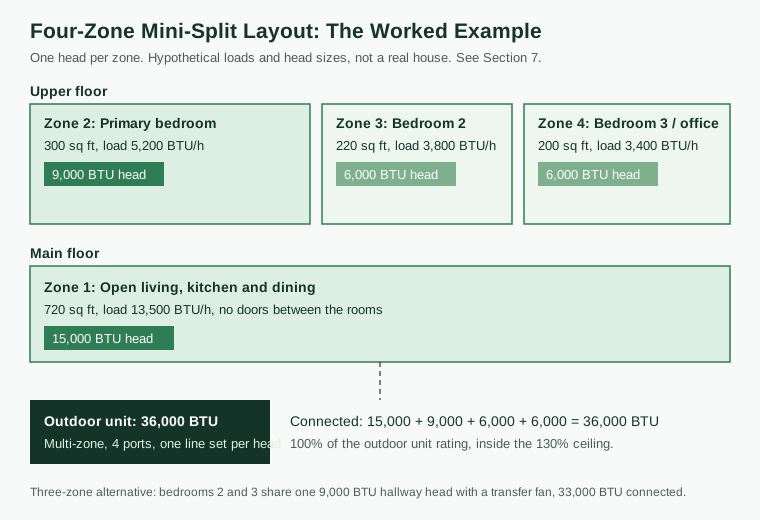
    A worked example makes the five steps concrete. The house below is hypothetical, with stated loads and head sizes, and it is the same shape as thousands of two-storey houses: an open main floor, three bedrooms upstairs, about 1,700 square feet.

    The zone map comes first. The main floor is one open space: living, kitchen and dining with no doors between them, used together through the day and evening. Upstairs, the primary bedroom has its own load and its own night schedule. The two smaller bedrooms have similar sizes and the same night schedule, but their doors close at night, so they do not share a head. The house has four zones and four heads.

    Zone Rooms Floor area Hypothetical load Head chosen Why this head
    1 Open living, kitchen, dining 720 sq ft 13,500 BTU/h 15,000 BTU wall-mounted Largest load; open space; one head covers the whole floor
    2 Primary bedroom 300 sq ft 5,200 BTU/h 9,000 BTU wall-mounted Closed door at night; its own schedule
    3 Bedroom 2 220 sq ft 3,800 BTU/h 6,000 BTU wall-mounted Smallest standard head; load is well below it
    4 Bedroom 3 / office 200 sq ft 3,400 BTU/h 6,000 BTU wall-mounted Same as Zone 3; doubles as a daytime office

    The loads are labelled hypothetical Manual J-style figures, not measurements from a real house, and the head sizes are the nearest standard sizes above each load. Zones 3 and 4 show the small-room problem in plain numbers: a 3,800 BTU load gets a 6,000 BTU head, and a 3,400 BTU load gets the same. Both heads are roughly 1.6 to 1.8 times their room loads. That is normal for ductless design, and it is manageable because the inverter ramps down, but it is also the reason the outdoor unit's minimum output matters when only one small zone is calling at night.

    The outdoor unit is a 36,000 BTU multi-zone unit with four ports. Connected capacity is 15,000 + 9,000 + 6,000 + 6,000 = 36,000 BTU, which is 100% of the outdoor unit's rating, inside the 130% connected-capacity ceiling with room to spare. All four heads calling at once on the hottest afternoon get the full 36,000 BTU the outdoor unit can deliver. At night, with only the three bedroom heads calling, the outdoor unit serves 21,000 BTU of connected heads, and the inverter turns down to match. The line runs are short: all four heads sit on walls within 40 feet of the outdoor unit's pad, inside the model's limits.

    The three-zone alternative is worth pricing before deciding. Bedrooms 2 and 3 share one 9,000 BTU head mounted in the upstairs hallway, with a transfer fan moving air into each bedroom and undercut doors providing the return path, the arrangement the Building America Solution Center describes. That cuts the system to three zones and three heads, 15,000 + 9,000 + 9,000 = 33,000 BTU connected on the same 36,000 BTU outdoor unit. The saving is one head and one line set. The cost is comfort on the nights the bedroom doors close and the hallway head cannot push enough air through a closed door, and the bedrooms drift apart in temperature. For a household that sleeps with doors open, the three-zone version is a fair trade. For a household that closes bedroom doors, it is a saving that gets spent again on discomfort.

    The controls for the four-zone version are one remote per head, labelled by zone, plus a central controller app so the whole house can be set back from one phone. The bedrooms run a night schedule; the main floor runs a daytime and evening schedule with a setback during work hours. The office zone, Bedroom 3, runs only on workdays. That schedule is the running-cost plan, and the operating-cost comparison in our heat pump versus gas furnace guide shows how the numbers work once the schedule is set.

    8. What the Organization Does to the Price

    The zone map is the price. Every zone adds a head, a line set, an electrical connection and labour, and the installation-cost bands in our mini-split installation cost guide show how the total moves: a single-zone install runs $2,500 to $6,000 in HomeGuide project data, two zones $4,500 to $8,000, three zones $6,500 to $11,000, and a five-zone whole-home system $10,000 to $15,000. A four-zone system like the worked example sits between the three-zone and five-zone bands. Each zone added or cut moves the price by roughly $2,000 to $3,000 inside those bands, which is why the zone map is drawn before quotes are requested and not after.

    Four things push a quote to the top of its band. Long line sets cost more in copper, insulation and labour, and a zone beyond the model's piping limits needs its own system instead. Indoor unit type matters: a ceiling cassette or concealed ducted head costs more installed than a wall-mounted head in the same room, because the mounting and the finishing work are heavier. Electrical work matters: a panel that needs a new circuit, or a subpanel, is a separate line on the quote, and our panel capacity guide covers when an upgrade is needed. And the outdoor unit's size matters: a five-zone outdoor unit costs more than a three-zone one, which is why the connected-capacity ceiling is checked before the outdoor unit is chosen, not used as a reason to buy the biggest box available.

    The control layer is the cheapest part of the system and the easiest to add later. A smart controller per head is a small purchase against a five-figure install, and it can be fitted after the first heating season, once the household knows which zones actually need scheduling. The expensive decisions are the ones in the walls: the zone count, the head locations and the line routes. Those are the decisions this guide front-loads, because they are the ones that cannot be changed with an app.

    Advertisement

    9. Five Organization Mistakes

    A hallway head serving bedrooms. The most common zone-map mistake is a head in the hallway, asked to heat or cool two or three bedrooms through their doorways. It works while the doors are open and stops working the night they close. Bedrooms with closed doors need their own heads, or a transfer fan and a return path built in deliberately, with the household agreeing to the arrangement.

    One head for two floors. Warm air rises and cold air sinks, so a head on the main floor cannot condition the upstairs, and a head upstairs cannot cool the main floor. Each floor is its own zone problem. A two-storey house needs at least one head per floor, and usually more.

    Sizing from square footage alone. The 20 BTU per square foot shortcut is a starting estimate, not a sizing method. A sunny west-facing room and a shaded north room of the same size carry different loads, and a quote built on square footage alone will oversize one and undersize the other. The load calculation is the step that catches both.

    Ignoring the outdoor unit's minimum. A system with four oversized heads and a large outdoor unit can struggle at night, when only one small bedroom head is calling and its load sits below the outdoor unit's minimum output. The inverter's 10% turndown helps, but it has a floor, and the floor belongs to the outdoor unit, not the head. Check the minimum against the smallest single-zone load before the outdoor unit is chosen.

    Buying heads before the zone map. The order matters: zones, then heads, then the outdoor unit, then the controls. A head bought before the zone map is a head looking for a job, and the job it finds is usually the wrong wall. The zone map costs an evening with a floor plan. The head costs thousands, installed.

    10. The Organization Worksheet

    Use this worksheet on the floor plan before requesting quotes. It is the take-away from the guide: a filled-in copy of it is what a contractor needs to quote the system instead of re-deriving it.

    1. Sketch every floor and mark the rooms to be conditioned. Cross out hallways, closets, bathrooms and utility rooms.
    2. For each room, write down the door habit (open or closed in normal use), the sun exposure, and the hours it is occupied.
    3. Group rooms that match on all three into zones. Give each zone a number and a name.
    4. Count one head per zone. Flag the exceptions: closed bedrooms, sunrooms, additions, basements and upper floors that run warm.
    5. Write the load next to each zone. Use the 20 BTU per square foot shortcut for a first estimate, then get a room-by-room load calculation before the quote is approved.
    6. Pick the nearest standard head size above each zone's load: 6,000, 9,000, 12,000, 18,000 or 24,000 BTU.
    7. Add up the connected head capacity and compare it with the outdoor unit's rating and its 130% connected-capacity ceiling. Check the port count.
    8. Measure the longest line run and the height difference against the chosen outdoor unit's limits.
    9. Decide the architecture: one multi-zone outdoor unit, several single-zone systems, or a mix, and write down why.
    10. Write the schedule per zone: temperatures, setbacks, and which zones run on which days.
    11. Choose the controls: labelled remotes, a central controller app, or a smart controller per head, and note which zones get a sensor that reads where people sit.
    12. Take the filled-in worksheet to two or three installers and ask each one to quote against it, with the load calculation attached.

    Frequently Asked Questions

    Do I need a mini split in every room? No. The Building America Solution Center notes it often does not make sense to put an indoor unit in every room, because even the smallest heads can deliver far more heating or cooling than a small room needs. Condition the rooms you use, group rooms that share a door pattern, a load and a schedule into zones, and let hallways, closets and bathrooms borrow air from the rooms around them. A guest room used a few nights a month can share by transfer fan or an open door.

    How many mini splits do I need? One head per zone, and a zone is a group of rooms that can share one temperature setting. As a first check, an open-concept one-storey house with two bedrooms usually needs two to three heads, and a two-storey house with three bedrooms usually needs three to four. Layout and doors decide the count, not floor area: a 1,500 square foot ranch with an open layout may need two heads while a 1,500 square foot two-storey with closed-off bedrooms may need four or five.

    Can one mini split head heat two rooms? Yes, when the rooms connect through a large opening or the doors between them stay open, and when their loads and schedules match. It fails when the doors close: a hallway head cannot heat bedrooms with closed doors. The workaround the Building America Solution Center describes is a small air transfer fan moving conditioned air into the second room, with a return path such as a vent or undercut doors so the air can come back.

    Should I get a multi-zone system or separate single-zone systems? A multi-zone system, one outdoor unit serving several heads, is the usual choice for a whole-home conversion where the zones are clustered: one pad, one circuit, up to eight heads on Mitsubishi's MXZ series. Separate single-zone systems suit zones spread across the property, long line runs, or a phased install. The deciding numbers are the line-set length and height limits on the chosen outdoor unit, and whether the zones peak at the same hour.

    Can I add a head to my mini-split system later? Only if three things are true: the outdoor unit has a free port, there is headroom under its connected-capacity ceiling (many multi-zone units allow up to 130% of the outdoor rating), and a line-set route exists within the model's length and height limits. Some larger multi-zone models need branch boxes for the extra heads. If a future head is likely, buy the port and the headroom with the first install.

    Do all the heads have to run at the same time? No. Each indoor unit operates independently and can be set to a different temperature, and some can be turned off while others keep running. That independence is the point of zoning. When every head does call at once, the outdoor unit delivers at most 100% of its rated capacity, spread across the zones, even if the connected head capacity is higher.

    How do I control multiple mini-split heads? Each head ships with its own remote. For three or more zones, a central controller such as Mitsubishi's kumo cloud app, or a third-party smart controller per head such as Sensibo, Flair Puck or Cielo Breez, turns the remotes into one system with schedules, app control and temperature sensing where people sit. One controller per head is the rule, because the head is the zone.

    What size mini split do I need for each room? Start with a room-by-room load calculation (ACCA Manual J), which is the standard. The installer shortcut of roughly 20 BTU per square foot gives a first estimate: a 300 square foot bedroom starts near 6,000 BTU, a 720 square foot open main floor near 14,400 BTU. The nearest standard head sizes are 6,000, 9,000, 12,000, 18,000 and 24,000 BTU, and the smallest rooms will usually get a head larger than their load, which is normal because the inverter ramps down.

    Common Questions

    What should I check first before using this hvac advice?

    Start with the numbers that apply to your home: climate, utility rate, equipment age, contractor quote, and local program rules. Organize a ductless mini-split system by zones, not by rooms. A zone is a group of rooms that share a door pattern, a heating and cooling load, and a daily schedule, and each zone gets one indoor head with its own temperature setting. The Building America Solution Center puts...

    How should I verify rebates, tax credits, rates, or savings before spending money?

    Treat program amounts, utility rates, and tax rules as date-sensitive. Check the named government, utility, or manufacturer source before you sign a contract, and keep screenshots or PDFs of eligibility rules for your records.

    When should I involve a licensed professional instead of doing this myself?

    Bring in a licensed electrician, HVAC technician, or other qualified professional for panel work, refrigerant handling, combustion equipment, structural changes, or anything that needs a permit or inspection. A guide can help you prepare questions and compare options, but it does not replace licensed work where codes or safety are involved.

    How should I compare contractor quotes for this kind of work?

    Ask each contractor to separate equipment, labor, electrical work, permits, and rebate assumptions on the quote, and to name the exact model numbers being priced. Comparing itemized quotes on the same scope is more useful than comparing headline prices, and it shows which savings claims depend on incentives you have not yet confirmed.

    What is the next useful step after reading this?

    Compare this with Ductless Mini-Split Layout: Where Each Indoor Head Goes so you can check the cost, rebate, installation, or operating-risk angle before making a decision.

    What to Read Next

    Ductless Mini-Split Layout: Where Each Indoor Head GoesUse this next to compare the cost, incentive, installation, or operating-risk angle before you make a home energy decision.

    Sources and Verification

    Editorial Review

    EnergyBS Editorial Team

    EnergyBS publishes practical homeowner guides. Important program, product, and cost claims should be checked against the linked source and local project documents before you commit to work.

    Last reviewed Nov 13, 2026. Read our editorial policy and methodology, or report an error.

    Important: Educational Purposes OnlyThe guides, tools, cost estimates, and ROI calculators provided on EnergyBS.com are for informational and educational purposes only. They do not constitute certified financial, tax, or professional engineering advice. Energy costs, government rebates, and installation fees vary significantly by location and are subject to change. Always consult with certified local professionals before undertaking home energy projects or making financial commitments.