EnergyBS
    General Efficiency & Design

    Smart Home Wiring Design 2026: Circuits, Ethernet, and a Panel That Works Together

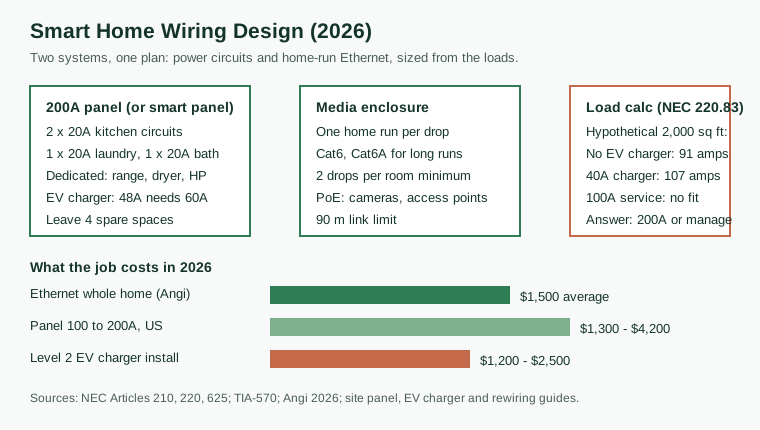
    A smart home runs on two wiring systems at once: the power circuits and the low-voltage network. This guide designs both together, starting from the loads. The code floor is two 20-amp kitchen small-appliance circuits, one 20-amp laundry circuit and one 20-amp bathroom circuit (NEC 210.11(C)), with a dedicated circuit for each major appliance and for the EV charger, sized at 125 percent of its continuous draw (NEC 625.41). A worked NEC 220.83 load calculation on a labelled hypothetical 2,000 sq ft house shows when 100 amps still fits and when the EV charger pushes the house to a larger service or a smart panel. The network half follows TIA-570: Cat6 or Cat6A home runs to a central media enclosure, one outlet per room at minimum, PoE for cameras and access points, and a 90-metre permanent-link limit. Costs use published 2026 figures: Ethernet averages $1,500 installed (Angi), a 100-to-200-amp panel upgrade runs $1,300 to $4,200 in the US and C$2,500 to C$4,500 in Ontario, and a Level 2 EV charger install typically lands at $1,200 to $2,500.

    EnergyBS Editorial Team8 sources34 min read
    Smart Home Wiring Design 2026: Circuits, Ethernet, and a Panel That Works Together

    Quick Checks

    • 1Start from the loads, not the panel. List every 240-volt appliance first (range, dryer, water heater, heat pump, EV charger, hot tub), then the required 120-volt circuits, then the network. The panel size and the circuit count fall out of that list.
    • 2The code floor for a dwelling is two 20-amp kitchen small-appliance circuits, one 20-amp laundry circuit and one 20-amp bathroom circuit (NEC 210.11(C)), plus a dedicated circuit for each major appliance. Anything less is a design that already fails inspection.
    • 3Size every EV charger circuit at 125 percent of the charger's continuous draw (NEC 625.41): a 32-amp charger needs a 40-amp circuit, 40 amps needs 50, and 48 amps needs 60 and must be hardwired.
    • 4Run the NEC 220.83 load calculation before buying anything. On the labelled hypothetical 2,000 sq ft house in this guide, adding a 40-amp Level 2 charger is what pushes the calculated load from 91 amps to 107 amps, past a 100-amp service.
    • 5Wire the network as home runs: every Ethernet drop gets its own cable back to a central media enclosure. TIA-570 recommends Cat6A, at least one outlet per room, and a 90-metre permanent-link limit. Never daisy-chain outlets.
    • 6In Ontario, almost all electrical installation and alteration work needs an ESA notification (permit) and inspection, including new circuits and EV chargers. Only a Licensed Electrical Contractor may be hired for the work.
    • 7Ethernet averages $1,500 installed in the US in 2026 (Angi), with most projects at $400 to $3,500. A 100-to-200-amp panel upgrade runs $1,300 to $4,200 in the US and C$2,500 to C$4,500 in Ontario, and a Level 2 EV charger install typically lands at $1,200 to $2,500.
    On this page(12 sections)Show
    1. Smart Home Wiring Design 2026: Circuits, Ethernet, and a Panel That Works Together
    2. The Short Answer
    3. 1. The Circuit Map: What the Code Requires
    4. 2. The Load Calculation Decides the Service
    5. 3. The Panel Is the Hub, Not an Afterthought
    6. 4. Structured Wiring: The Low-Voltage Half
    7. 5. The Four Big Circuits: EV, Heat Pump, Solar and Battery
    8. 6. What the Whole Job Costs in 2026
    9. 7. Permits, Inspection, and the Ontario Difference
    10. 8. The Mistakes That Cost the Most
    11. Frequently Asked Questions
    12. Related Reading

    Smart Home Wiring Design 2026: Circuits, Ethernet, and a Panel That Works Together

    By EnergyBS Editorial Team | November 10, 2026

    The Short Answer

    Short Answer: A smart home needs two wiring systems designed together: the power circuits and the low-voltage network. Start with a list of every load, run the load calculation, then size the panel and the network around the answer. The code floor is two 20-amp kitchen small-appliance circuits, one 20-amp laundry circuit and one 20-amp bathroom circuit (NEC 210.11(C)), a dedicated circuit for each major appliance, and a dedicated EV charger circuit sized at 125 percent of the charger's continuous draw (NEC 625.41). The network half is home-run Ethernet to a central media enclosure, Cat6 or Cat6A, with at least one outlet in every room and Power over Ethernet for cameras and access points. A 100-amp service still fits many houses until the EV charger arrives: on the labelled hypothetical 2,000 sq ft house worked in Section 2, the charger is the load that pushes the calculation from 91 amps to 107 amps, past what a 100-amp service carries. At that point the choice is a service upgrade, a smart panel that manages loads, or a smaller charger setting.

    Most smart home guides treat wiring as an afterthought, a few tips about where to put the router. That gets the order backwards. The wiring is the part you cannot change cheaply later. A panel with no spare breaker spaces, a kitchen with one circuit feeding the countertop and the microwave, a house where every camera runs on Wi-Fi because nobody ran a cable, a garage with no conduit for the EV charger that arrives two years after the renovation: each of these is a design decision made once, usually by default, and paid for repeatedly. The fixes are all the same shape (open a wall, add a subpanel, run a cable through a finished ceiling) and all cost several times what the wire would have cost while the walls were open.

    This guide is the design pass that happens before the electrician arrives. It covers the circuit map the code requires, the load calculation that sizes the service, the panel decision, the structured wiring plan, the four big 240-volt circuits, the cost of each piece, and the permit and inspection rules in the US and Ontario. The companion guides on this site price each piece on its own: the panel upgrade guide for 100-to-200-amp costs, the smart panel comparison for Span, Leviton and Schneider Home, the EV charger installation guide for charger hardware and install pricing, and the whole-house rewiring guide for what a full rewire costs when the existing wiring is the problem.

    The design in six steps:

    1. List every load before drawing anything: the 240-volt appliances, the required 120-volt circuits, the EV charger, the heat pump, solar and battery if planned, and every network device that will ever want a cable.
    2. Draw the circuit map from Section 1 and count breaker spaces. The map is the code floor plus one dedicated circuit per major appliance. If the count exceeds the panel, the panel decision is already made.
    3. Run the NEC 220.83 load calculation from Section 2 on the real nameplates. The number it returns decides between keeping the service, upgrading it, or managing loads with a smart panel.
    4. Pick the panel strategy from Section 3: a standard 200-amp panel, a smart panel that sheds loads, or a subpanel for the garage or addition. Leave at least four spare spaces.
    5. Draw the network plan from Section 4: one home-run cable per drop, a central media enclosure, Cat6 or Cat6A, PoE where cameras and access points will sit, and conduit on every route that might grow.
    6. Price the job from Section 6 and file the permit from Section 7 before work starts. In Ontario that means an ESA notification; in the US it means the local authority having jurisdiction and the NEC edition it has adopted.

    1. The Circuit Map: What the Code Requires

    Every dwelling starts from the same floor. NEC 210.11(C) requires three sets of branch circuits in every home, and they cannot be shared with anything else:

    Required circuit Minimum size Serves Protection
    Small-appliance circuits 2 x 20A, 120V Kitchen, pantry, dining room, breakfast room countertop receptacles AFCI and GFCI
    Laundry circuit 1 x 20A, 120V Laundry area receptacles AFCI and GFCI
    Bathroom circuit 1 x 20A, 120V Bathroom basin receptacles GFCI, dedicated

    That table is the minimum, not the design. A kitchen that meets it and nothing more still has a problem the first time the coffee maker, toaster and microwave run together, because the two small-appliance circuits are the only ones allowed to feed the countertop. The code also sets receptacle spacing (no point along a wall more than 6 feet from a receptacle, NEC 210.52(A)) and requires a receptacle within 3 feet of each bathroom basin. Under the 2023 NEC, GFCI protection covers all kitchen receptacles, not just the countertop ones, and AFCI protection applies to 120-volt circuits serving living spaces (NEC 210.12). The 2026 edition of the NEC reorganized some article numbers (Article 220 moved to Article 120, Article 750 to Article 130, per the NFPA summary), and most jurisdictions are still enforcing the 2023 edition, so confirm which edition the local inspector uses before treating a section number as final.

    On top of the required circuits, each major appliance gets its own dedicated circuit. A dedicated circuit serves one appliance and nothing else, which is what keeps a starting compressor from dimming the lights on a shared circuit and what keeps a fault in one appliance from taking out a room. The usual list for a modern all-electric home:

    Appliance Typical circuit Notes
    Electric range or cooktop 40-50A, 240V Minimum 40A range circuit (NEC 210.19)
    Electric dryer 30A, 240V
    Electric water heater 30A, 240V Heat pump water heater draws far less; check the nameplate
    Dishwasher 15-20A, 120V Dedicated; GFCI protected
    Garbage disposal 15-20A, 120V Often paired with the dishwasher on separate circuits
    Microwave (built-in) 20A, 120V Countertop microwaves can use a small-appliance circuit
    Refrigerator 15-20A, 120V Dedicated avoids a tripped shared circuit spoiling food
    Furnace or air handler 15-20A, 120V Plus the heat pump or AC compressor circuit below
    Heat pump / AC compressor 20-60A, 240V Sized from the nameplate MCA, not the tonnage
    EV charger (Level 2) 40-60A, 240V NEC 625: dedicated, 125 percent sizing, GFCI
    Hot tub 50-60A, 240V GFCI protected; check the nameplate
    Washer 20A, 120V Served by the laundry circuit in most homes

    Count the rows that apply to the house and add the three required sets. A typical all-electric home with a range, dryer, water heater, dishwasher, disposal, built-in microwave, refrigerator, furnace, heat pump and one EV charger lands at roughly 13 to 15 circuits before lighting and general receptacles. General lighting and receptacle circuits are sized at 3 VA per square foot (NEC 220.12), which for a 2,000 sq ft house is 6,000 VA, or about five 15-amp lighting circuits in practice, though the code counts volt-amperes rather than circuits and the electrician lays out the actual count.

    Two design rules follow from the count. First, the panel needs spare spaces, not just enough spaces. A 40-space panel with 36 circuits filled is a panel that cannot take the second EV charger, the heat pump water heater, or the workshop subpanel without a tandem-breaker workaround or a replacement. Leave at least four full-size spaces empty, and treat tandem breakers as a repair, not a plan. Second, circuits that will never run at the same time still each need their own breaker. Sharing a circuit between the dishwasher and the disposal because they are never on together is the kind of shortcut that fails inspection and trips breakers at the worst moment.

    The garage deserves its own line in the map. It holds the EV charger, often the panel or subpanel, sometimes the water heater or the laundry, and it is where the next load always arrives. Run a subpanel or at least a spare conduit to the garage even if the charger is not in this year's budget. The subpanel guide prices that work by amps, distance and location, and the EV charger guide prices the charger circuit itself.


    Advertisement

    2. The Load Calculation Decides the Service

    The circuit map says how many breakers the house needs. The load calculation says how many amps the service must carry. The two numbers answer different questions, and the second one is the one that decides whether the existing service survives the renovation. No house runs every appliance at once, so the code does not add up nameplates. NEC Article 220 applies demand factors, which are the code's own discounts for the fact that loads coincide only part of the time. The calculated load is what the utility, the plan reviewer and the inspector all work from.

    For an existing dwelling, the optional method in NEC 220.83 is the worksheet most electricians reach for. It runs in three lines: add up the general load (lighting, receptacles, small-appliance and laundry circuits, fixed appliances, and the EV charger), count the first 8,000 VA at 100 percent and the remainder at 40 percent, then add 100 percent of the larger of the heating or cooling load. Divide the total volt-amperes by 240 to get amps, and round up to the next standard service size (100, 125, 150, 200, 225 or 400 amps). The minimum service for a one-family dwelling is 100 amps (NEC 230.79(C)).

    The worked example below is a labelled hypothetical, not a house. It uses a 2,000 sq ft existing home with gas heat, an electric range, dryer and water heater, and a 40-amp Level 2 EV charger, with the air conditioner as the larger HVAC load. Every figure is a nameplate or a code value, and the arithmetic is shown so it can be checked against an electrician's own worksheet.

    Load Calculation VA
    General lighting 2,000 sq ft x 3 VA 6,000
    Small-appliance circuits 2 x 1,500 VA 3,000
    Laundry circuit 1 x 1,500 VA 1,500
    Electric range Nameplate 12,000
    Electric dryer Nameplate 5,000
    Electric water heater Nameplate 4,500
    Dishwasher Nameplate 1,200
    Garbage disposal Nameplate 900
    EV charger, 40-amp Level 2 40A x 240V 9,600
    Total, all other loads 43,700
    First 8,000 VA at 100 percent 8,000
    Remainder 35,700 VA at 40 percent 14,280
    Subtotal 22,280
    Air conditioning (larger HVAC load) at 100 percent Nameplate 3,500
    Calculated load 25,780 VA
    Calculated current 25,780 / 240V 107 amps

    At 107 amps, this hypothetical house does not fit a 100-amp service. The next standard size is 125 amps, and most electricians would quote 200 amps because the cost difference between a 125-amp and a 200-amp service is small once the meter base and service cable are being replaced anyway, and 200 amps leaves room for the second EV charger or the heat pump that usually follows.

    Now run the same worksheet without the EV charger. The total of all other loads drops to 34,100 VA. The first 8,000 VA counts at 100 percent and the remaining 26,100 VA at 40 percent, which is 10,440 VA, for a subtotal of 18,440 VA. Add the same 3,500 VA of air conditioning and the calculated load is 21,940 VA, or 91 amps. That fits a 100-amp service with 9 amps to spare. The charger is the load that pushes this house over the line, which is the normal pattern in 2026: the house was fine until the largest continuous load in its history arrived in the garage.

    That result frames the three options, and the wrong answer is to pretend the calculation does not exist. Option one is a service upgrade to 200 amps. The panel upgrade guide puts that job at $1,300 to $4,200 installed in the US in 2026, with a national average near $1,600, and C$2,500 to C$4,500 in Ontario including the ESA permit. Option two is a smart panel that manages loads in real time, shedding the EV charger or the water heater when the heat pump starts, so the total never crosses the existing service. The smart panel comparison covers Span, Leviton and Schneider Home on monitoring depth, load control and cost. Option three is a smaller charger setting: a 32-amp charger on a 40-amp circuit draws 7,680 VA instead of 9,600 VA, and a 24-amp setting on a 30-amp circuit draws 5,760 VA, which can be enough to keep the calculation inside 100 amps while still adding roughly 20 miles of range per hour overnight. The Level 1 vs Level 2 guide works through the charging-speed side of that trade.

    One caution about the worksheet: it is a planning tool, not a permit document. The binding calculation is done on site by a licensed electrician, and local amendments routinely change the answer. The 2026 NEC reorganized the article numbers, some jurisdictions still enforce the 2020 or 2023 edition, and the optional method has conditions attached. Use the worksheet to check a quote and to ask why it differs, not to overrule the electrician who signs it.


    3. The Panel Is the Hub, Not an Afterthought

    Once the load calculation returns a number, the panel decision is mechanical. A standard panel is a box of breakers. A smart panel is a box of breakers with metering on every circuit and software that can shed loads. The choice between them is a choice about what happens at peak, not about what the panel looks like.

    A standard 200-amp panel fits a house whose calculated load sits comfortably inside 200 amps and whose owner has no interest in per-circuit data. It is the cheaper buy, it is what every electrician stocks, and it does the job for decades. Its limit is that it cannot help when the load grows: the only answer it offers to a new 48-amp charger is a bigger service.

    A smart panel fits three situations. The first is the house in Section 2, where the calculated load sits just past the existing service and the owner would rather manage loads than replace the service entrance. The second is a house with solar and a battery, where the panel has to decide which circuits stay live in an outage and which shed. The third is a house where the owner wants to see, circuit by circuit, where the electricity actually goes, because the fastest way to cut a bill is to find the load that should not be running. The three systems in the site's comparison differ in how deep that visibility goes: Span meters every circuit natively, Leviton adds monitoring one smart breaker at a time inside a conventional panel footprint, and Schneider Home ties monitoring to its solar and battery setup. The right pick follows from whether the house needs full visibility from day one, gradual monitoring added to a panel it already owns, or one system for panel, solar and battery together.

    Whichever panel goes in, four details decide whether the installation ages well. First, breaker spaces: buy the 40-space panel even if the count says 30 will do, and leave at least four spaces empty on the day it is installed. Second, the main breaker rating must match the service cable and the meter base; the lowest-rated part sets the real service size, so a 200-amp panel on a 100-amp service cable is still a 100-amp service. Third, the panel location matters for the network: the media enclosure should sit near the panel but not inside the same cabinet, with a dedicated 20-amp circuit for the network gear and a UPS that keeps the router, switch and modem alive through a short outage. Fourth, label every circuit in plain words at install time, not in electrician shorthand. A panel schedule that reads "kitchen counter east" beats one that reads "BR-14" on the night a breaker trips.

    A subpanel is the right answer when the loads live far from the main panel: a detached garage, an addition, a pool house, a workshop. Running one feeder to a subpanel beats running six long branch circuits back to the main panel, and it keeps the garage's circuits local when something trips. The site's subpanel guide prices that work by amps, distance and location, and the same logic applies to the network: a small switch in the garage, fed by one home-run cable or a fiber run, beats six long Ethernet runs through the yard.


    4. Structured Wiring: The Low-Voltage Half

    The power circuits are half the design. The other half is the low-voltage network, and it follows a different standard and a different logic. The power side is about capacity and safety. The network side is about getting a cable to every place a device will ever want one, because a device that cannot be wired will be a device on Wi-Fi, and Wi-Fi is a shared medium that gets slower exactly when the house gets busier.

    The governing standard is ANSI/TIA-570, the residential telecommunications infrastructure standard. The current edition is TIA-570-E, published in 2024, succeeding 570-D. It recommends Cat6A cable, a home-run topology in which every outlet has its own cable back to a central distribution device (a structured media enclosure, usually a recessed cabinet in a basement, garage or utility closet), at least one telecommunications outlet in the kitchen, every bedroom, the living room, the office and the home theater, and a maximum permanent link of 90 metres with patch cords bringing the total channel to 100 metres. It also recommends the T568A wiring scheme for residential work. Use one scheme at both ends of every cable; mixing A and B on the same run is a fault that a cable tester will catch and a Wi-Fi network will not.

    The cable choice is Cat6 or Cat6A, and the decision is about distance, not speed on paper. Cat6 carries 10 gigabits per second over shorter runs, roughly 55 metres depending on installation conditions, and 1 gigabit over the full 100-metre channel. Cat6A carries 10 gigabits over the full 100 metres. Cat6A cable is thicker, stiffer, harder to terminate, and costs $0.30 to $1.50 more per foot than Cat5e in Angi's 2026 figures. For most homes, Cat6 is the sensible default and Cat6A goes on the runs that matter most: the access point drops, the office, the media wall, and any run longer than about 50 metres. Do not install Cat5e in new work. It saves almost nothing and caps the house at 1 gigabit on the day 2.5-gigabit and 10-gigabit switches are already cheap.

    The drop map is the network equivalent of the circuit map. Two drops per room is the working minimum, on different walls where the furniture layout allows it, because a drop behind the only wall the television can sit on is a drop that cannot serve the desk. The table below is a starting point for a four-bedroom house; adjust it to the floor plan, and add a drop anywhere a device might sit in the next ten years rather than anywhere one sits today.

    Location Drops What they serve
    Living room / media wall 4 Television, streaming box or console, soundbar or receiver, spare
    Home office 4 Desktop, dock, printer, spare
    Each bedroom 2 Desk or television, spare or access point
    Kitchen 1-2 Counter device, smart display, spare
    Ceiling, one per floor 1 each Wi-Fi access point, centred on the floor
    Front door, back door, driveway 1 each PoE camera or doorbell, run to the soffit or eave
    Garage / workshop 2 Workbench, EV charger data, spare
    Utility / network closet 4+ Router, switch, modem, UPS, smart home hub
    Basement / attic access 1 each Future access point or camera

    Power over Ethernet is what makes the camera and access point drops work. PoE sends power down the same cable as data, so a camera needs one cable, not a cable plus a nearby outlet. The IEEE tiers, from TP-Link's standards guide:

    Standard At the switch port At the device Typical devices
    PoE, 802.3af 15.4W 12.95W VoIP phone, basic camera, single-radio access point
    PoE+, 802.3at 30W 25.5W Standard camera, dual-radio access point
    PoE++ Type 3, 802.3bt 60W 51W Multi-radio access point, PTZ camera, AV gear
    PoE++ Type 4, 802.3bt 90W 71.3W Wi-Fi 7 access point, heated PTZ camera, display

    The per-port figure is not the budget. A switch with 24 PoE+ ports and a 250-watt total budget cannot run nine of them at full power at once, so size the switch by total budget, not by port count, and leave headroom for the camera that arrives next year. Also note that "PoE++" is a marketing name covering both Type 3 and Type 4, which differ by 30 watts at the port; check which type a product supports before buying.

    Three installation rules save more money than any cable choice. First, never run low-voltage cable in the same conduit or through the same holes in the studs as line-voltage wiring. They are separate systems with separate code requirements, and the separation is a safety rule, not a preference. Second, run conduit on the routes that will grow: from the media enclosure to the attic, from the enclosure to the garage, and one spare conduit to the outside for a future camera or fiber drop. Cable is cheap while walls are open and ruinously expensive after they close. Third, test every run with a cable tester and label both ends before the drywall goes up. A cable that tests clean today and is unlabeled is a cable nobody can find in five years, which is the same as a cable that was never run.


    5. The Four Big Circuits: EV, Heat Pump, Solar and Battery

    Four loads dominate the design, because each one is a 240-volt circuit that cannot share, cannot be improvised, and cannot be added later without opening walls or the panel. Get these four right and the rest of the house is small work.

    The EV charger. Article 625 of the NEC governs electric vehicle power transfer systems. Three rules drive the design. The charger gets its own dedicated branch circuit. The circuit is sized as a continuous load, which means the breaker is rated at 125 percent of the charger's maximum draw (NEC 625.41). And the circuit carries GFCI protection for personnel (NEC 625.54). The ladder, at 240 volts:

    Charger setting Power delivered Minimum breaker Notes
    16A 3.8 kW 20A Light Level 2, small battery
    24A 5.8 kW 30A Overnight charging for most commutes
    32A 7.7 kW 40A The common residential setting; NEMA 14-50 or hardwired
    40A 9.6 kW 50A NEMA 14-50 or hardwired
    48A 11.5 kW 60A Hardwired only; no standard receptacle is rated for it
    80A 19.2 kW 100A High-power residential, e.g. Ford Charge Station Pro

    Hardwire the charger when the circuit exceeds 50 amps, and consider hardwiring at 40 amps too: a NEMA 14-50 receptacle under a continuous load is the connection that fails when a cheap receptacle meets hours of heat, and the site's EV charger guide recommends hardwiring for exactly that reason. A listed energy management system (NEC 625.42) can share capacity between two chargers or cap the charger when the house peaks, which is the mechanism a smart panel uses to fit a charger onto an existing service. The charger hardware and the install pricing, including the $1,200 to $2,500 typical total for a standard Level 2 install, are in the EV charger installation guide.

    The heat pump. The compressor circuit is sized from the nameplate minimum circuit ampacity (MCA), not from the tonnage and not from a rule of thumb. A 3-ton cold-climate heat pump can need a 30-amp circuit or a 50-amp one depending on the model, the auxiliary heat strips, and the defrost cycle, so the nameplate decides and the electrician sizes the wire and breaker from it. Auxiliary electric heat is the hidden load: a 10 kW strip heater draws over 40 amps on its own, and a heat pump with strips sized for a cold snap can be the largest load in the house on the coldest night. That is why the load calculation counts the larger of heating or cooling, not both, and why the heat pump cost guide for Ontario and the heat pump vs gas furnace comparison both price the equipment and the running cost together rather than separately.

    Solar and battery. A solar inverter needs a dedicated circuit back to the panel, sized from the inverter output, and a battery system needs its own circuit plus a critical-loads subpanel that carries the circuits that stay live in an outage: refrigerator, some lighting, the network closet, the furnace blower, a few receptacles. The critical-loads list is a design decision, not an afterthought, because a battery that backs up the whole house will drain in hours while a battery that backs up six circuits will last the night. The panel that manages this is usually the smart panel from Section 3, and the solar-plus-battery circuits are the reason the panel location and the media enclosure should be planned in the same conversation.

    The induction range and the heat pump water heater. The range is a 40-to-50-amp 240-volt circuit, already in the Section 1 table. The heat pump water heater is the pleasant surprise: it draws far less than a resistance water heater, often on a 15-amp 120-volt circuit, which can free a 240-volt circuit slot when a resistance tank is replaced. When the range, the heat pump, the EV charger and the water heater are all electric, the load calculation is the document that keeps them from colliding, and the smart panel is the device that manages the collision when they do.


    6. What the Whole Job Costs in 2026

    Pricing a wiring design means pricing four jobs that are usually quoted separately, and the quotes hide different things. The table below uses published 2026 figures and the site's own cost guides, so a quote can be checked line by line. All figures are installed prices unless noted, and all of them move with the local labour market, the wall construction, and how much of the house is open when the work happens.

    Job US, 2026 Canada / Ontario, 2026
    Ethernet, whole home $1,500 average; most projects $400-$3,500 (Angi) Per-drop retrofit C$150-C$300; whole home C$800-C$2,500
    Ethernet, per drop, retrofit $100-$250 per drop C$150-C$300 per drop
    Ethernet, per drop, new construction $40-$80 per drop Lower than retrofit; priced with the build
    Panel upgrade, 100 to 200 amps $1,300-$4,200; national average near $1,600 C$2,500-C$4,500 including ESA permit
    Level 2 EV charger install $1,200-$2,500 typical; $3,500-$5,000 with panel upgrade or trenching Varies by province and utility rebate
    Subpanel, 60-100 amps $1,400-$2,800 in high-cost metros Priced locally; ESA permit included in Ontario figures
    Whole-house rewire $2-$4 per sq ft (Angi calculator); $5-$17 per sq ft (HomeGuide, finished-wall old houses) Priced locally; BC electrician figures in the site's rewire guide

    Three things move the Ethernet number more than the cable does. The first is access: a drop fished through finished walls costs two to three times a drop run while the walls are open, which is why the cheapest Ethernet ever installed is the Ethernet run during a renovation. The second is the network hardware: a patch panel and switch add $150 to $500, and a PoE switch with a real power budget costs more than a basic switch with the same port count. The third is the wall itself: brick, plaster and slab foundations push a drop toward $300 and beyond, while open studs and a basement or attic above keep it near the low end.

    The panel number moves on access too, plus the service entrance. A straight panel swap on an accessible wall is the low end. Underground service, a meter base replacement, a long service cable run, or a panel that has to move to meet clearance rules are the reasons a quote climbs past $4,500, and a quote that does climb should be able to point at the reason in writing. In Ontario the ESA permit is inside the C$2,500 to C$4,500 band in the site's panel guide, so a Canadian quote that adds the permit on top of a C$4,500 price deserves a question.

    The EV charger number moves on distance and on the panel. A charger ten feet from a panel with spare capacity is the low end. A charger at the far end of a detached garage, or a charger that needs the panel upgraded first, is the $3,500 to $5,000 end. Utility rebates and the federal 30C credit change the net cost, and the charger guide tracks the current incentive picture; check it before signing, because the credit rules changed after 2025 and a quote that still assumes the old credit is a quote that will come in high.

    The rewire number has the widest spread on the page, and the spread is scope, not error. Angi's calculator prices the wiring work itself at $2 to $4 per square foot. HomeGuide prices old-house work through finished walls, with wall repair and code upgrades, at $5 to $17 per square foot. A house with an attic and a basement that the wire can run through lands near the Angi end. A house with no access that needs walls opened lands near the HomeGuide end. The rewire guide reconciles the two sources line by line, including knob and tube replacement at $12,000 to $35,000.

    Get the quote in the same units as the table: per drop for Ethernet, per circuit for the panel work, parts and labour split for the charger. A quote that gives one lump sum for "smart home wiring" is a quote that cannot be checked, and the job it describes cannot be compared with the next quote.


    Advertisement

    7. Permits, Inspection, and the Ontario Difference

    Electrical work needs a permit and an inspection almost everywhere, and the wiring design is not finished until the permit is in the plan. In the US, the authority having jurisdiction is usually the city or county building department, and it enforces the NEC edition the state or city has adopted, plus local amendments. The permit triggers the inspection, the inspection produces the record, and the record is what the insurer and the next buyer ask for. Work done without a permit is work that has to be disclosed at sale and redone if the inspector finds it, which is a more expensive sequence than filing first.

    Ontario runs the same idea through a different body. The Electrical Safety Authority (ESA) requires a notification of work, commonly called a permit, for almost all electrical installation and alteration work, including new circuits, added receptacles, panel and service changes, EV chargers, and the wiring in a basement or kitchen renovation. Homeowners may do electrical work in their own home after filing the notification themselves, but only a Licensed Electrical Contractor may be hired for electrical work, and a panel change or service upgrade is never exempt: the utility will not reconnect an upgraded service without ESA authorization. The governing code is the Ontario Electrical Safety Code, which adopts the Canadian Electrical Code with Ontario amendments. Arc-fault protection for bedroom receptacles has been required since 2002 and the requirement has since expanded to most other areas of the home.

    The practical sequence is the same on both sides of the border: the electrician or the homeowner files before work starts, the inspector visits at the rough-in stage while the wiring is still visible, and again at completion. The rough-in inspection is the one that matters for a smart home design, because it is the last chance to catch a missing circuit, a wrong cable, or a media enclosure with no power before the drywall closes. Schedule the inspection for the day the wiring is finished and the walls are still open, and do not let the drywall crew start until it passes.

    Two documents close the job. The first is the certificate or record of inspection, which goes in the house file with the permit. The second is the as-built record the owner keeps: a panel schedule in plain words, a network map showing every drop and its cable number, the load calculation worksheet, and the make and model of the panel, the smart panel hub, and the switch. A house with that file is a house the next electrician can work on without guessing. A house without it is a house where every future job starts with an hour of tracing circuits.


    8. The Mistakes That Cost the Most

    Every item below has been paid for, more than once, by someone who skipped it during a renovation. The list is short because the mistakes repeat.

    1. Too few circuits in the kitchen. One small-appliance circuit plus the refrigerator circuit is a kitchen that trips a breaker every time the kettle and the toaster run together. Run the two required circuits and a dedicated circuit for the built-in microwave, and put the refrigerator on its own.
    2. No spare breaker spaces. A full panel is a renovation that ends at the panel. Leave four spaces, and treat tandem breakers as a repair.
    3. Sizing the service from the panel label instead of the load calculation. A 200-amp panel on a 100-amp service cable is a 100-amp service. The calculation decides, not the box.
    4. A 48-amp charger on a 50-amp breaker. EV charging is a continuous load. The breaker is 125 percent of the charger, so 48 amps needs 60, and a 60-amp charger circuit must be hardwired.
    5. Daisy-chained Ethernet. One cable per drop, each home-run to the enclosure. A daisy chain is a single point of failure that takes out every device past the break.
    6. Cat5e in new work. The saving is a few dollars a run. The cost is a house capped at 1 gigabit on the day faster switches are cheap.
    7. No conduit on the growth routes. Enclosure to attic, enclosure to garage, one spare to the outside. The conduit costs almost nothing while walls are open and cannot be added later without opening them.
    8. Wi-Fi for cameras and access points. A camera on Wi-Fi is a camera that drops frames when the house is busy. Run the PoE cable, size the switch budget, and let Wi-Fi serve the phones and laptops it is good at.

    Frequently Asked Questions

    How many circuits does a smart home need?

    Count the code floor first: two 20-amp kitchen small-appliance circuits, one 20-amp laundry circuit, one 20-amp bathroom circuit. Then add one dedicated circuit per major appliance (range, dryer, water heater, dishwasher, disposal, built-in microwave, refrigerator, furnace, heat pump, EV charger, hot tub). A typical all-electric home lands at 13 to 15 circuits before lighting and general receptacles, and the panel should have at least four spare spaces beyond that count.

    Do I need a 200-amp service for a smart home?

    Not automatically. Run the NEC 220.83 load calculation on the real nameplates. On the labelled hypothetical 2,000 sq ft house in Section 2, the calculation returns 91 amps without an EV charger and 107 amps with a 40-amp Level 2 charger, so the charger is what forces the upgrade in that house. A house with gas heat, gas cooking and no EV charger can fit 100 amps comfortably. A house with a heat pump, an induction range and two EV chargers will not.

    Is a smart panel worth it, or should I just upgrade to 200 amps?

    Upgrade the service when the calculated load sits well past the existing service and the owner wants headroom for the next decade. Choose a smart panel when the load sits just past the service, when the house has solar and a battery that need load shedding in an outage, or when per-circuit monitoring is worth paying for. The site's smart panel comparison covers Span, Leviton and Schneider Home on monitoring depth, load control and cost.

    Should I run Cat6 or Cat6A?

    Cat6 for most rooms, Cat6A for the runs that matter: access points, the office, the media wall, and any run longer than about 50 metres. Cat6 carries 10 gigabits over shorter runs and 1 gigabit over the full channel; Cat6A carries 10 gigabits over the full 100 metres. Cat6A is thicker, harder to terminate and costs $0.30 to $1.50 more per foot than Cat5e. Do not install Cat5e in new work.

    Can I run Ethernet and power in the same conduit?

    No. Low-voltage wiring and line-voltage wiring are separate systems with separate code requirements, and they cannot share a conduit or run through the same holes in the studs. Plan separate routes, and use a different trade or a clear scope split if one contractor does both.

    How much does it cost to wire a house for Ethernet in 2026?

    Angi's 2026 data puts the national average at $1,500, with most projects at $400 to $3,500. A retrofit drop runs $100 to $250, and a new-construction drop runs $40 to $80, because the cable goes in before the drywall. Add $150 to $500 for the patch panel and switch, and more for a PoE switch with a real power budget.

    Do I need a permit to add circuits or an EV charger in Ontario?

    Yes, in almost every case. The ESA requires a notification of work for almost all electrical installation and alteration work, including new circuits, added receptacles, panel and service changes, and EV chargers. Homeowners may do work in their own home after filing, but only a Licensed Electrical Contractor may be hired for it. Keep the certificate of inspection with the house file.

    What is the single most valuable thing to do while the walls are open?

    Run conduit and spare cables. One spare conduit from the media enclosure to the attic, one to the garage, and one spare Ethernet drop in every room cost very little while the walls are open. They are the difference between a house that absorbs the next device and a house that needs a wall opened for it.


    Common Questions

    What should I check first before using this efficiency advice?

    Start with the numbers that apply to your home: climate, utility rate, equipment age, contractor quote, and local program rules. A smart home needs two wiring systems designed together: the power circuits and the low-voltage network. Start with a list of every load, run the load calculation, then size the panel and the network around the answer. The code floor is two 20-amp kitchen small-appliance circu...

    How should I verify rebates, tax credits, rates, or savings before spending money?

    Treat program amounts, utility rates, and tax rules as date-sensitive. Check the named government, utility, or manufacturer source before you sign a contract, and keep screenshots or PDFs of eligibility rules for your records.

    When should I involve a licensed professional instead of doing this myself?

    Bring in a licensed electrician, HVAC technician, or other qualified professional for panel work, refrigerant handling, combustion equipment, structural changes, or anything that needs a permit or inspection. A guide can help you prepare questions and compare options, but it does not replace licensed work where codes or safety are involved.

    How should I compare contractor quotes for this kind of work?

    Ask each contractor to separate equipment, labor, electrical work, permits, and rebate assumptions on the quote, and to name the exact model numbers being priced. Comparing itemized quotes on the same scope is more useful than comparing headline prices, and it shows which savings claims depend on incentives you have not yet confirmed.

    What is the next useful step after reading this?

    Compare this with Electrical Panel Upgrade Cost 2026: What a 100 to 200 Amp Upgrade Runs so you can check the cost, rebate, installation, or operating-risk angle before making a decision.

    What to Read Next

    Electrical Panel Upgrade Cost 2026: What a 100 to 200 Amp Upgrade RunsUse this next to compare the cost, incentive, installation, or operating-risk angle before you make a home energy decision.

    Sources and Verification

    Editorial Review

    EnergyBS Editorial Team

    EnergyBS publishes practical homeowner guides. Important program, product, and cost claims should be checked against the linked source and local project documents before you commit to work.

    Read our editorial policy and methodology, or report an error.

    Important: Educational Purposes OnlyThe guides, tools, cost estimates, and ROI calculators provided on EnergyBS.com are for informational and educational purposes only. They do not constitute certified financial, tax, or professional engineering advice. Energy costs, government rebates, and installation fees vary significantly by location and are subject to change. Always consult with certified local professionals before undertaking home energy projects or making financial commitments.